Version Control
| Field | Value |
|---|---|
| Document title | Kloktoba User Manual |
| Version number | 2.4 |
| Release date | 27 October 2026 |
| Document owner | To be confirmed (product documentation owner) |
| Approver | To be confirmed |
| Approval date | Pending approval |
| Next review date | Within 90 days of release, and with each product release |
| Status | Draft for review |
Owner, approver and dates must be completed by the organisation before publication.
Executive Summary
This release is a complete rewrite of the Kloktoba User Manual. The previous manual was a single in-app page of about 30 sections without screenshots. It described an earlier version of the product and omitted most of what Kloktoba now does, including breaks, attendance corrections, rota and shift swaps, overtime slots, reports, messaging, notifications, organisation structure and the audit log.
- Documentation: 14 chapters, 41 detailed feature sections, all following the same eight-part pattern (Purpose, Business benefit, User roles, Steps, Expected result, Common errors, Troubleshooting, FAQ).
- UX: cover page, clickable contents, previous and next links on every chapter, cross references, callouts, consistent typography.
- Branding: product name KLOKTOBA used throughout; brand colours and logo applied to cover, headers, footers, tables, callouts and diagrams; no legacy names.
- Screenshots: 90 annotated screenshots captured from the current build using realistic fictitious demo data, with numbered markers and a legend, indexed in Appendix A.
- Workflows: 4 new workflow diagrams (attendance, leave, missed attendance, onboarding).
- Accessibility: alt text on every image, heading hierarchy, colour contrast checked, keyboard navigation notes. See Appendix D.
- Honesty about scope: capabilities in the original brief that the application does not currently provide are documented as not available rather than invented (Appendix E).
Future recommendations
- Code identifiers (namespace, assembly, solution, CSS and JS file names) still use the older spelling "Klocktoba"; rename them separately if wanted.
- Consider adding multi-factor authentication, a public-holiday calendar and leave notifications.
- Capture email notification and registration-pending screens once a mail sender is configured in the demo environment.
- Add a quarterly documentation review tied to each release; re-run the screenshot script (tools/capture.js) to refresh images.
Chapter 1
Introduction
What Kloktoba is, who it is for and how this manual is organised.
1.1 About Kloktoba
Kloktoba is a web-based workforce management platform. It lets organisations record when people work and where they clock in, manage breaks, rotas and overtime, handle leave and attendance corrections through approval workflows, maintain employee records and organisation structure, and report on all of it.
Kloktoba runs in a standard web browser on a computer, tablet or phone. There is nothing to install for end users.
1.2 Key benefits
| Benefit | What it means for you |
|---|---|
| Accurate time records | Every clock event is stamped with the server time and the device location, so timesheets are built from facts rather than memory. |
| Less admin | Timesheets, hours against target, overtime and leave balances are calculated automatically. |
| Clear approvals | Corrections, leave, overtime, shift swaps and timesheets each follow a defined route and everyone sees the status. |
| Right access for each person | Menus and screens are tailored to Employee, Supervisor, HR, Admin and SuperAdmin roles. |
| Audit-ready | Attendance changes, approvals, sign-ins and administrative changes are written to a permanent, read-only audit log. |
1.3 Key features
| Area | Features | Chapter |
|---|---|---|
| Attendance | Clock in/out with location capture, lunch, flagged shifts, hours against target | Chapter 4, Chapter 5 |
| Breaks | Paid and unpaid breaks, session limits, excessive-break alerts | Chapter 6 |
| Leave and scheduling | Holiday requests and balances, rota, shift swaps, overtime slots and requests | Chapter 7 |
| Supervision | Approval dashboard, team dashboard, approvals, team timesheets, two-step overtime approval | Chapter 8 |
| Administration | Employees, departments, positions, teams, business units, locations, shift templates, settings | Chapter 3, Chapter 9 |
| Security and access | Roles, menu permissions, account approvals, audit log | Chapter 10 |
| Reporting | 18 report types including the Standard Salary Bill, the employee timesheet report, attendance analytics, monthly and date-range company timesheets, exports | Chapter 11 |
| Communication | Notifications, messages, announcements | Chapter 12 |
1.4 User roles
Every account has one role. Higher roles include what lower roles can do, plus more. Which menu items each role sees is controlled by Menu Permissions (Chapter 10), so your organisation may differ slightly from the defaults below.
| Role | Typical responsibilities |
|---|---|
| Employee | Clock in/out, take breaks, view own timesheet and schedule, request leave, overtime, shift swaps and corrections, update own details, read messages. |
| Supervisor | Everything an Employee does, plus: approve direct reports' corrections, leave, overtime requests, swaps and timesheets; recommend overtime worked over target; manage the team rota; run team reports; request overtime slots. |
| HR | Everything a Supervisor does for the whole organisation, plus: employee records, organisation structure, final approval of corrections and of overtime worked, overtime slots, flagged shifts, exports, the salary bill, break and attendance settings, audit log. |
| Admin | Everything HR does, plus: company settings, menu permissions, organisation details, promoting Admins, app feedback, and deactivating or reactivating accounts. |
| SuperAdmin | Runs the platform, not an organisation: creates, edits, activates and deactivates organisations, creates Organisation Admins, activates, deactivates and resets them, manages subscription plans (priced per active user, with a minimum monthly price and a currency), generates monthly invoices, issues trial periods and deactivates organisations that do not pay, and views system statistics. SuperAdmin does not manage employees, approve leave or handle attendance. |
1.5 How to use this manual
- Use the clickable Contents page to jump to any chapter, section or appendix.
- Each feature section follows the same pattern: Purpose, Business benefit, User roles, Step-by-step instructions, Expected result, Common errors, Troubleshooting and FAQs.
- Numbered yellow markers on screenshots match the numbered key under each figure. Every screenshot is listed in Appendix A.
- Sample data in screenshots is fictitious demonstration data.
Chapter 2
Getting Started
Requirements, signing in, password reset and a tour of the screen.
2.1 System requirements and browser compatibility
| Item | Requirement |
|---|---|
| Browser | A current version of Microsoft Edge, Google Chrome, Mozilla Firefox or Apple Safari (desktop or mobile). |
| Device | Any computer, tablet or smartphone with a modern browser. A device with location services is needed to clock in and out. |
| Connection | An internet connection to your organisation's Kloktoba address. |
| Location | Location access must be allowed for the Kloktoba site (see Clock In and Clock Out). |
| An email address on your account is needed to receive password reset links and email notifications. |
2.2 Logging in
Step-by-step instructions
- Open your organisation's Kloktoba address. You are taken to the sign-in page.
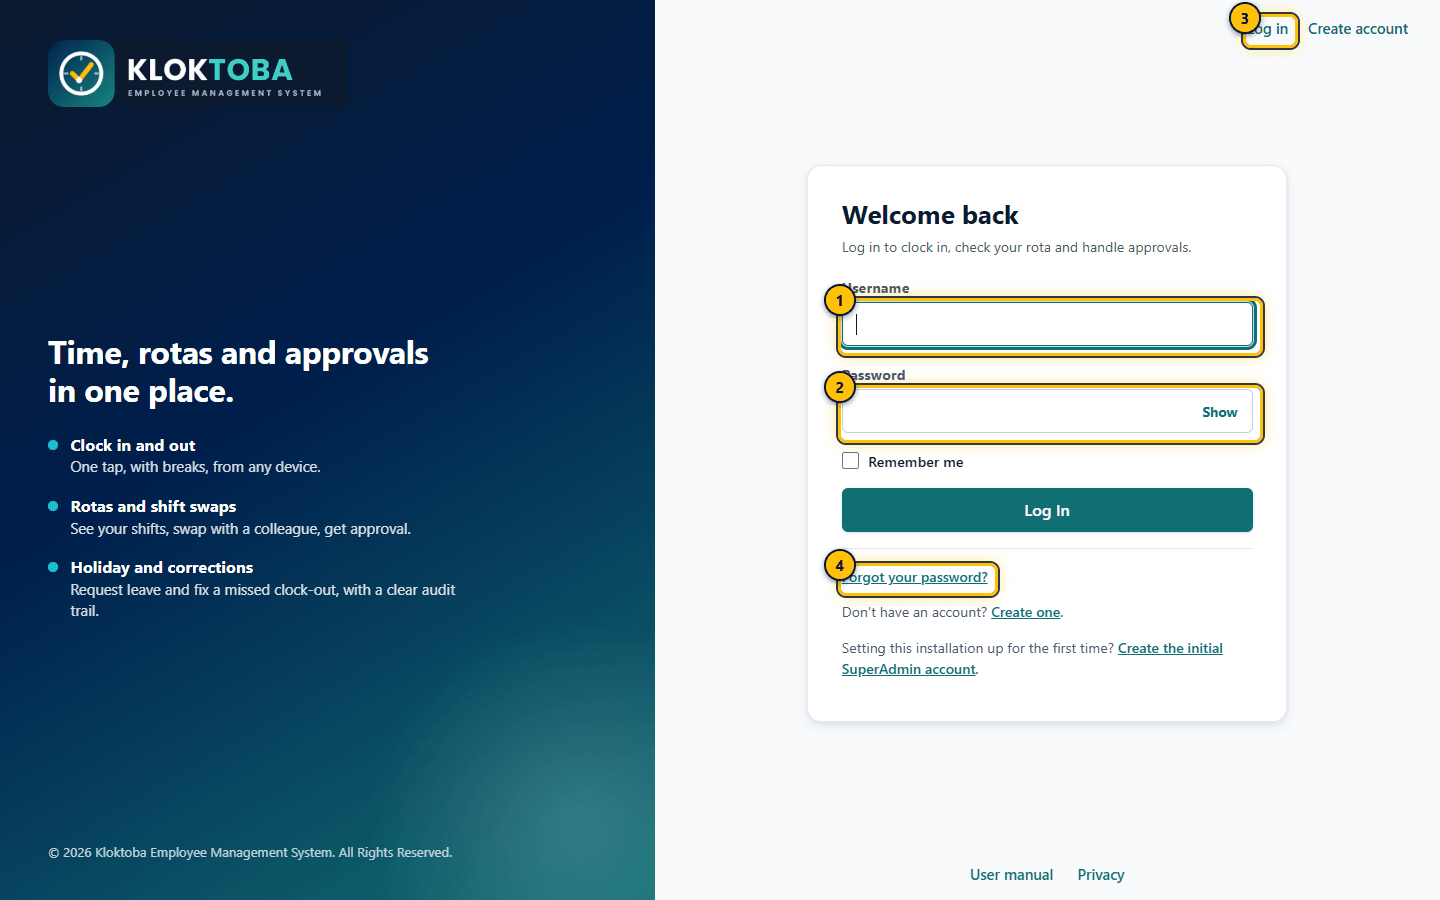
SS-001 – Sign-in page. Viewed as: Signed out. - Username field
- Password field (use Show to reveal what you type)
- Log In button
- Forgot your password? link
- Enter your Username (not your email address) and Password. Select Show beside the password to check what you typed.
- Optionally tick Remember me to stay signed in on this device for 30 days. Without it you are signed out when you close the browser. Even so, a session times out after 8 hours of inactivity.
- Select Log In. You land on your Dashboard.
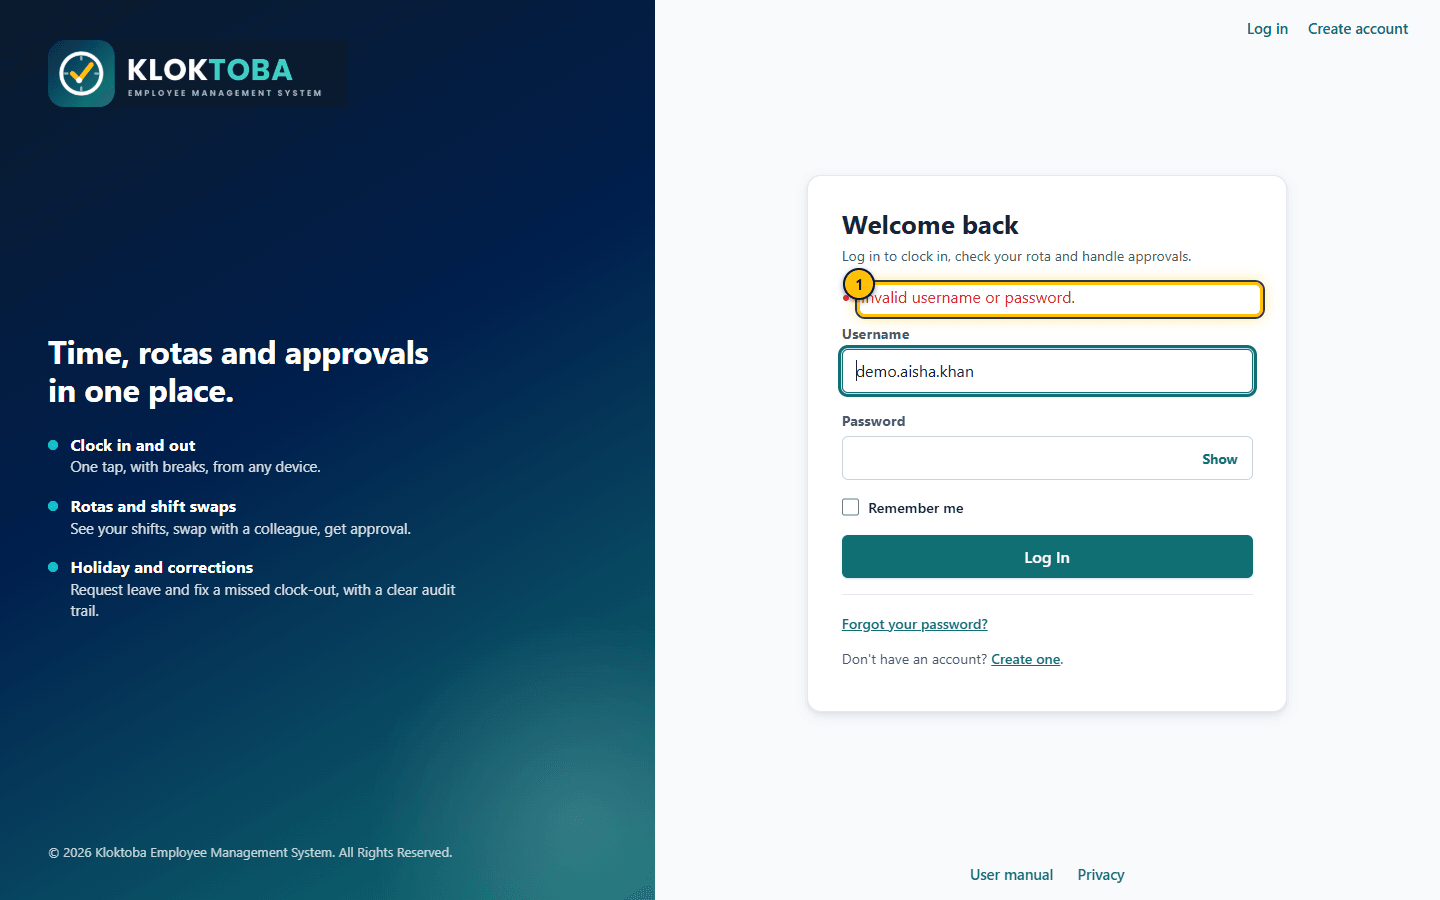
- The same message is shown whether the username or the password is wrong
Expected result
The Dashboard opens with your name and role shown at the top right and a sidebar of the screens your role can use.
Common errors
| Error or mistake | What to do |
|---|---|
| "Invalid username or password." | The same message is shown whether the username or the password is wrong, deliberately. Check caps lock and that you used your username, not your email. |
| A message that your account is awaiting approval | Self-registered accounts need manager and HR/Admin approval first. See Account approvals. |
Troubleshooting
| Problem | Solution |
|---|---|
| Sign-in keeps failing | Use Forgot your password? to set a new password. If that does not work, ask your Supervisor, HR or Admin to send you a reset link. |
Frequently asked questions
- Can I sign in with my email address?
- No. Use the username you registered with or were given.
- How long does a session last?
- Up to 8 hours with activity, or 30 days if you chose Remember me on a trusted device.
2.3 Resetting your password
Step-by-step instructions
- On the sign-in page select Forgot your password?.
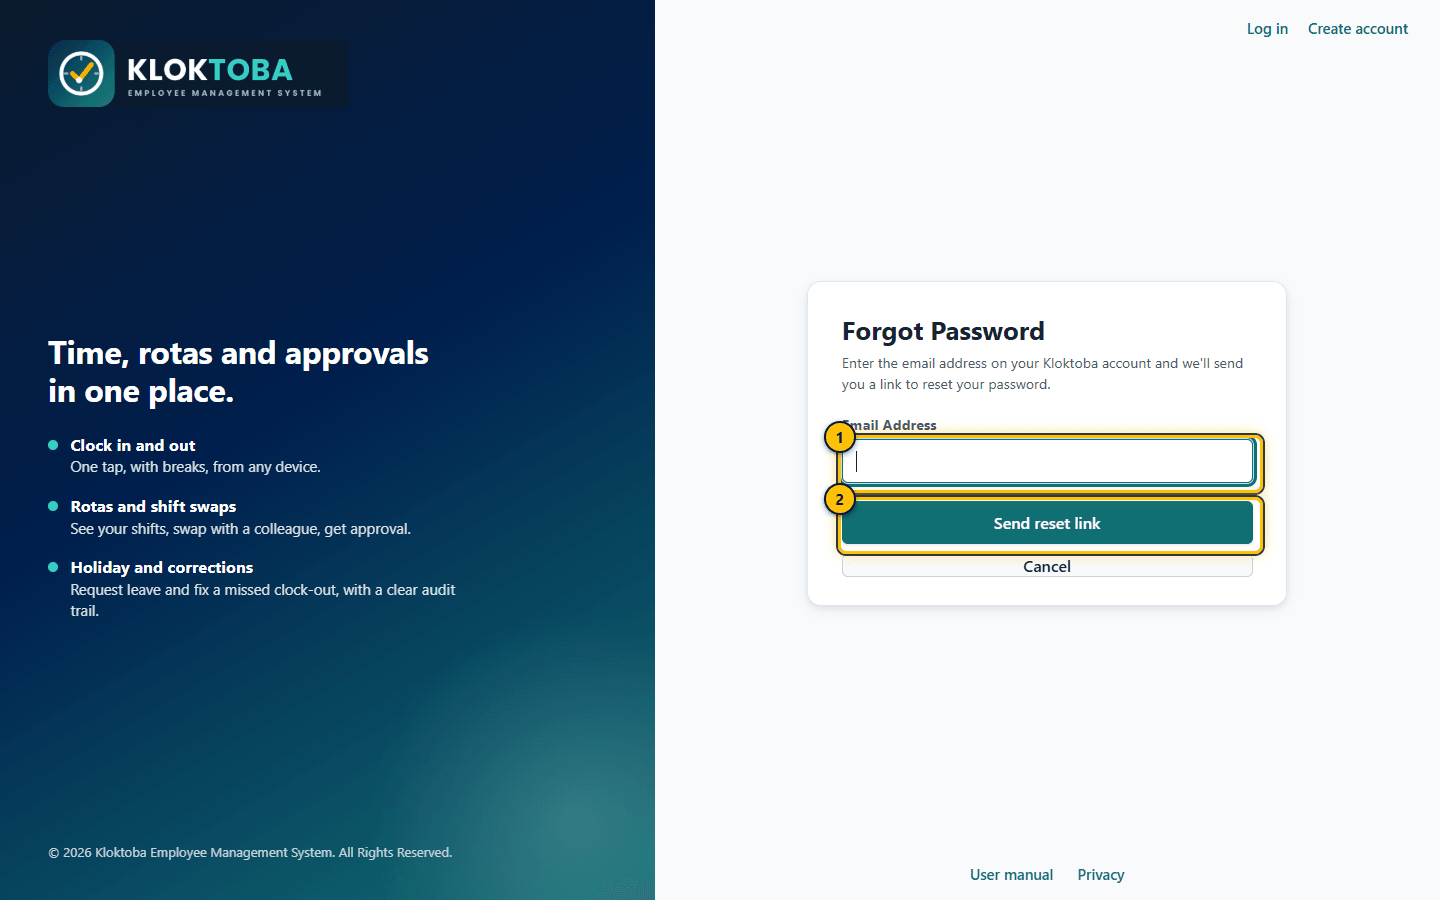
SS-003 – Forgot your password. Viewed as: Signed out. - Email address on your account
- Send reset link
- Enter the email address on your account and select the send button.
- Open the email and select the link. It is valid for 24 hours and can be used once.
- Choose a new password that meets the rules shown under the box (set by your SuperAdmin; by default at least 8 characters), confirm it and save. Then sign in normally.
Expected result
You see the same confirmation message whether or not the email matches an account (to protect privacy). If it matches an active account, a link is sent.
Common errors
| Error or mistake | What to do |
|---|---|
| The link has expired or was already used | Request a new link. Each link works once and for 24 hours. |
Troubleshooting
| Problem | Solution |
|---|---|
| No email arrives | Check your spam folder. If you have no email on file, ask your Supervisor (Team Members), HR or Admin (Employee List) to send you a link. |
Frequently asked questions
- Which password rules apply?
- The rules shown under every password box. SuperAdmin sets them on Global Settings > Password policy: a minimum length (8 unless changed), optionally an uppercase letter, a lowercase letter, a number and a symbol, and never the username. Passwords may also expire after a set number of days: when yours has, signing in takes you to Change Password first.
- Someone gave me a temporary password
- Sign in with it. If you are asked to change it, enter it as the current password and choose your own. Nothing else is available until you do.
2.4 Creating an account (self-registration)
Step-by-step instructions
- On the sign-in page select Create account.
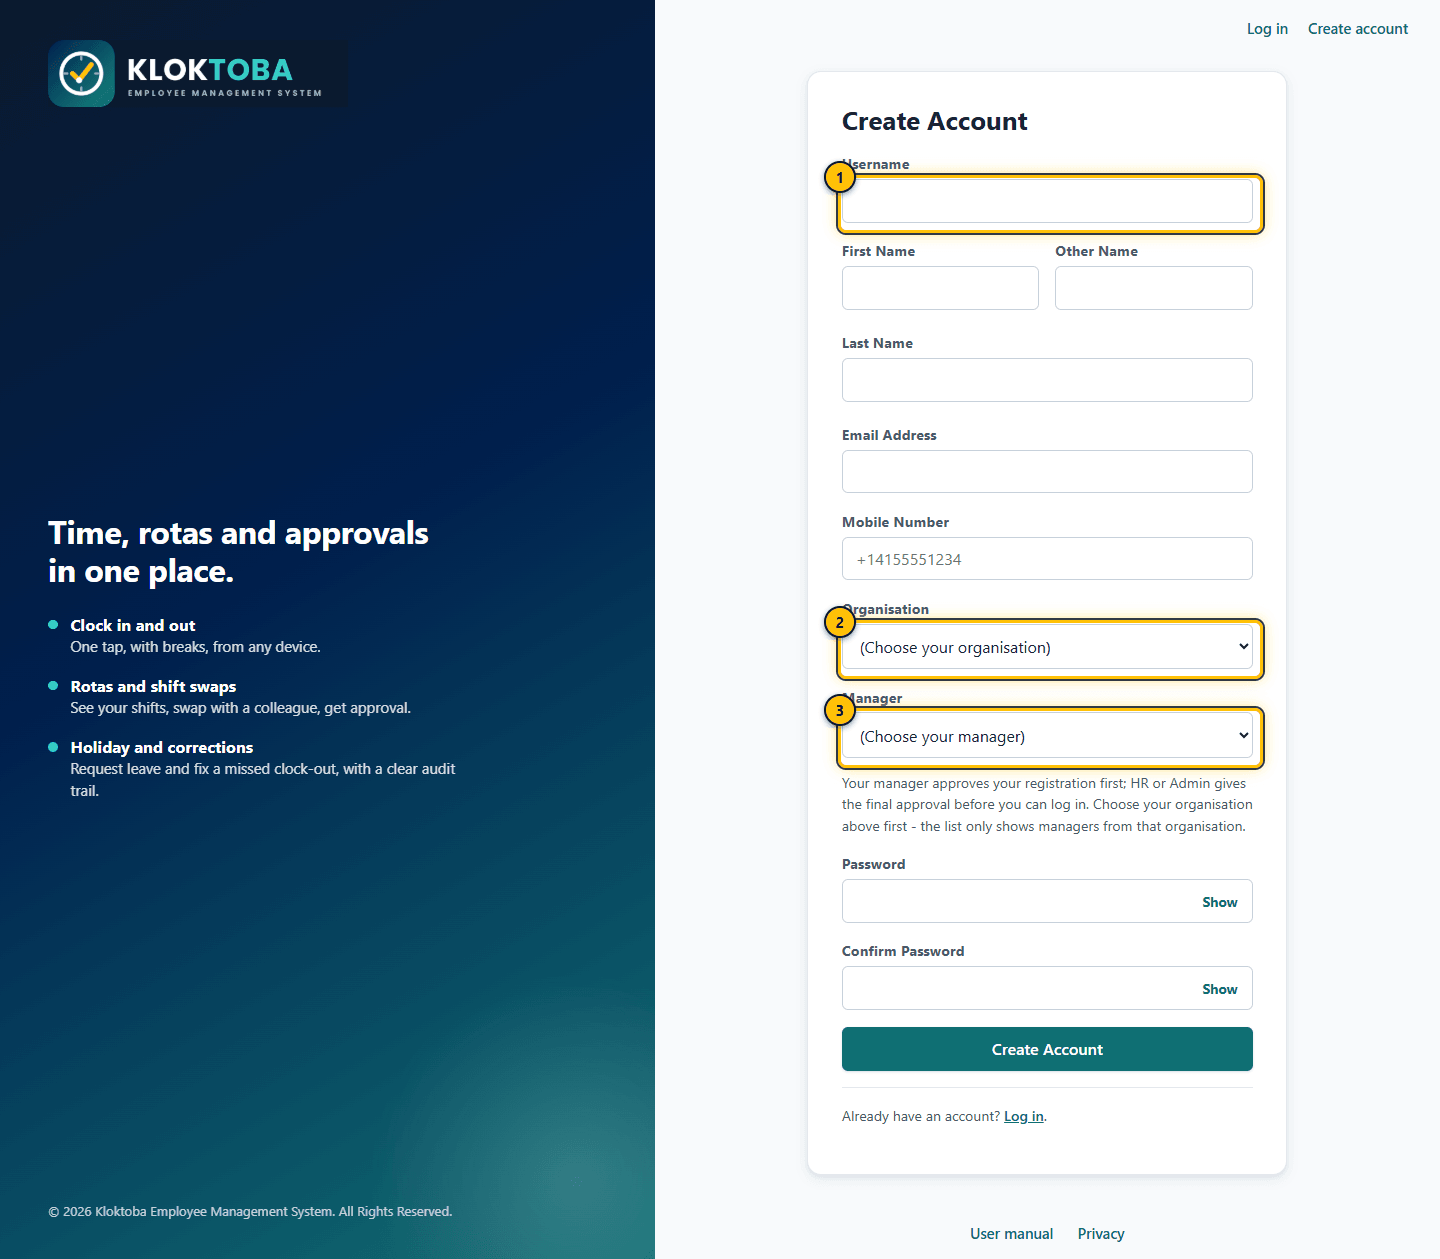
SS-004 – Create account (self-registration). Viewed as: Signed out. - Unique username
- Organisation (choose first)
- Manager who approves your registration
- Enter a unique Username, your First Name (Other and Last Name are optional), optional Email Address and Mobile Number (start with + and digits only).
- Choose your Organisation first, then your Manager. The manager list only shows managers from that organisation.
- Enter and confirm a password that meets the rules shown under the box, then select Create Account.
Expected result
A Registration Pending page explains that two approvals are required before you can sign in.
Common errors
| Error or mistake | What to do |
|---|---|
| Username already taken | Choose another. Usernames are unique. |
| Manager list is empty | Select your Organisation first. |
Troubleshooting
| Problem | Solution |
|---|---|
| I registered but cannot sign in | See Account approvals. Contact your manager or HR if it is taking long. |
Frequently asked questions
- Can I choose my own role?
- No. Self-registered accounts are always Employees.
2.5 Account approvals
Step-by-step instructions
- Open Account Approvals in the sidebar (Supervisor group). Two queues are shown.
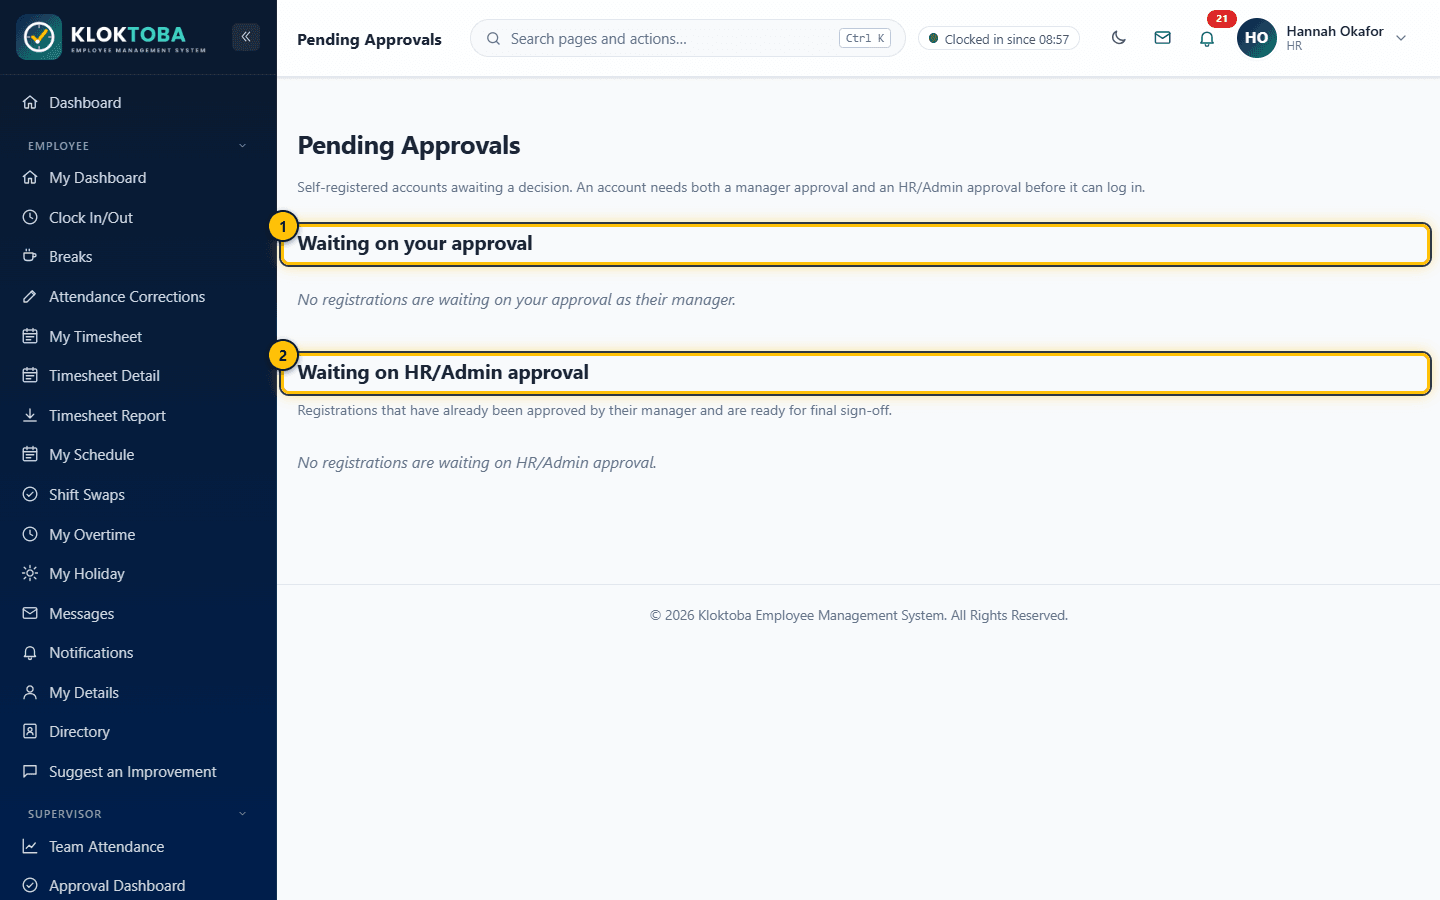
SS-044 – Account approvals. Viewed as: HR. - Manager approval queue
- HR/Admin approval queue
- Waiting on your approval lists registrations that named you as manager. Enter an optional note and select Approve or Reject.
- Waiting on HR/Admin approval (HR and Admin) lists registrations that the manager has already approved. Give final sign-off here.
Expected result
After both approvals the account becomes Active and the person can sign in. Rejection at either stage is final and the person is emailed.
Common errors
| Error or mistake | What to do |
|---|---|
| "Already decided" message | Someone else decided first; nothing is applied twice. |
Troubleshooting
| Problem | Solution |
|---|---|
| A registration is not in my queue | Only the chosen manager sees stage one. HR/Admin see stage two only after the manager approves. |
Frequently asked questions
- Can a rejected person re-apply?
- A rejected account stays rejected. HR can create the employee directly with Add Employee.
2.6 First-time setup: the initial SuperAdmin
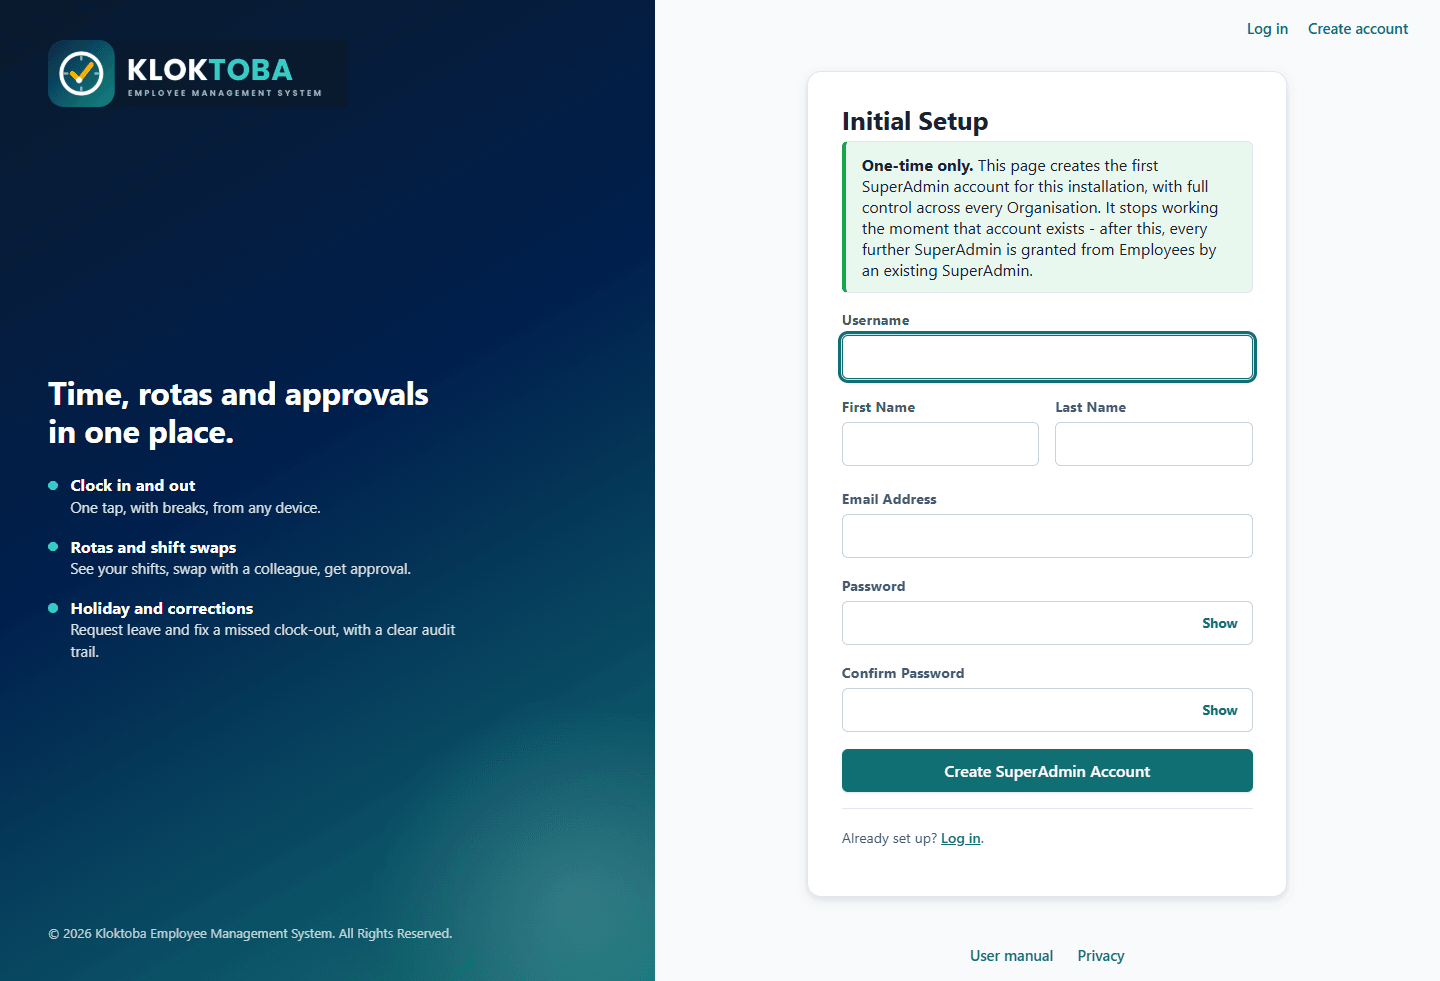
On a brand-new installation no accounts exist yet. The sign-in page then shows a link to create the initial SuperAdmin account. It opens a one-time setup page where you enter a username, name, email and password. The page and link disappear as soon as one SuperAdmin exists and cannot be run again. You are not signed in automatically; sign in with the new account afterwards.
2.7 Dashboard overview
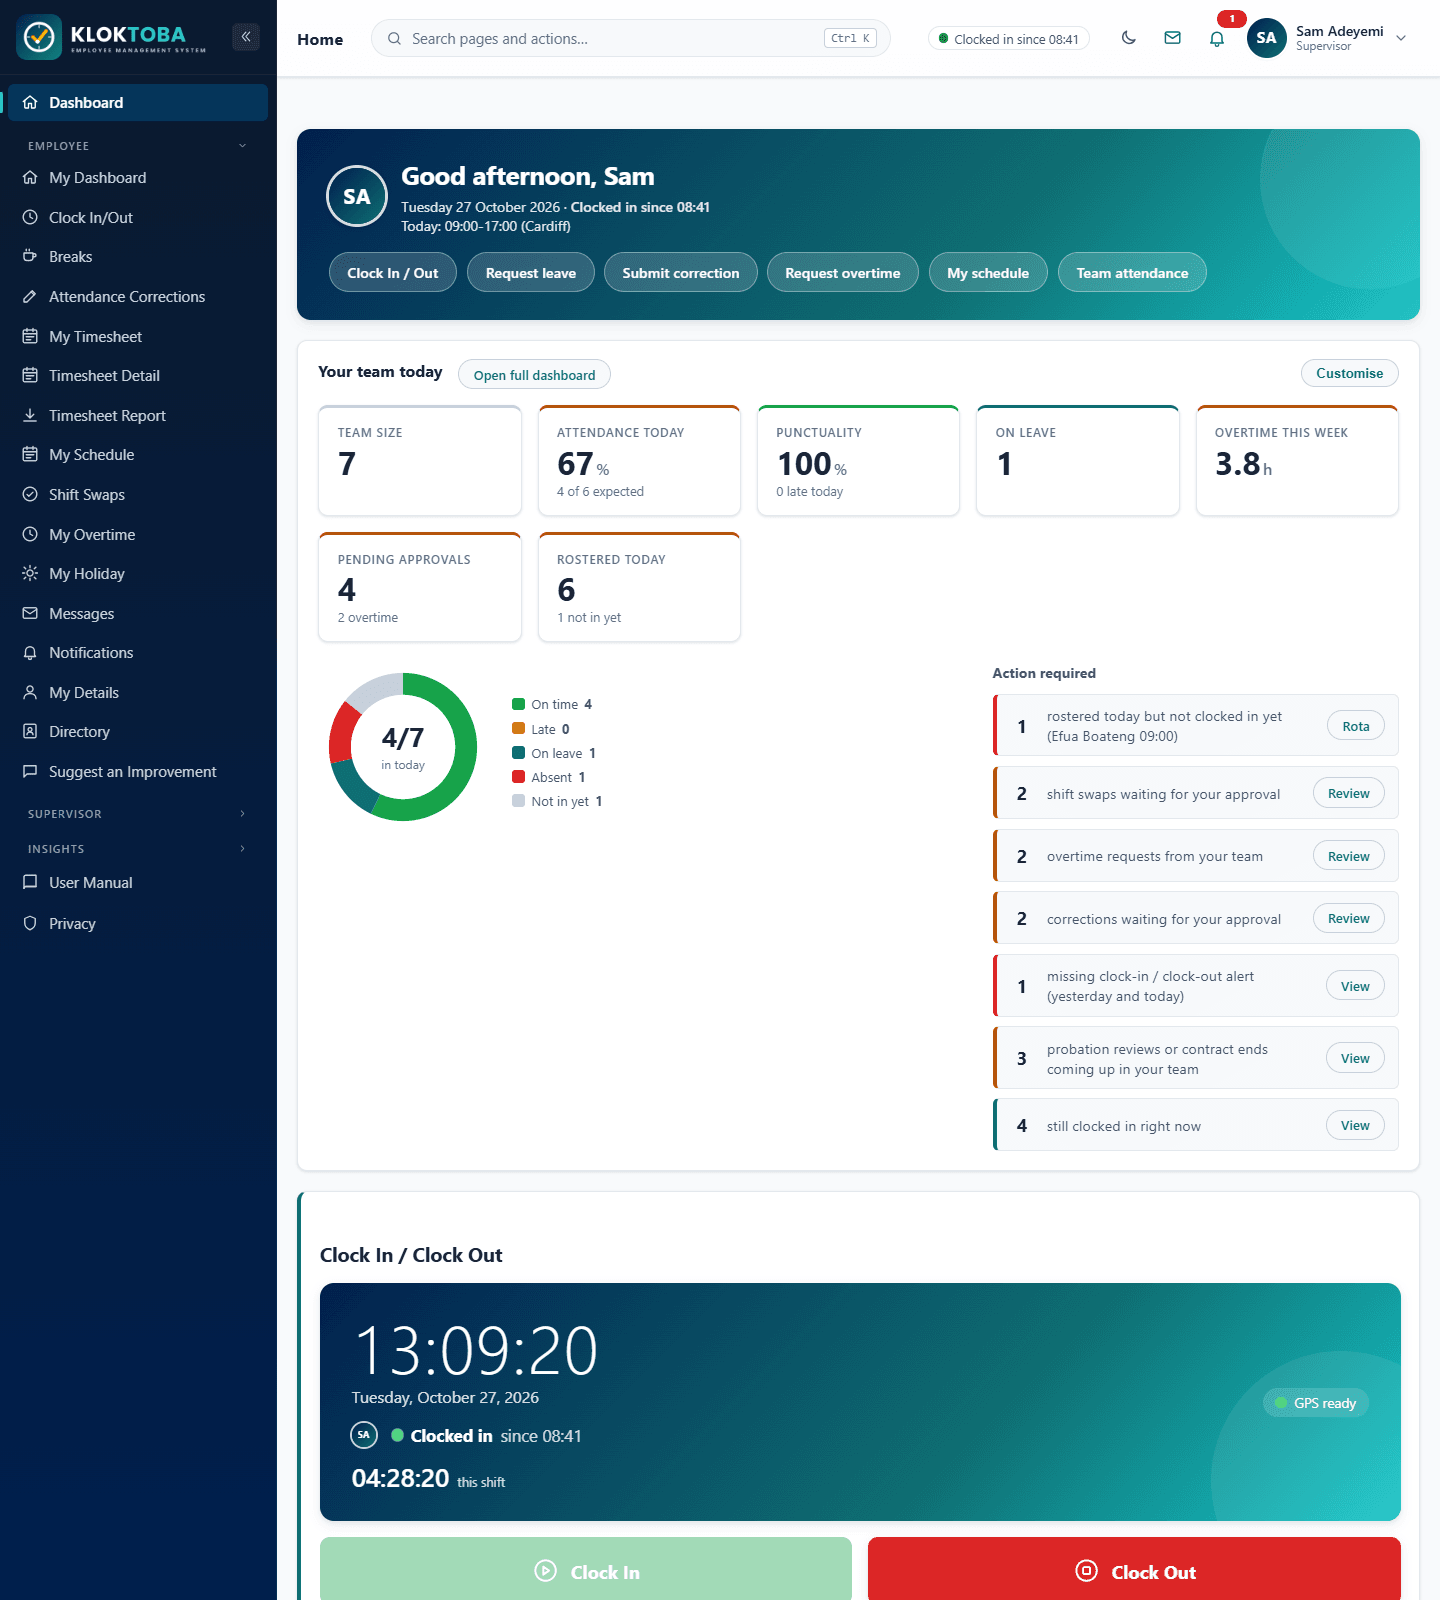
After signing in, Dashboard is your starting page. It combines a greeting with your next shift, quick action buttons, role-specific summary tiles, the clock widget, holiday and hours figures, and Quick access tiles for every screen you can reach.
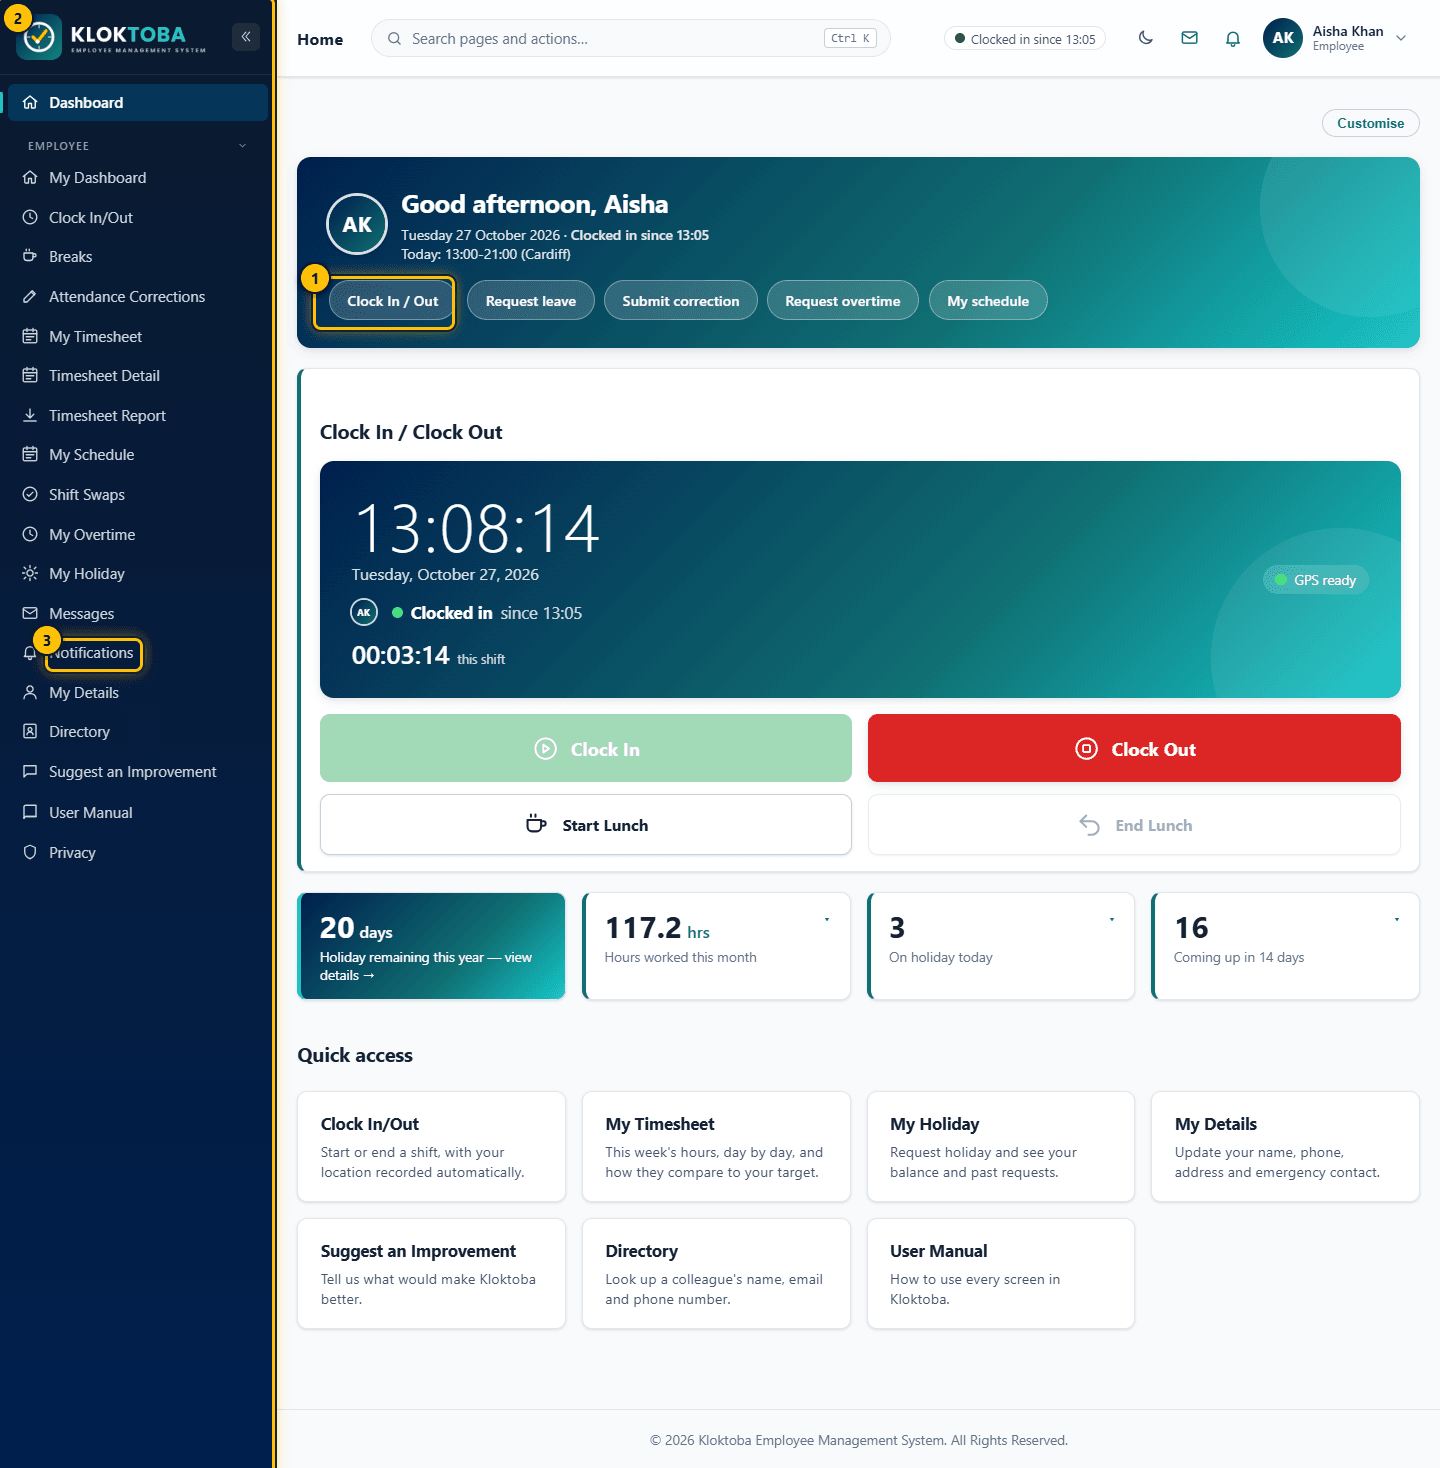
- Quick actions
- Sidebar navigation (items depend on your role)
- Notifications
Dashboards by role:
| Dashboard | Where | What it shows | Roles |
|---|---|---|---|
| Employee | Dashboard, My Dashboard | Clock status, break status, hours today, correction requests, unread messages and notifications, the week so far, holiday remaining. | Everyone |
| Supervisor | Dashboard, Team Attendance | Team size, attendance today, punctuality, on leave, overtime this week, approval queue, rota and probation or contract alerts. | Supervisor and above |
| HR | HR Dashboard | Headcount, attendance rate, late and absent today, clocked in now, pending HR approvals, 14-day trend, action list. | HR and above |
| Administrator | Dashboard (company today) | Company-wide tiles and action list, with Customise to choose what appears. | Admin and above |
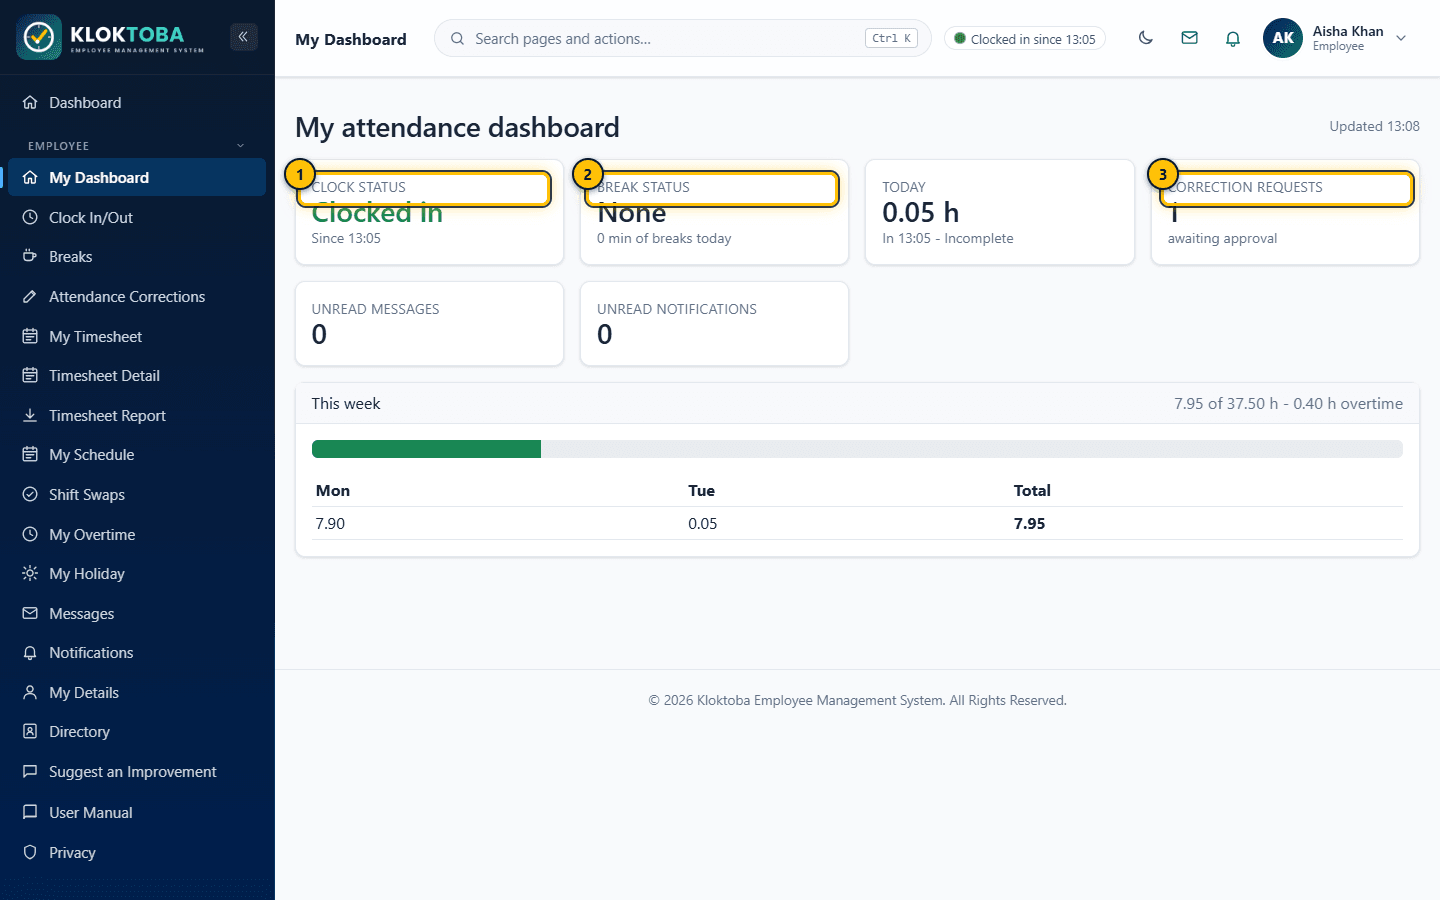
- Current clock status
- Break status
- Corrections awaiting approval
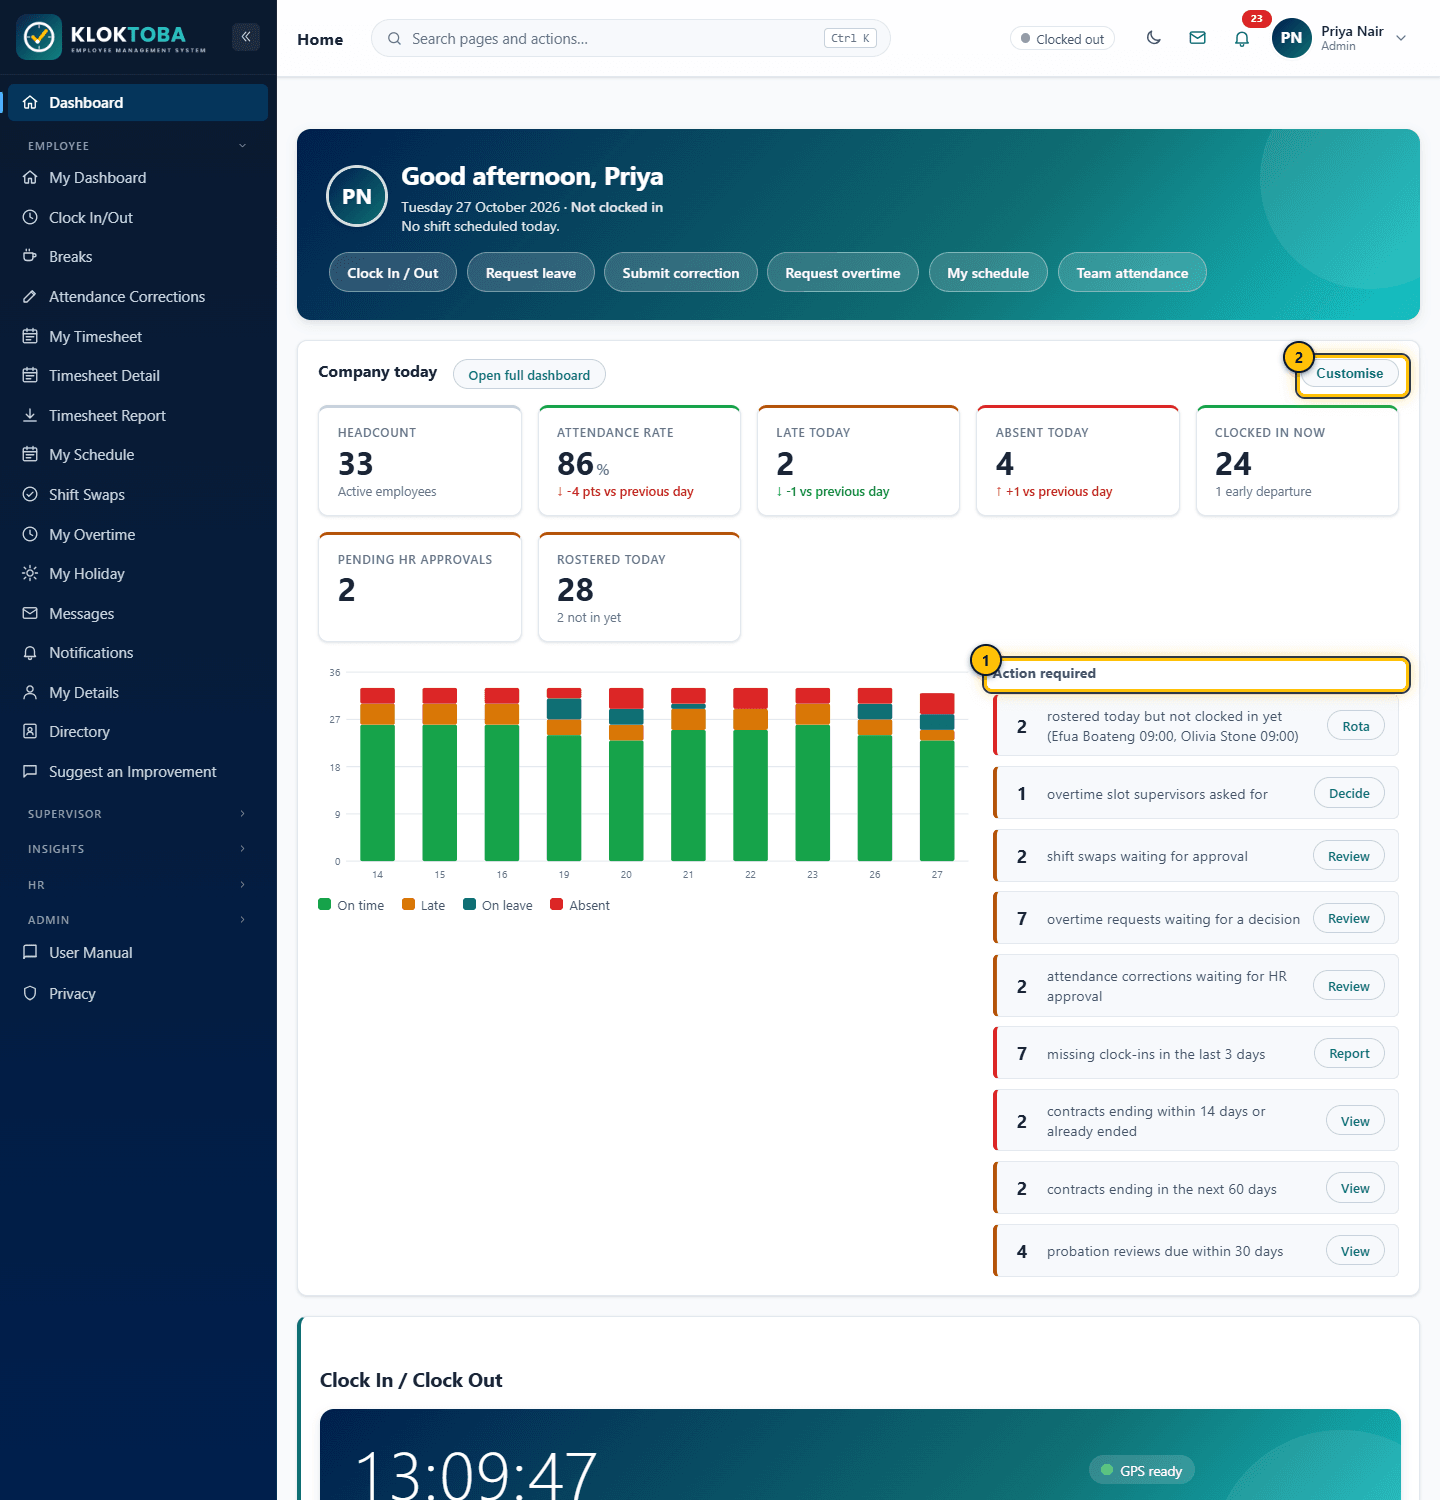
- Action required
- Customise the dashboard
Sorting lists: on any table, select a column heading to sort ascending, select it again to sort descending. An arrow shows the column and direction. Your search text, filters and page size are kept, and long lists are sorted across all pages, not just the page you can see.
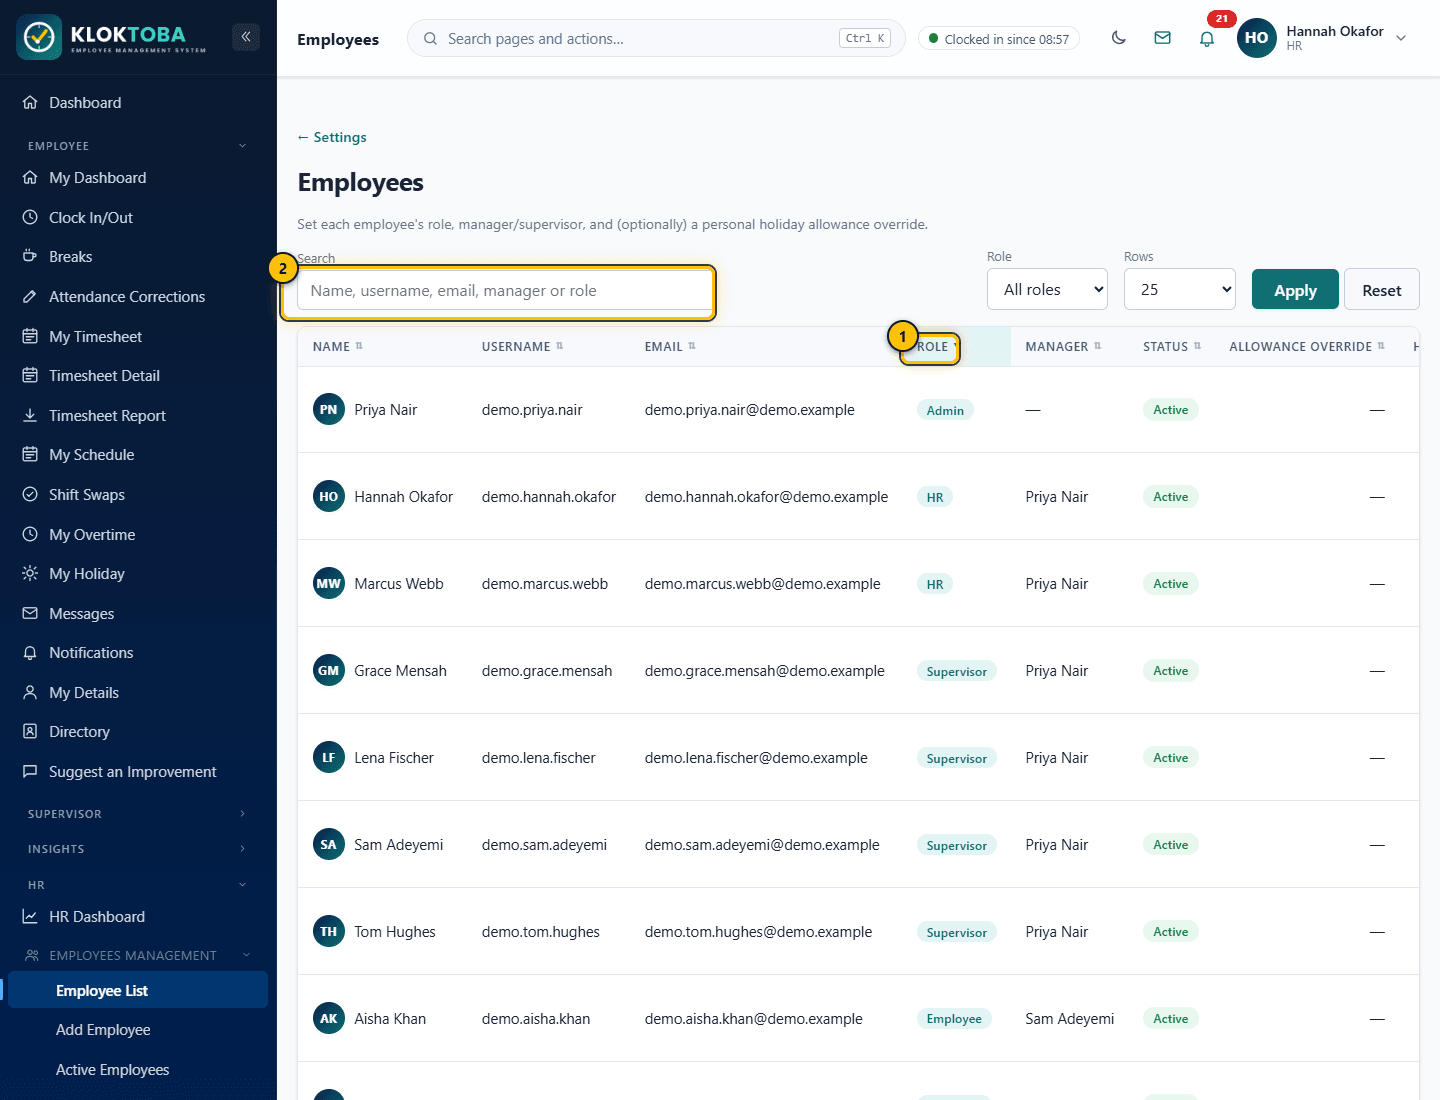
- The arrow shows the sort column and direction
- Search keeps your sort
First sign-in with a new account: administrators created by a SuperAdmin, and people whose password was set for them, are asked to choose a new password before they can use Kloktoba.
The sidebar groups pages as Employee, Supervisor, Insights, HR and Admin, showing only the groups your role can use. Insights holds Reports, Team Insights and Data Insights. Admin holds the organisation's configuration, with an Organisation sub-group for the organisation profile, structure, branding and administrators. Select the arrow beside the logo to collapse the sidebar to icons, select a group heading to collapse that group, or select a sub-group (such as Organisation or Employees Management) to open or close it; the sidebar remembers what you left open. On a phone, open the menu with the menu button. Use the moon icon in the top bar to switch between light and dark theme.
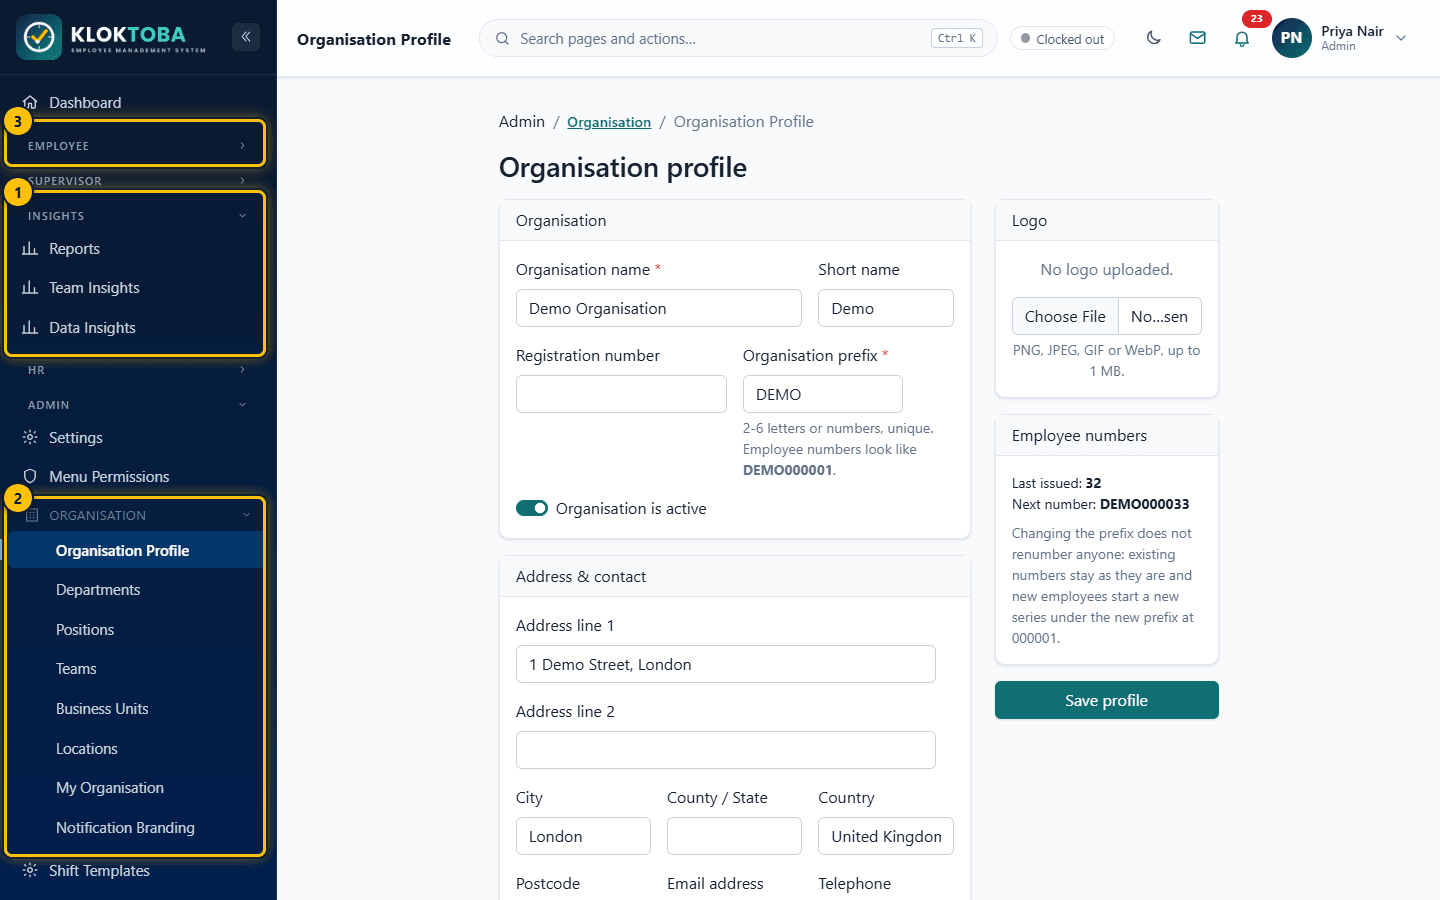
- Insights: Reports, Team Insights and Data Insights
- Admin > Organisation: profile, structure, branding and administrators
- Select a group heading to open or close it
The status chip in the top bar (for example Clocked in since 09:03) always shows your current clock state. The envelope and bell icons open Messages and Notifications.
Signing out: open the menu under your name at the top right and choose Log out. You return to the sign-in page. Always sign out on shared devices.
Multi-factor authentication: Kloktoba does not currently offer multi-factor authentication. Protect your account with a strong, unique password and sign out on shared devices (see Chapter 14).
Chapter 3
Employee Management
Employee records, profiles, employee numbers and employment information.
3.1 Employee records and the employee list
Step-by-step instructions
- Open HR > Employees Management > Employee List. Use Active Employees or Inactive Employees to filter by status.
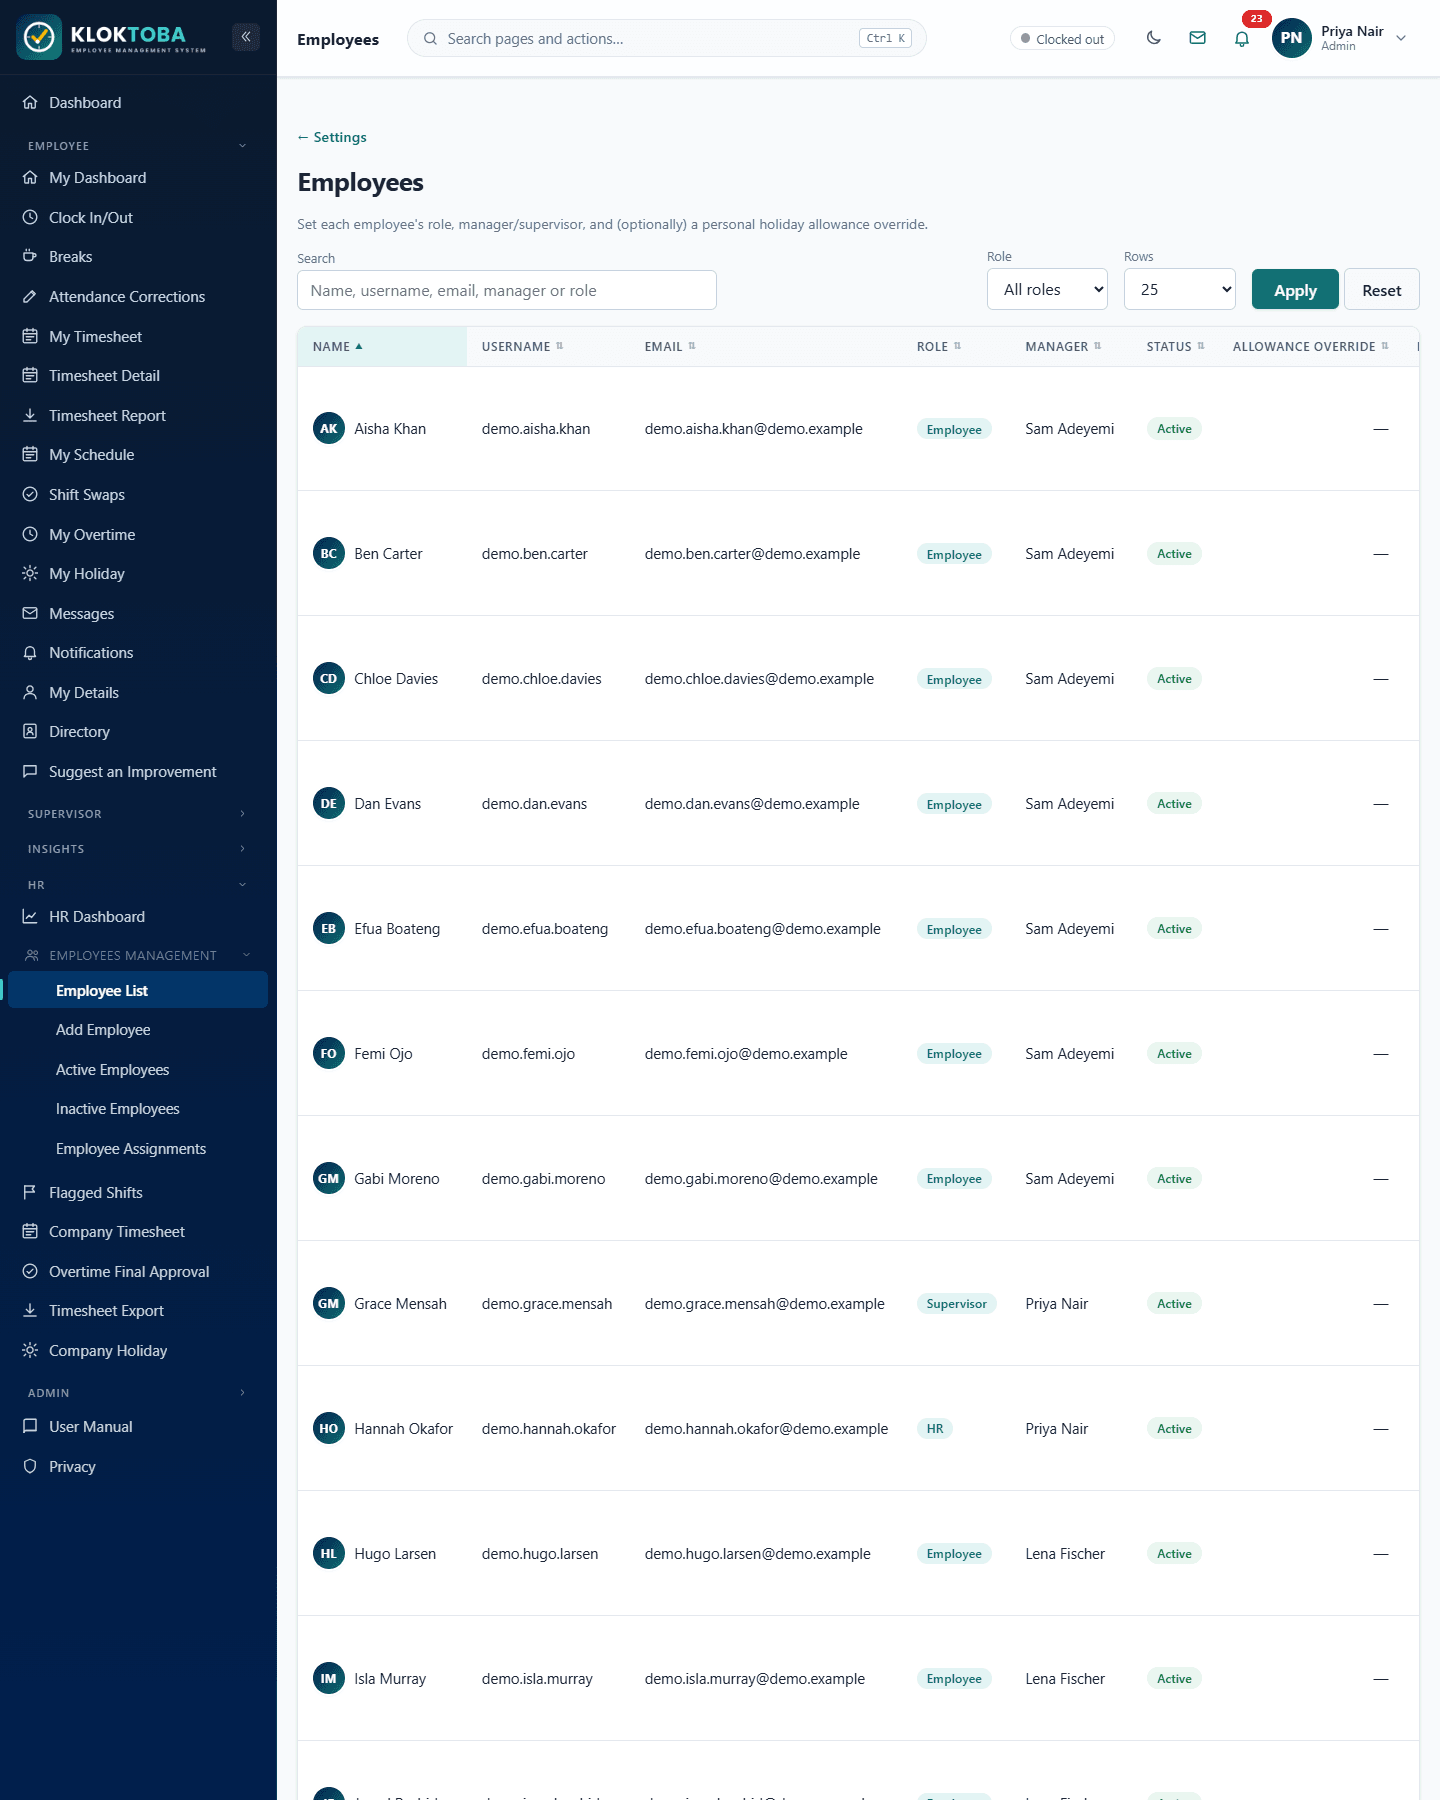
SS-038 – Employee list. Viewed as: Admin. - Edit
- Send password reset link
- Deactivate
- Review Name, Username, Email, Role, Manager, Status, and any personal Allowance or Hours overrides. Pay rates are intentionally not shown on the list.
- Select Edit to open the record. You can change role, manager, allowance and hours overrides, pay rate, organisation assignment and the Allow clocking in/out switch (untick it to stop someone clocking while keeping their account and history).
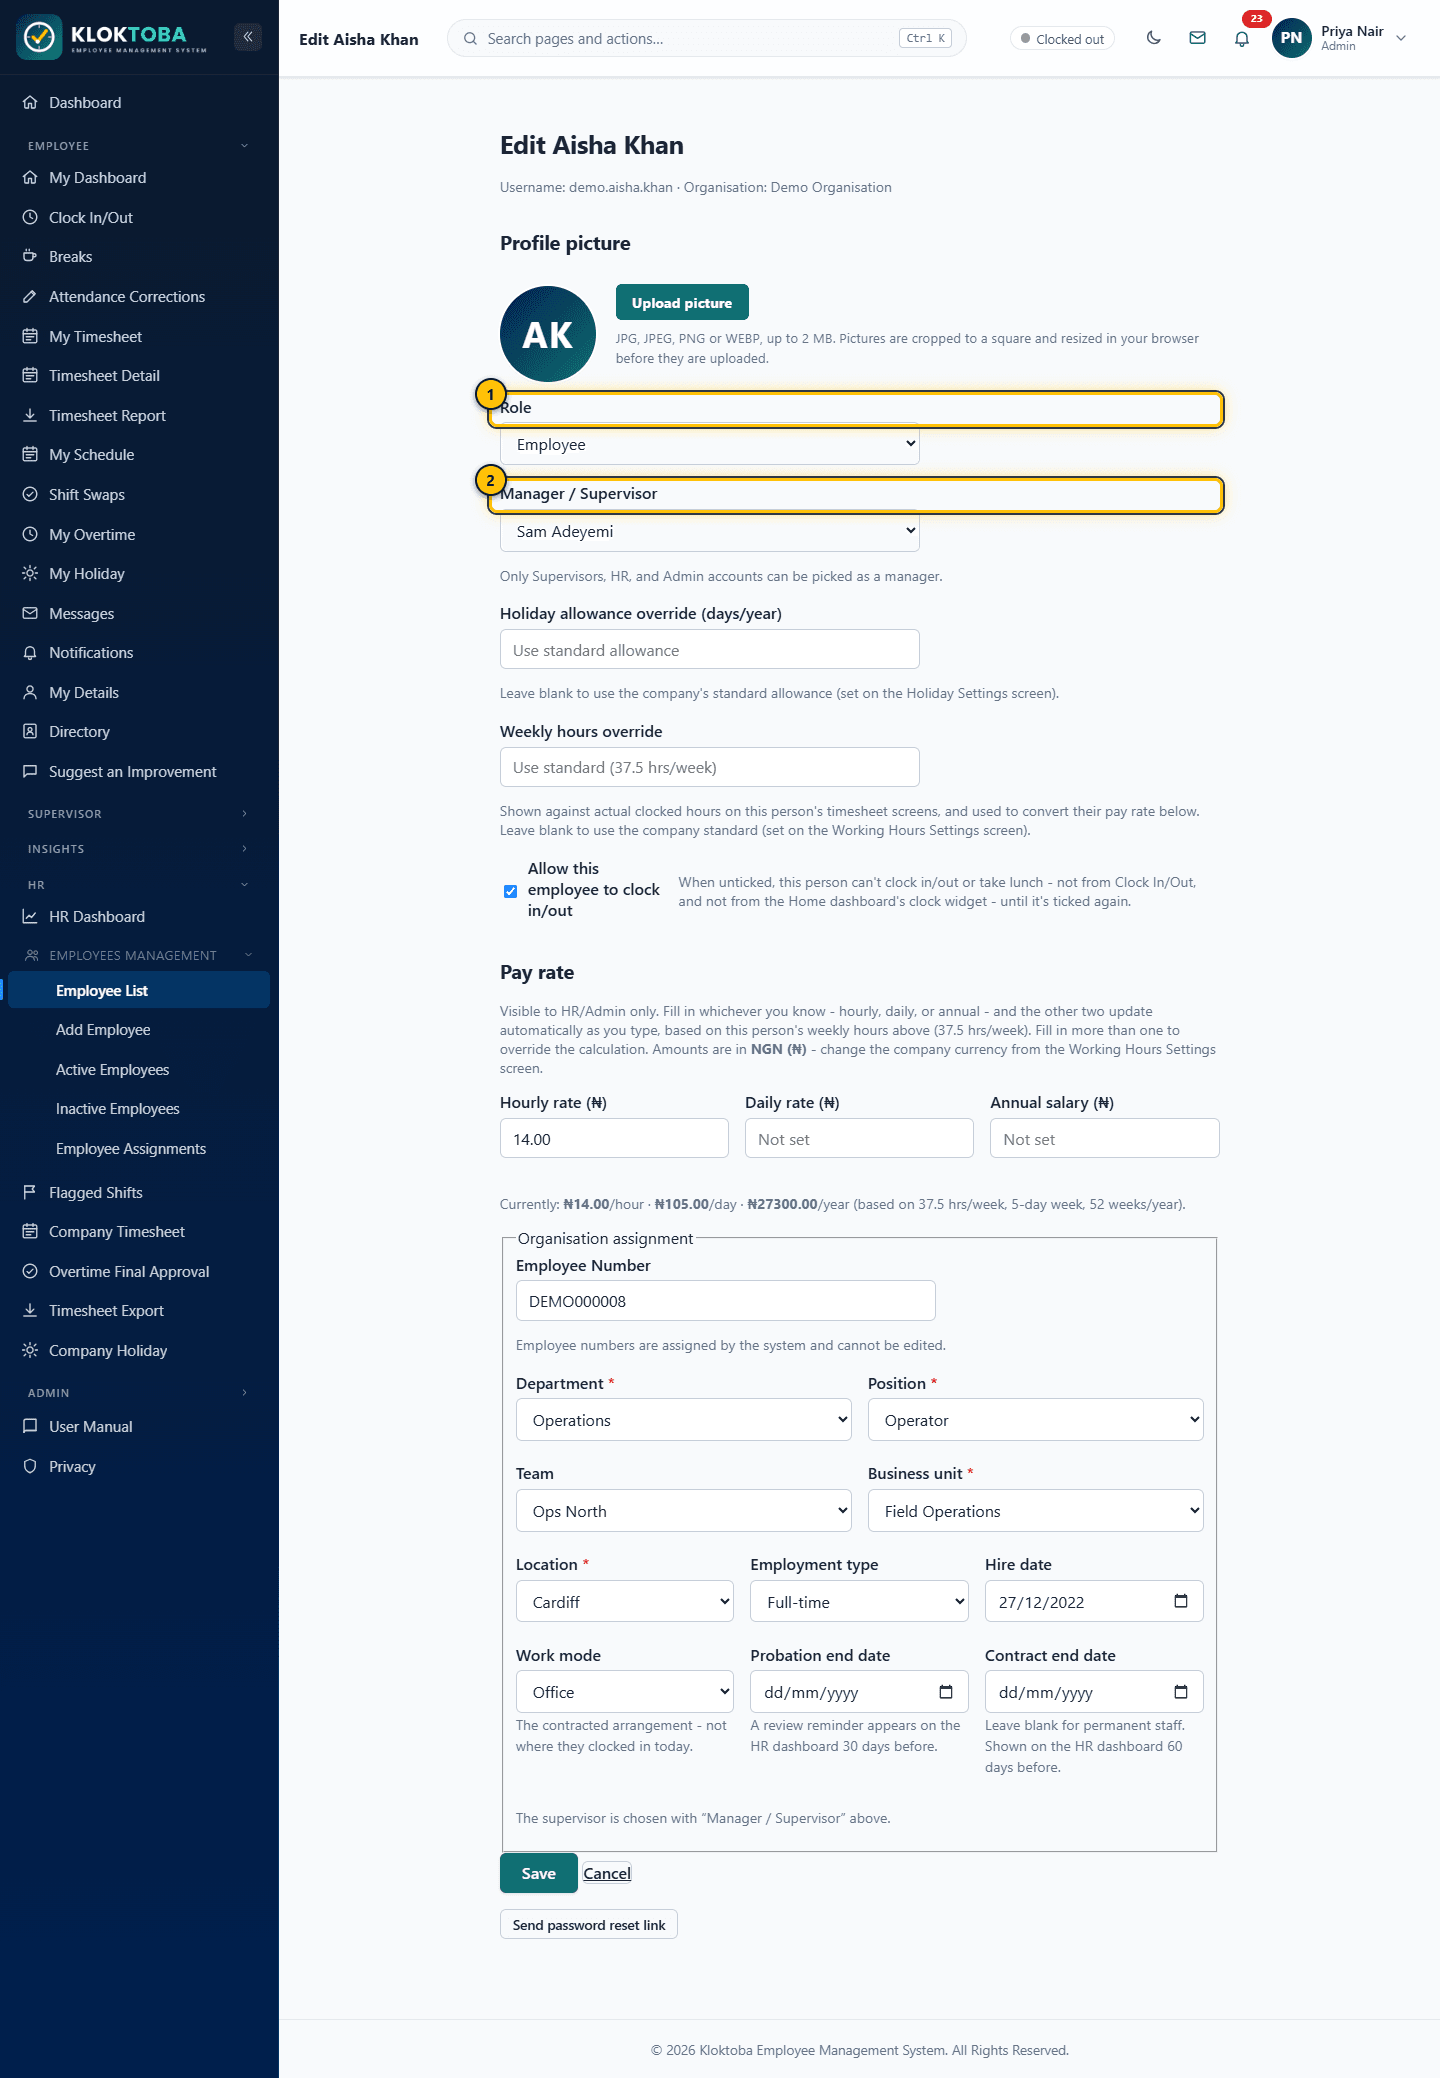
SS-040 – Edit Employee. Viewed as: Admin. - Role
- Manager / Supervisor
- Use Send password reset link to help someone get back in, or Deactivate (Admin) to block sign-in without deleting history.
Expected result
The list reflects your changes immediately. A deactivated employee shows a Deactivated badge and an Admin can activate them again at any time. Someone whose Allow clocking in/out is switched off is left out of the Company Timesheet, team timesheets, the team rota, timesheet exports, attendance reports and analytics, because they cannot clock. They still appear on the Standard Salary Bill if they have a pay rate.
Common errors
| Error or mistake | What to do |
|---|---|
| Cannot deactivate my own account | Not allowed. Ask another Admin. |
| Cannot find an employee | HR and Admin only see their own organisation. |
Troubleshooting
| Problem | Solution |
|---|---|
| Reset link says no email on file | Edit the employee and add an email address first. |
Frequently asked questions
- Is anything deleted when I deactivate?
- No. Timesheets, leave and history are kept; access is simply blocked.
3.2 Adding an employee
Step-by-step instructions
- Open Employees Management > Add Employee.
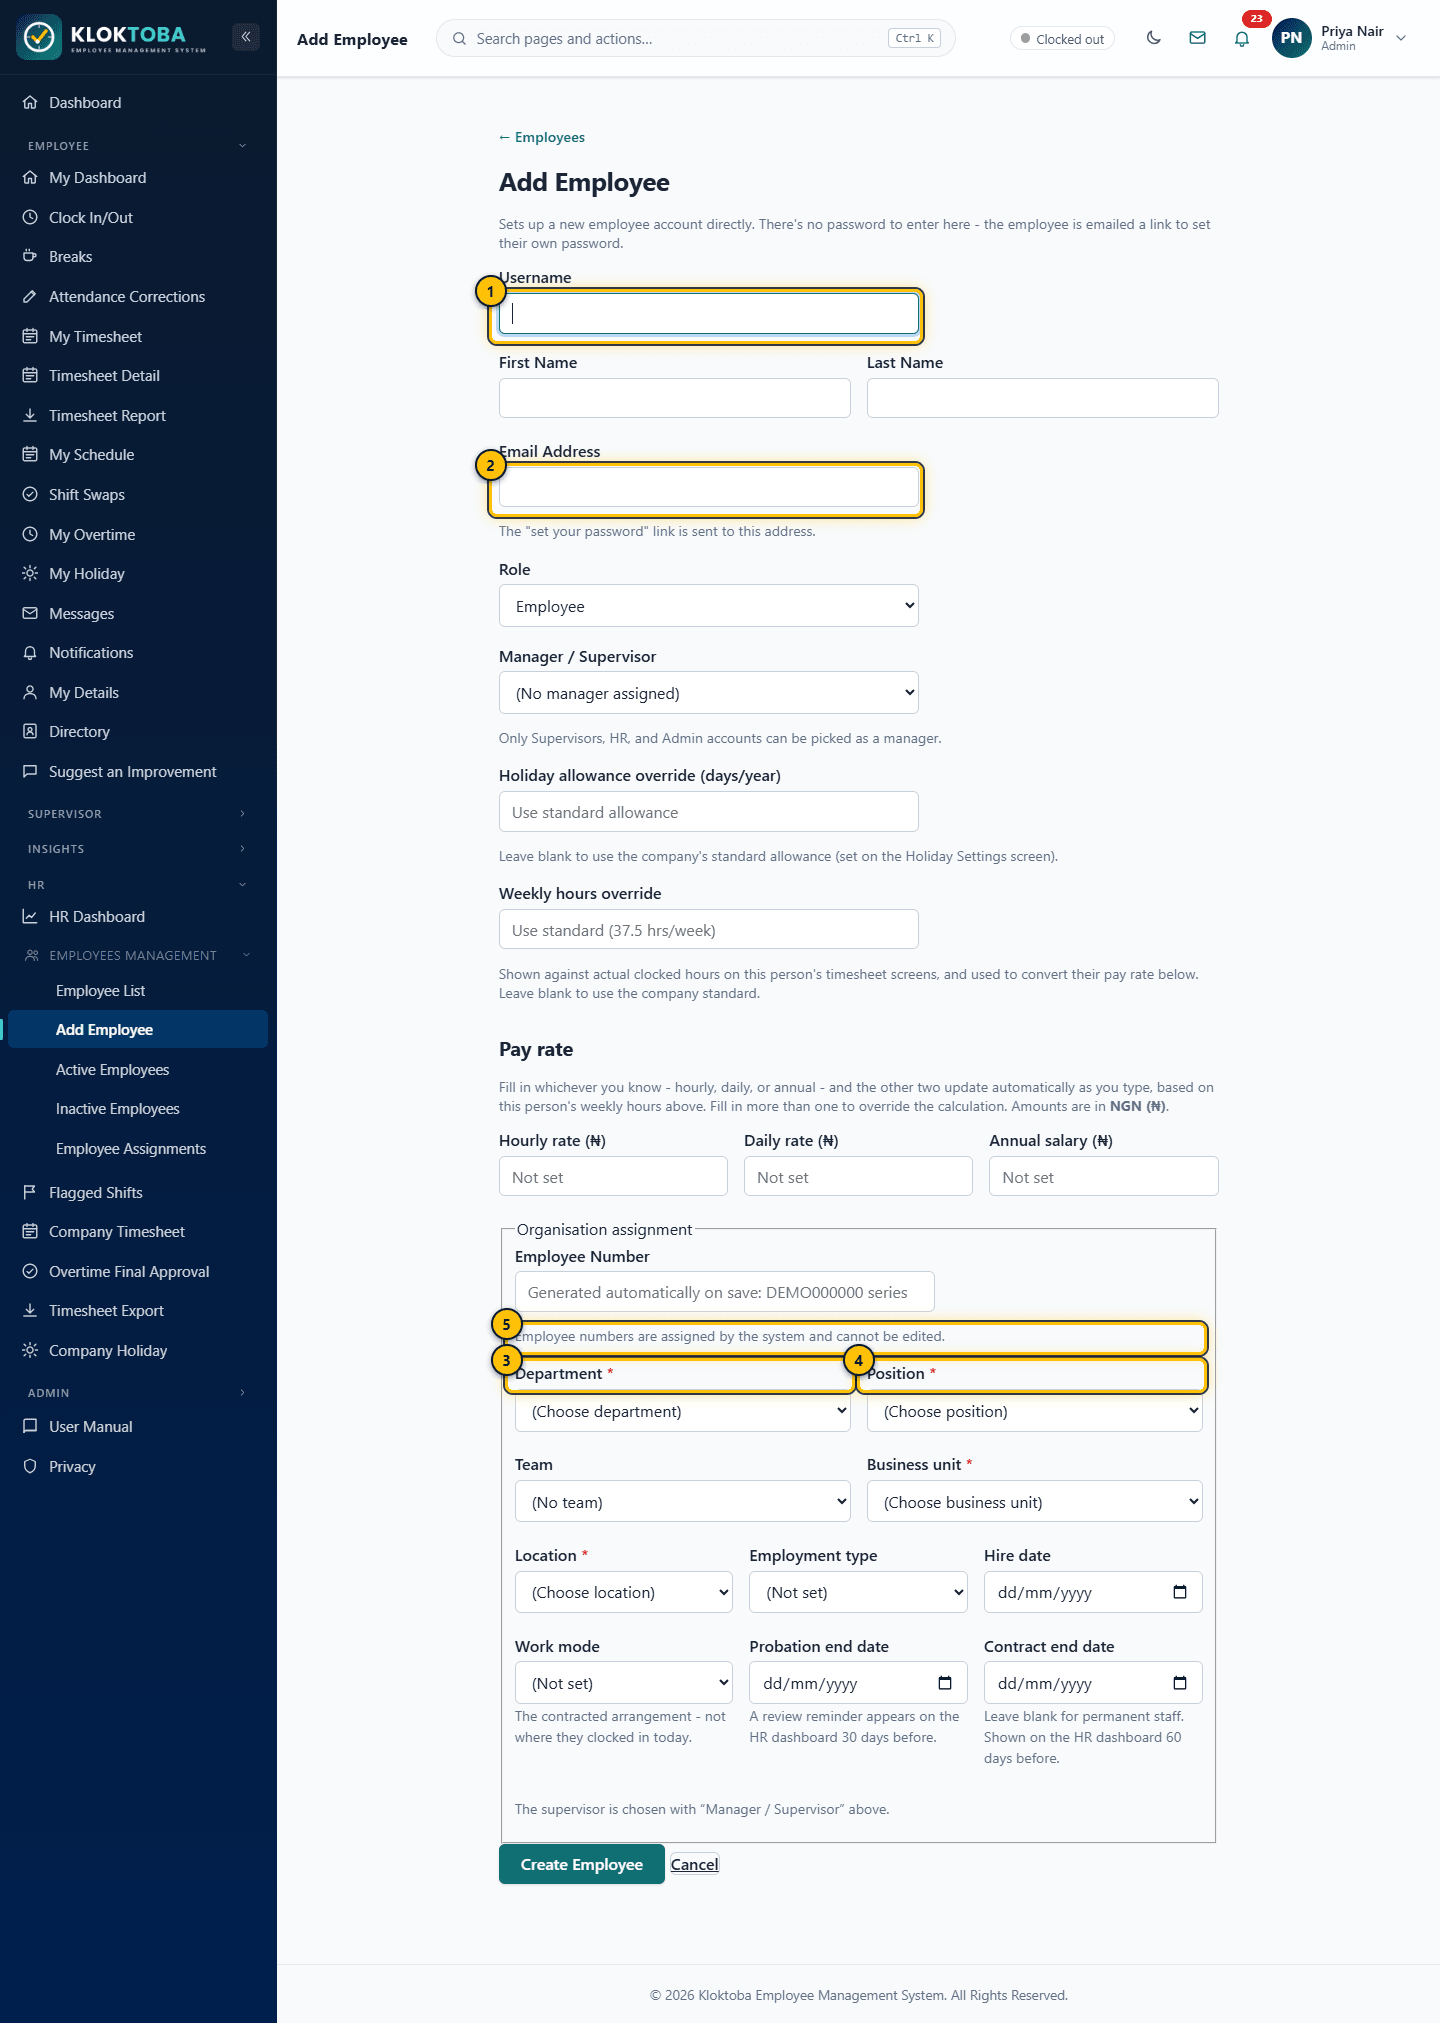
SS-039 – Add Employee. Viewed as: Admin. - Username
- Email address (receives the set-password link)
- Department (required)
- Position (required)
- Employee number (assigned by the system)
- Enter Username, First Name, Last Name and Email Address. The email receives a link so the employee can choose their own password; there is no password field.
- Choose Role and Manager / Supervisor. Only Supervisor, HR and Admin accounts can be managers.
- Optionally set a holiday allowance override, weekly hours override and a pay rate. Enter just one of hourly, daily or annual and the other two are calculated.
- In Organisation assignment choose Department, Position, Business unit and Location (all required), and optionally Team, employment type, hire date, work mode, probation end and contract end dates.
- Select Create Employee.
Expected result
The account is active at once and an employee number such as DEMO000033 is generated automatically. The employee is emailed a set-your-password link.
Common errors
| Error or mistake | What to do |
|---|---|
| Username already exists | Usernames are unique; pick another. |
| Required field is empty | Department, Position, Business unit and Location are mandatory. |
Troubleshooting
| Problem | Solution |
|---|---|
| The set-password email failed to send | The account is still created. Use Send password reset link on the Employee List to resend. |
Frequently asked questions
- Can I edit the employee number?
- No. It is assigned by the system.
- Which organisation does the employee join?
- Yours. Only SuperAdmin sees an organisation selector.
3.3 Employee profile and My Details
Step-by-step instructions
- Open Employee > My Details.
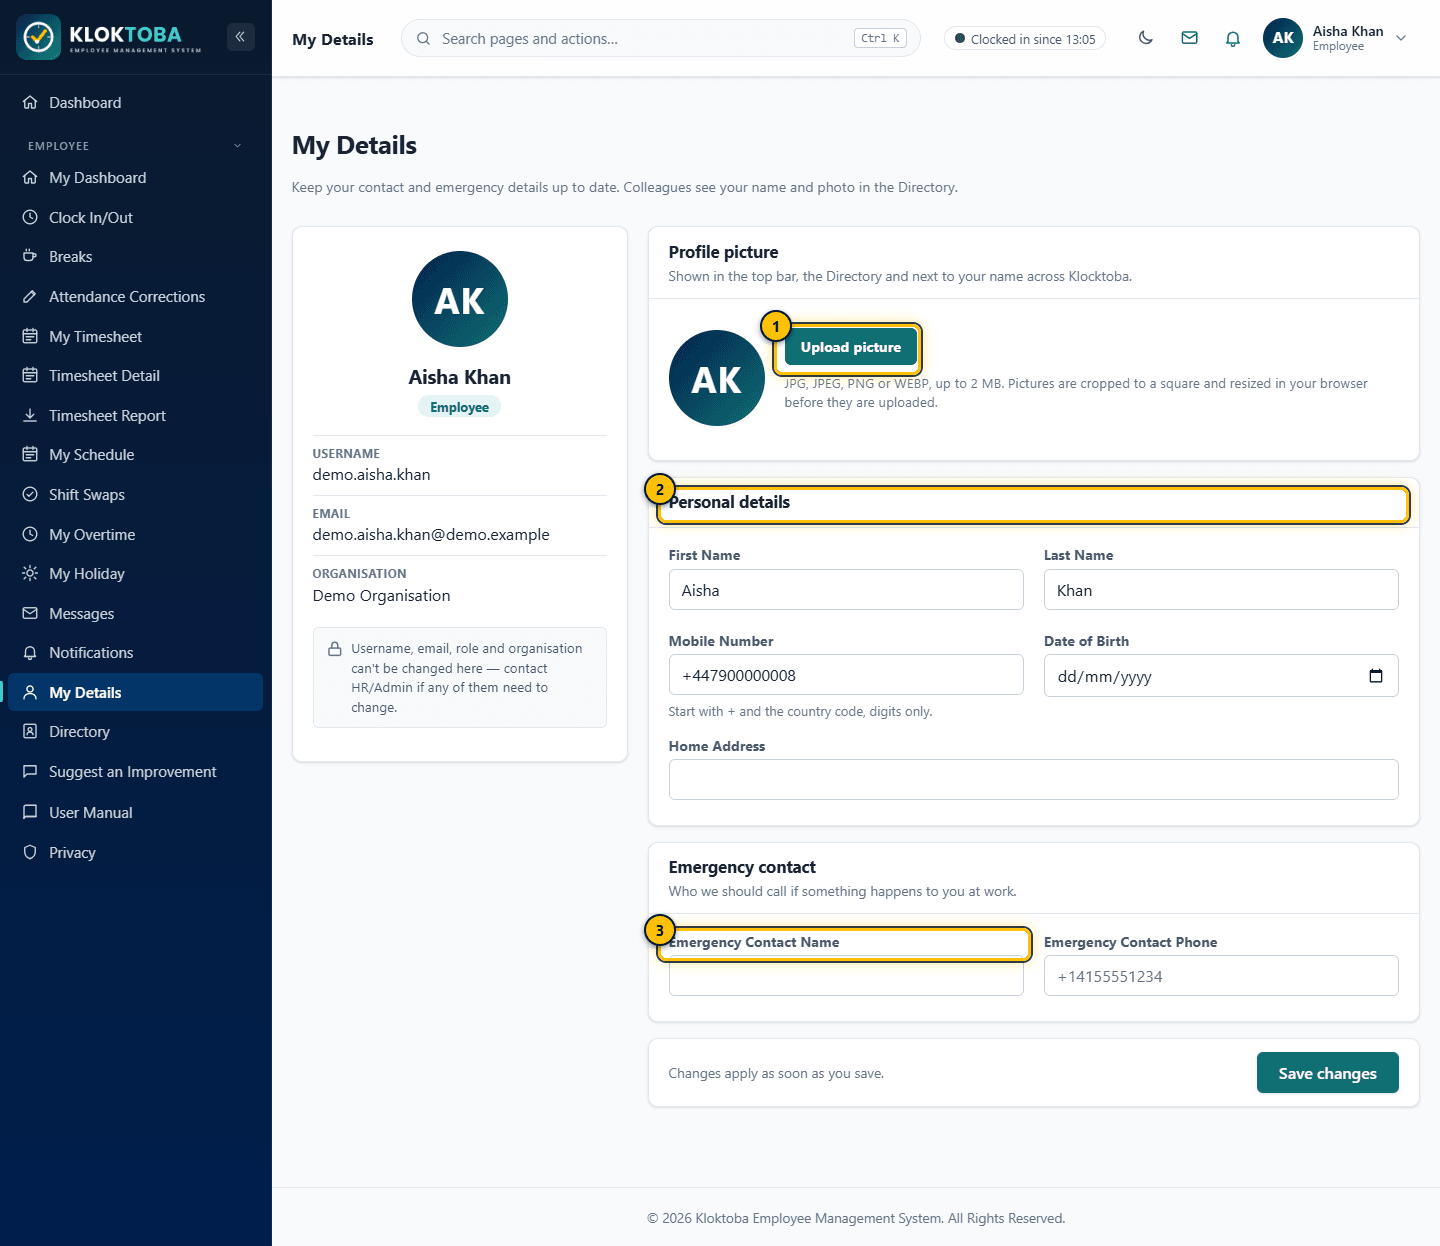
SS-043 – My Details. Viewed as: Employee. - Profile picture
- Personal details
- Emergency contact
- Upload a Profile picture (JPG, PNG or WEBP, up to 2 MB). It is cropped square and resized in your browser.
- Update First Name, Last Name, Mobile Number (start with + and the country code), Date of Birth and Home Address.
- Complete Emergency contact name and phone, then save.
Expected result
Your changes are saved. Colleagues see your name and photo in the Directory.
Common errors
| Error or mistake | What to do |
|---|---|
| Mobile number rejected | It must start with + followed by digits only, for example +447700900123. |
| Picture rejected | Check the file type and that it is under 2 MB. |
Troubleshooting
| Problem | Solution |
|---|---|
| I need to change my username, email, role or organisation | These are read-only. Ask HR or Admin. |
Frequently asked questions
- Who can see my emergency contact?
- Only HR and Admin through your employee record.
3.4 Directory and searching for people
Step-by-step instructions
- Open Employee > Directory.
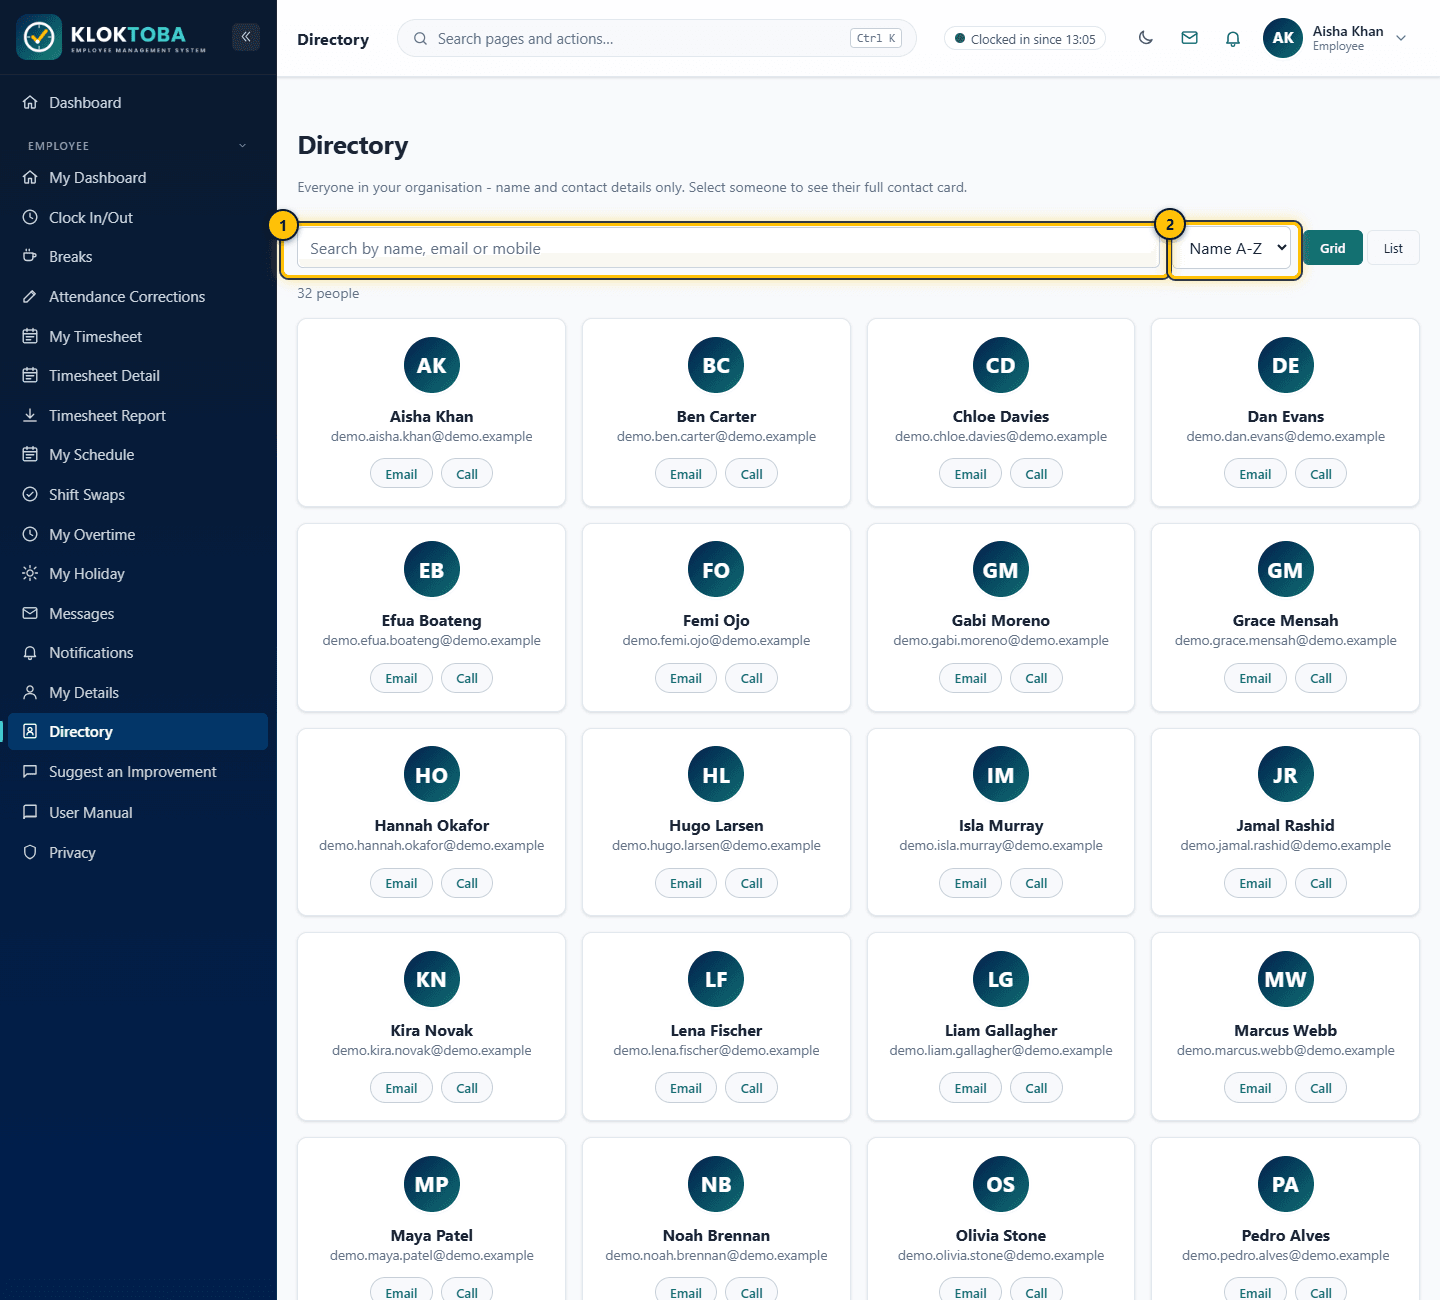
SS-042 – Directory. Viewed as: Employee. - Search people
- Sort order
- Type in Search people, change the sort order and switch between Grid and List.
- Select a person to open their contact card, or use Email or Call.
Expected result
You see everyone in your organisation (SuperAdmin sees all organisations).
Common errors
| Error or mistake | What to do |
|---|---|
| A colleague is missing | They may be inactive or in another organisation. |
Troubleshooting
| Problem | Solution |
|---|---|
| Photo shows initials | The person has not uploaded a picture. |
Frequently asked questions
- Does the Directory show roles or pay?
- No. Only name and contact details.
3.5 Employee numbers and employment information
Each employee receives a unique employee number when their record is created. The number is built from the organisation prefix (2 to 6 letters or numbers, set under Organisation Profile) and a running sequence, for example DEMO000012. Numbers cannot be edited. Changing the prefix later does not renumber anyone; new employees simply start a new series.
Employment information held on the record includes employment type (Full-time, Part-time, Contract, Temporary, Intern, Volunteer), hire date, work mode, probation end date and contract end date. Probation and contract end dates feed reminders on the HR dashboard: a review reminder 30 days before probation ends and a warning 60 days before a contract ends.
3.6 Assigning department, position, team and location
Step-by-step instructions
- Open Employees Management > Employee Assignments.
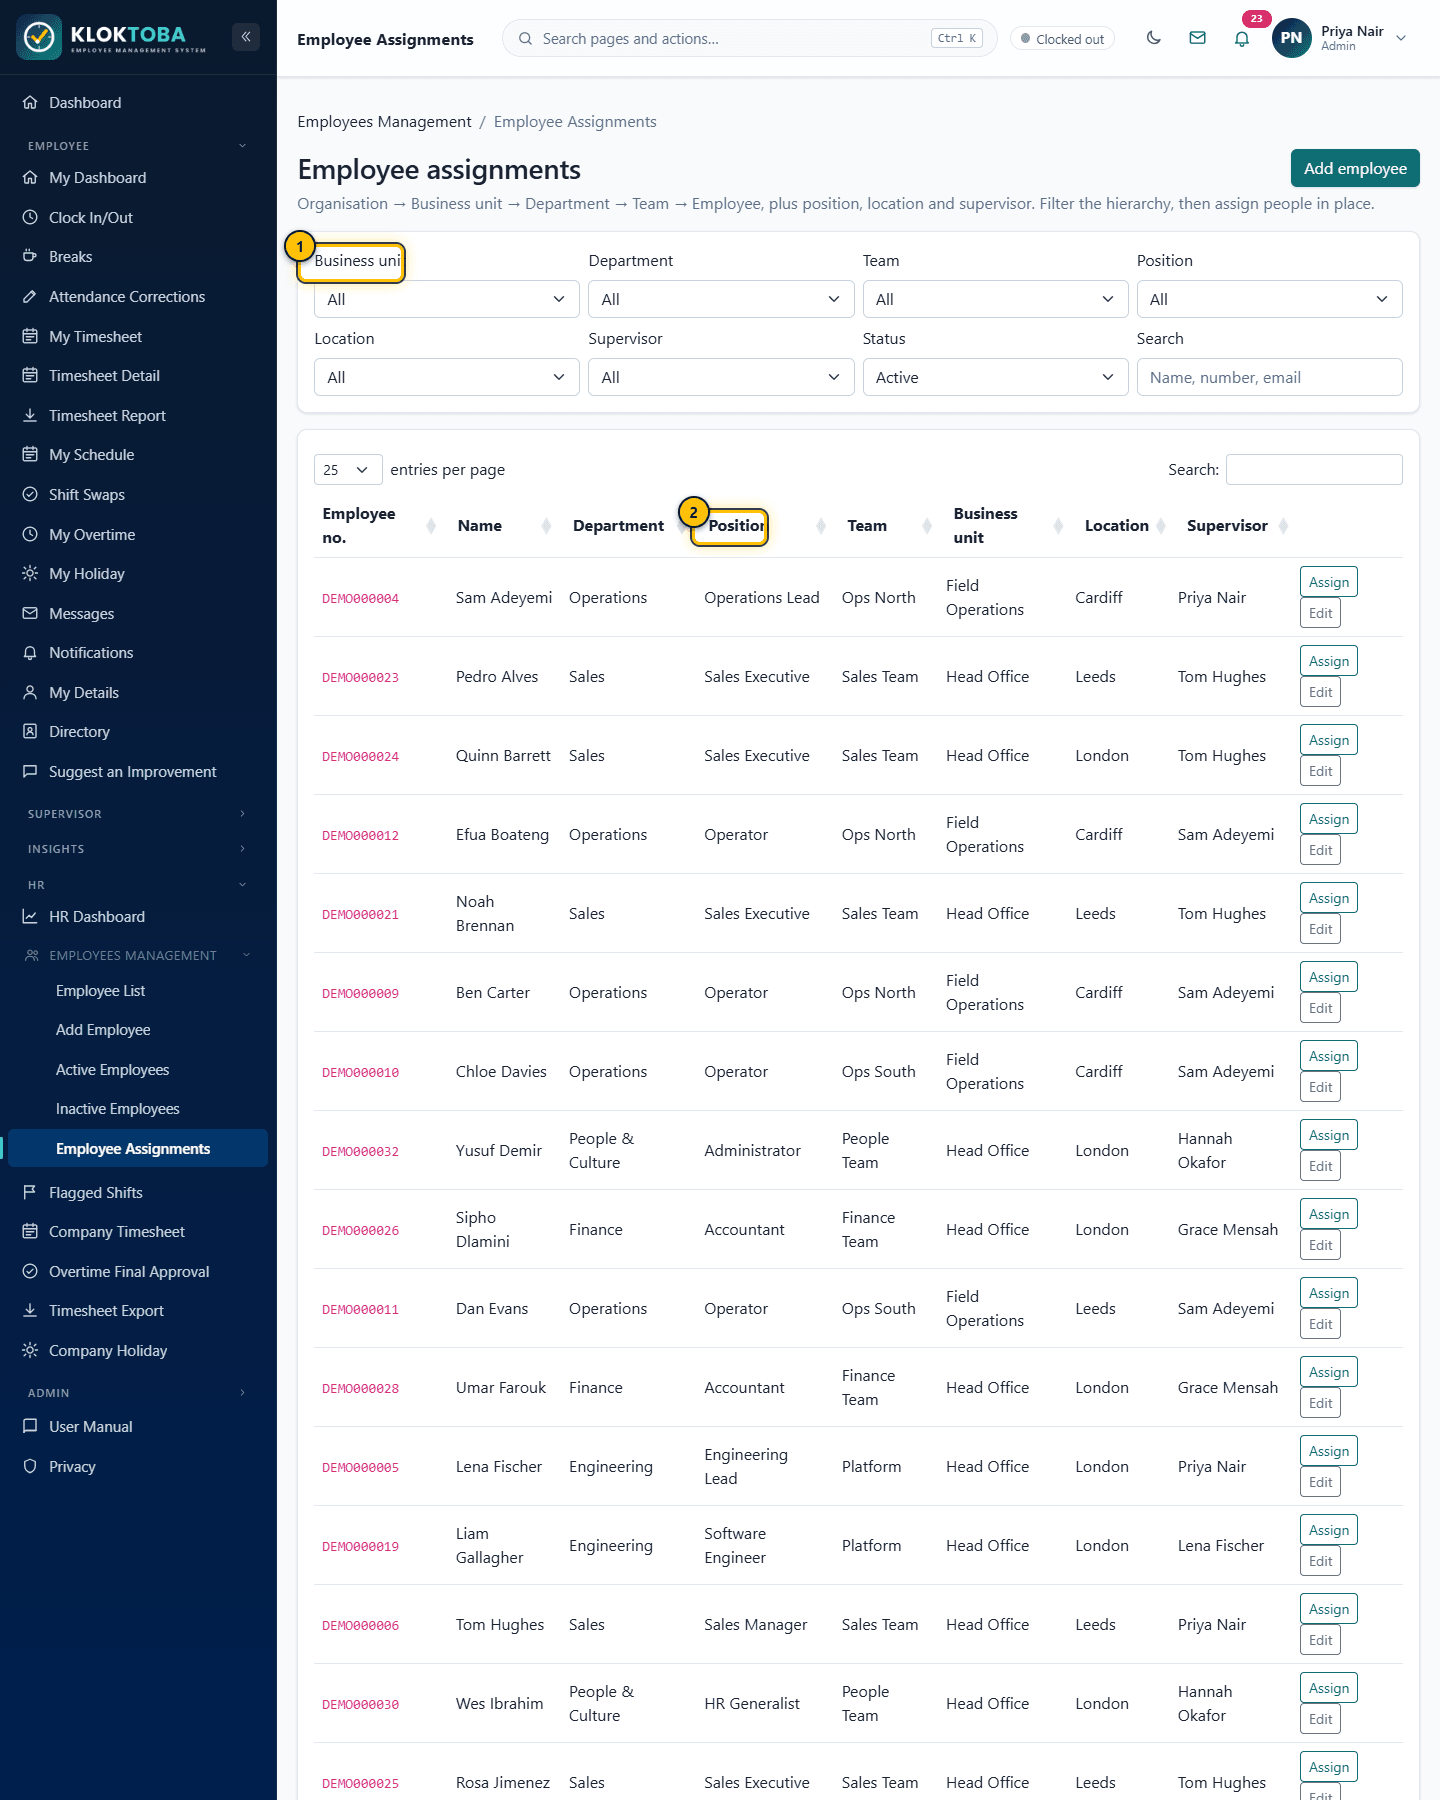
SS-041 – Employee assignments. Viewed as: Admin. - Filter the hierarchy
- Position filter
- Filter by Business unit, Department, Team and Position to narrow the list.
- Assign people in place by choosing their department, position, team, location and supervisor, then save.
Expected result
Reports, rotas and overtime allowances immediately use the new assignment.
Common errors
| Error or mistake | What to do |
|---|---|
| A position is not offered | Positions belong to a department. Pick the department first. |
Troubleshooting
| Problem | Solution |
|---|---|
| Assignment will not save | Check that required fields (department, position, business unit, location) are set. |
Frequently asked questions
- Where do I create departments or positions?
- Under Admin > Organisation. See Chapter 9.
Chapter 4
Clock In and Clock Out
Recording when you start and finish work, with location captured at each event.
4.1 Attendance overview
Clocking is the foundation of your timesheet. Each clock event records the server time (so device clocks cannot be altered), your device location converted to a readable address, your IP address and your device and browser details. Kloktoba reads your location only at the moment you clock in, clock out, or start or end lunch. It does not track you at any other time. See the Privacy page for details.
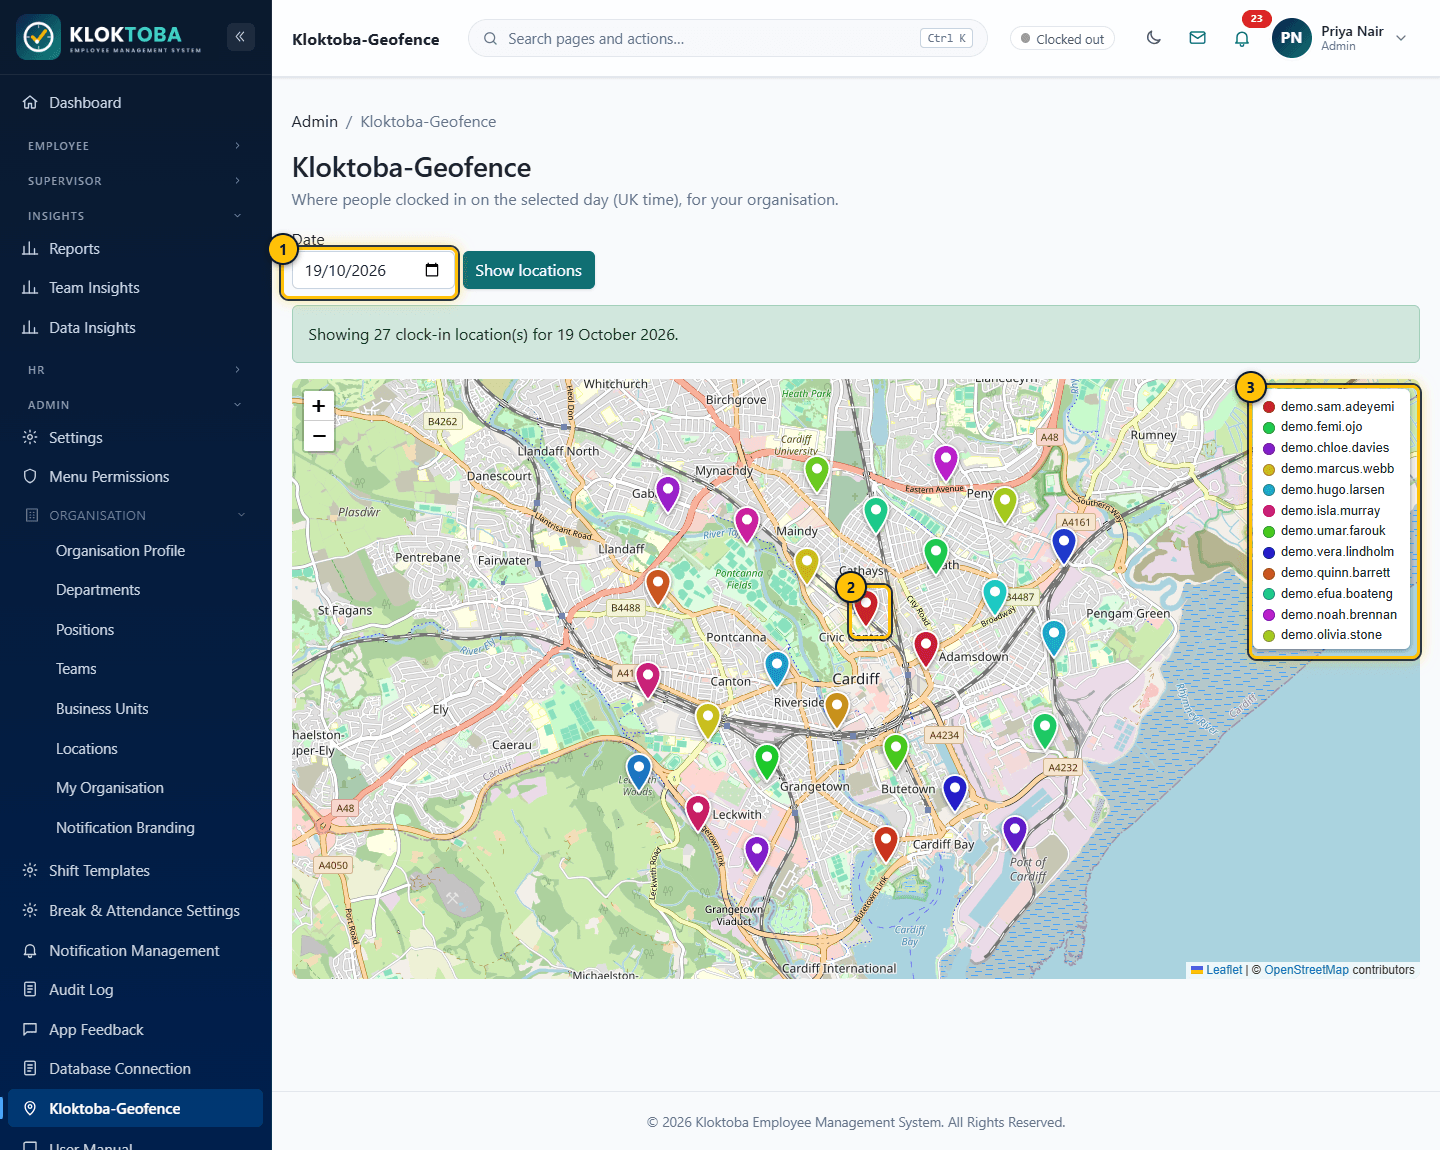
- Choose the day
- A pin for each clock-in, coloured per employee
- Legend: which colour is which employee
4.2 Clocking in and clocking out
Step-by-step instructions
- Open Clock In/Out in the sidebar, or use the widget at the top of your Dashboard. When you are clocked out only Clock In is enabled. The GPS ready chip shows location is available.
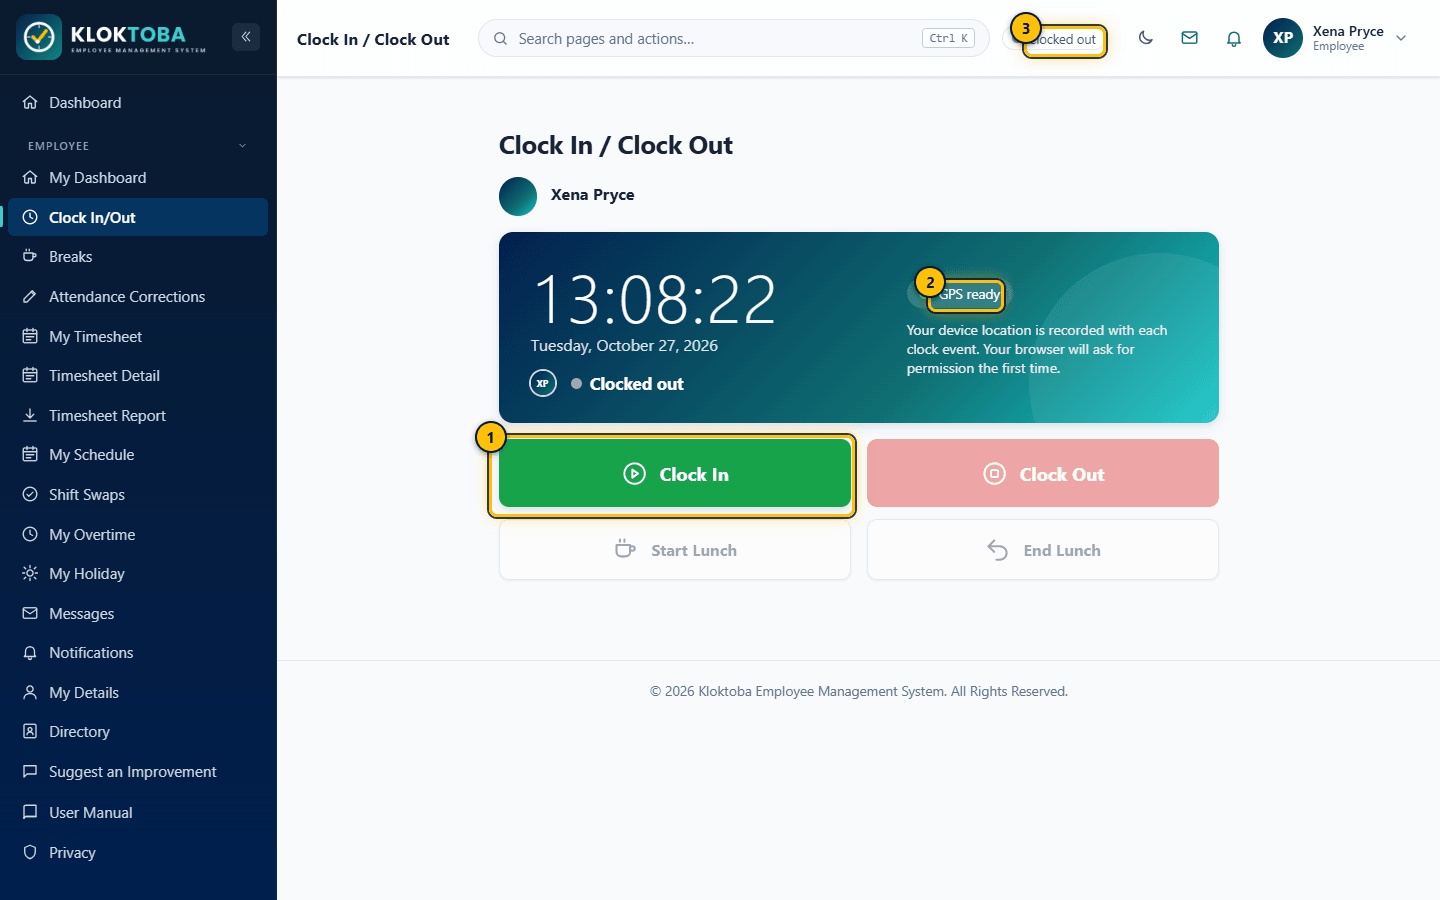
SS-008 – Clock In screen (before clocking in). Viewed as: Employee2. - Clock In (the only active button)
- GPS status - your browser asks for location permission the first time
- Current status
- Select Clock In. The first time, your browser asks to allow location. Choose Allow.
- Kloktoba records the event automatically. A green banner confirms the time and the top bar shows Clocked in since the time.
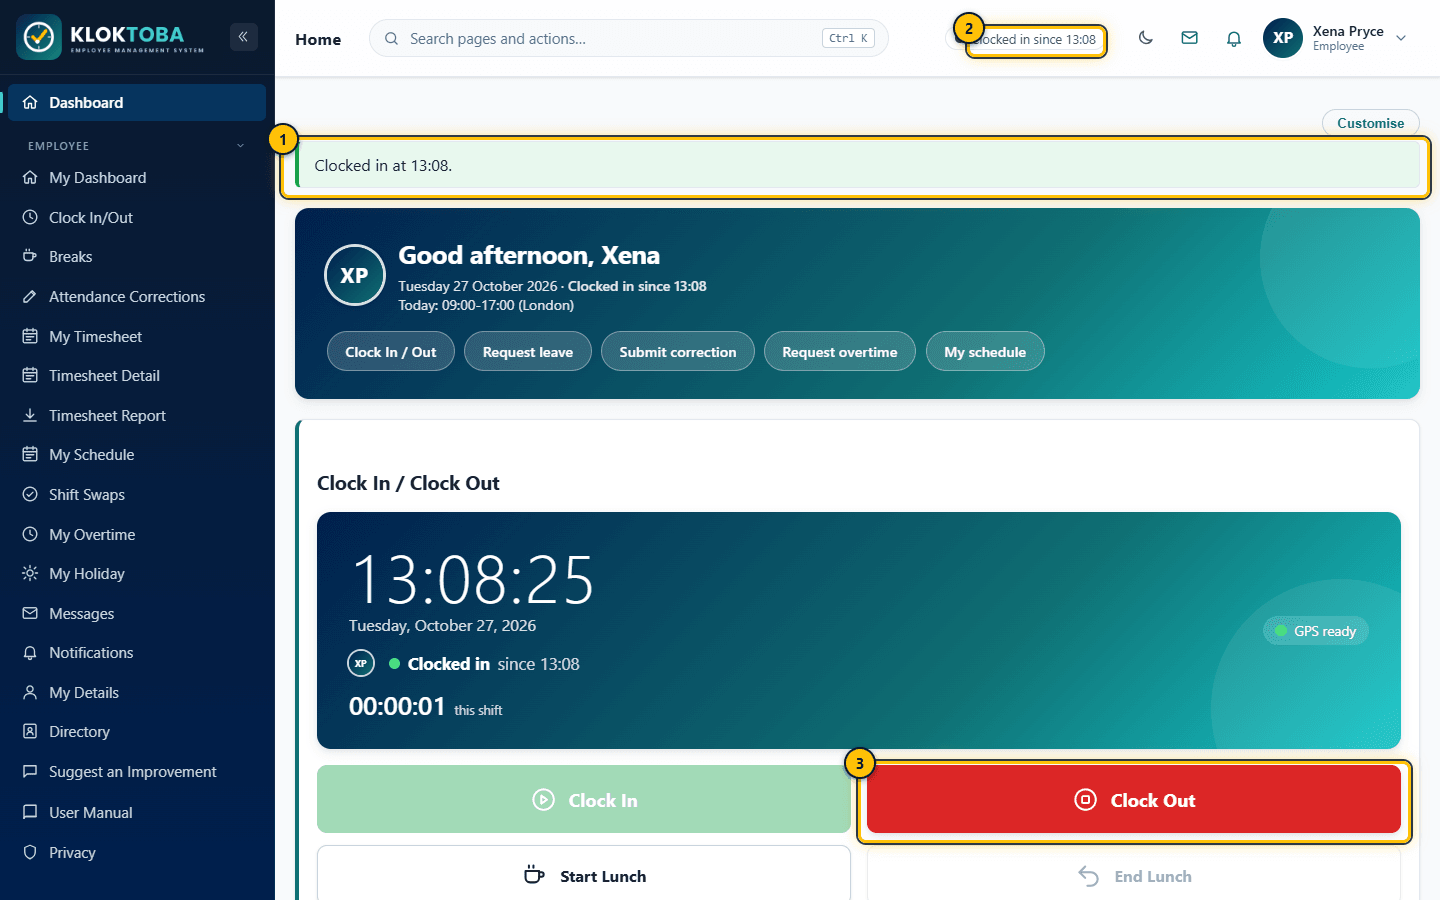
SS-009 – After clocking in - confirmation banner. Viewed as: Employee2. - Confirmation banner with the recorded time
- Status chip in the top bar
- Clock Out is now the available action
- At the end of your shift open the same page. Clock Out is now enabled. A running timer shows your time on shift.
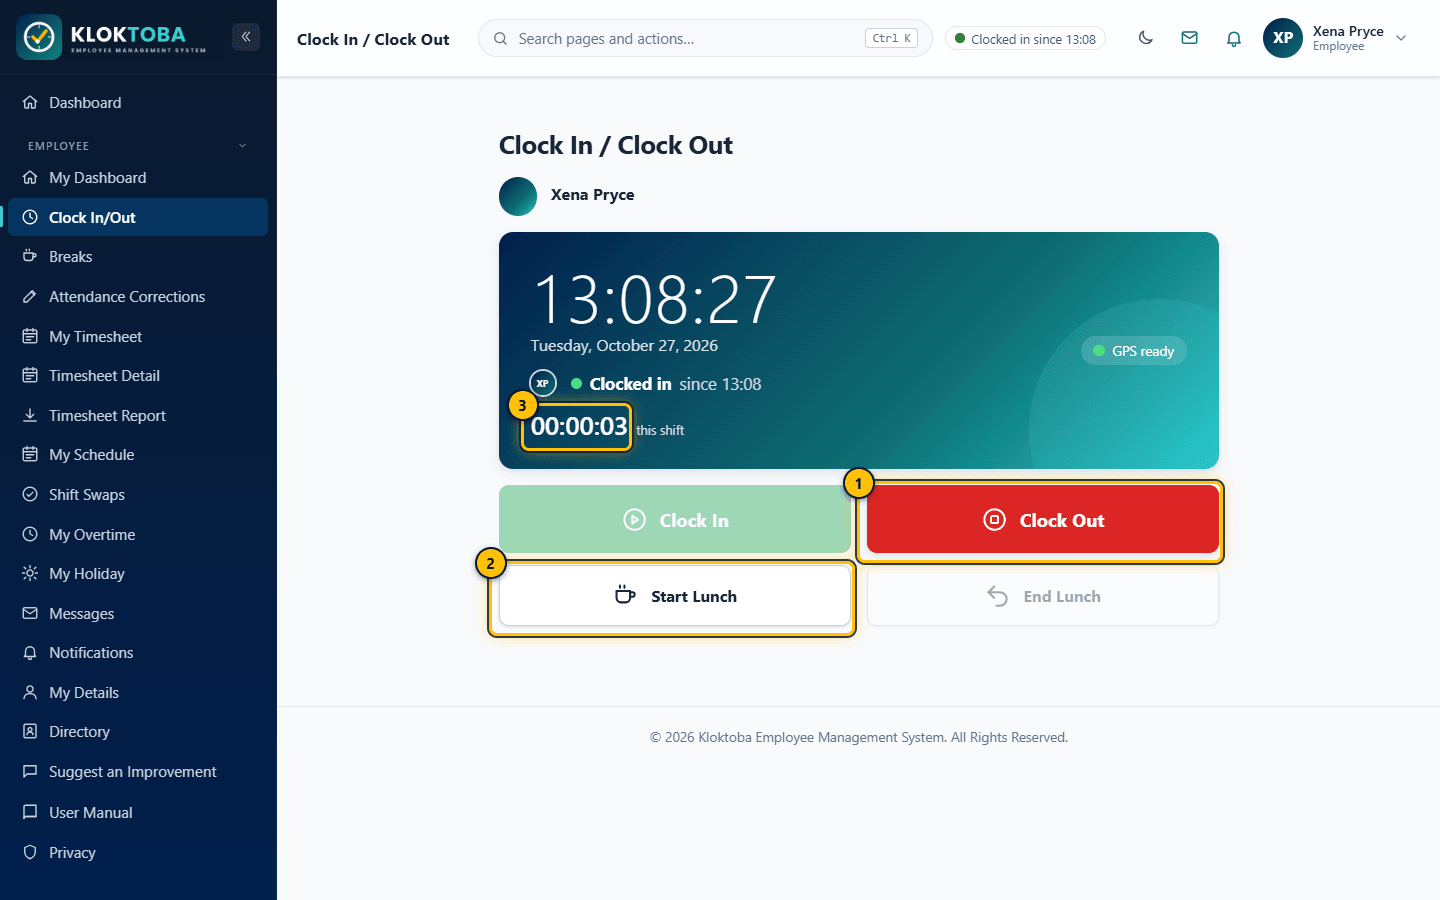
SS-010 – Clock Out screen (while clocked in). Viewed as: Employee2. - Clock Out
- Start Lunch
- Elapsed time this shift
- Select Clock Out. A banner shows the clock-out time and your shift length.
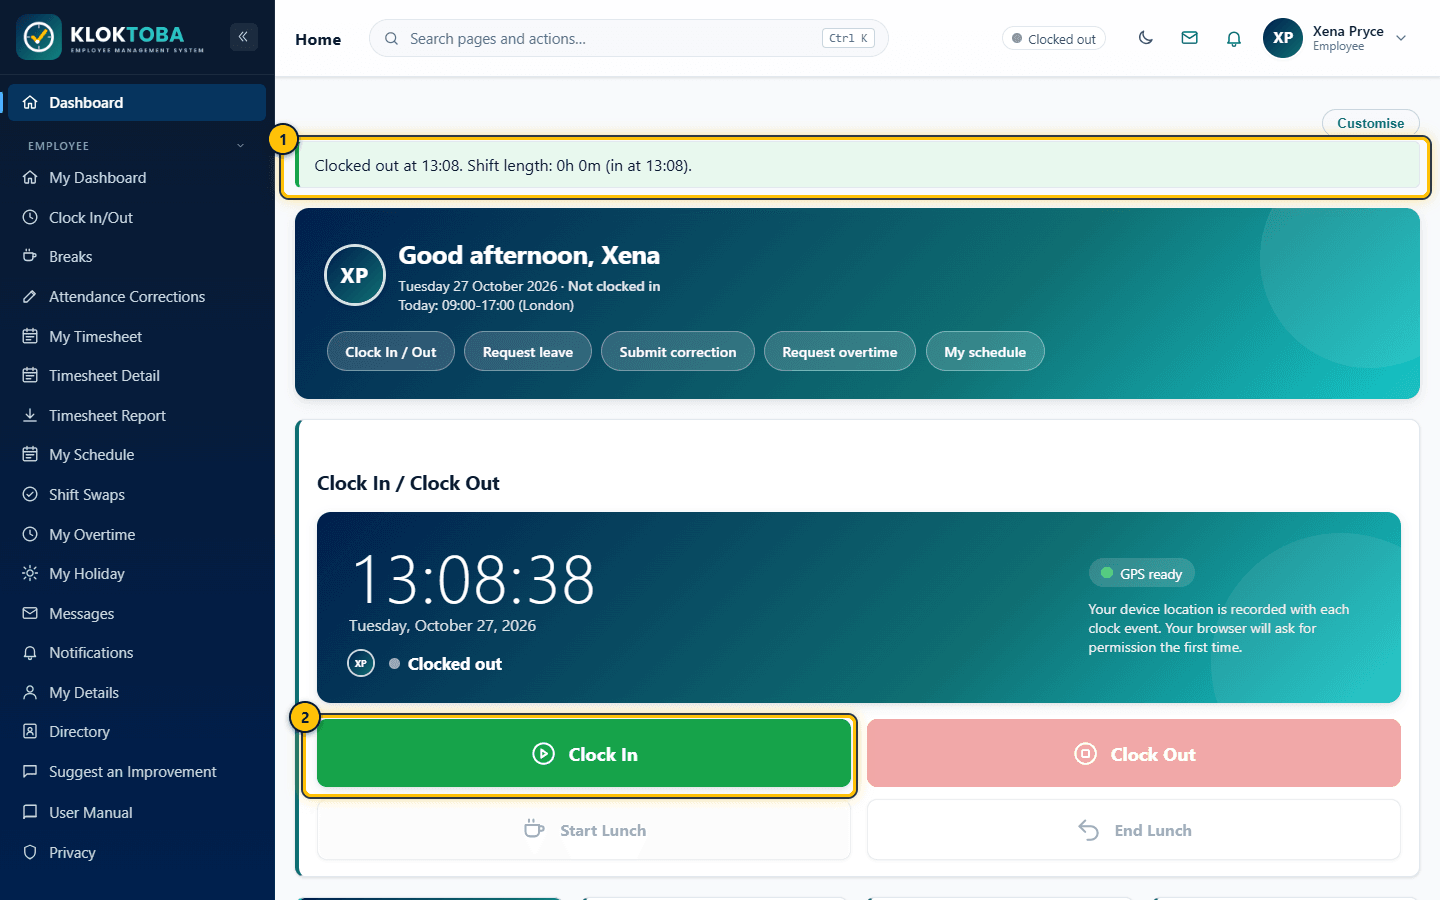
SS-014 – After clocking out - confirmation banner. Viewed as: Employee2. - Confirmation banner with the shift length
- Clock In available again
Expected result
The shift appears on My Timesheet and in team and company reports with the clock times and addresses.
Common errors
| Error or mistake | What to do |
|---|---|
| "Permission to access location was denied." | Allow Location for the Kloktoba site in your browser settings, reload and try again. |
| "You're already clocked in. Please clock out first." | You have an open clock-in, possibly on another device. Clock out of that shift first. |
| All buttons are disabled with a message that clocking is turned off | HR or Admin has switched off clocking for your account. Contact them. |
Troubleshooting
| Problem | Solution |
|---|---|
| GPS chip stays on "Checking location" | Turn on device location services and allow your browser to use them, then reload. |
| I forgot to clock out | At the end of the day the system closes the shift at 23:59 and flags it (see Chapter 5). Ask HR to correct it, or submit an attendance correction. |
Frequently asked questions
- Can I clock in twice in a row?
- No. Clock in and out must alternate. The buttons enable and disable accordingly and the server also checks.
- Is my location tracked all day?
- No. It is read only at clock in, clock out and lunch start or end.
4.3 Taking lunch from the clock widget
Step-by-step instructions
- While clocked in, select Start Lunch on the clock widget when you leave.
- Select End Lunch when you return. Both capture your location like Clock In and Out.
Expected result
Lunch time is subtracted from your shift total on My Timesheet.
Common errors
| Error or mistake | What to do |
|---|---|
| Start Lunch is disabled | You must be clocked in and not already on lunch. |
Troubleshooting
| Problem | Solution |
|---|---|
| I forgot End Lunch | Submit an attendance correction so HR can fix the record. |
Frequently asked questions
- Is lunch the same as a break?
- Lunch uses the clock widget. Paid and unpaid breaks use the Breaks page (Chapter 6).
4.4 Manual attendance: requesting a correction
Step-by-step instructions
- Open Employee > Attendance Corrections. Use the status filter to find earlier requests, then select New correction request.
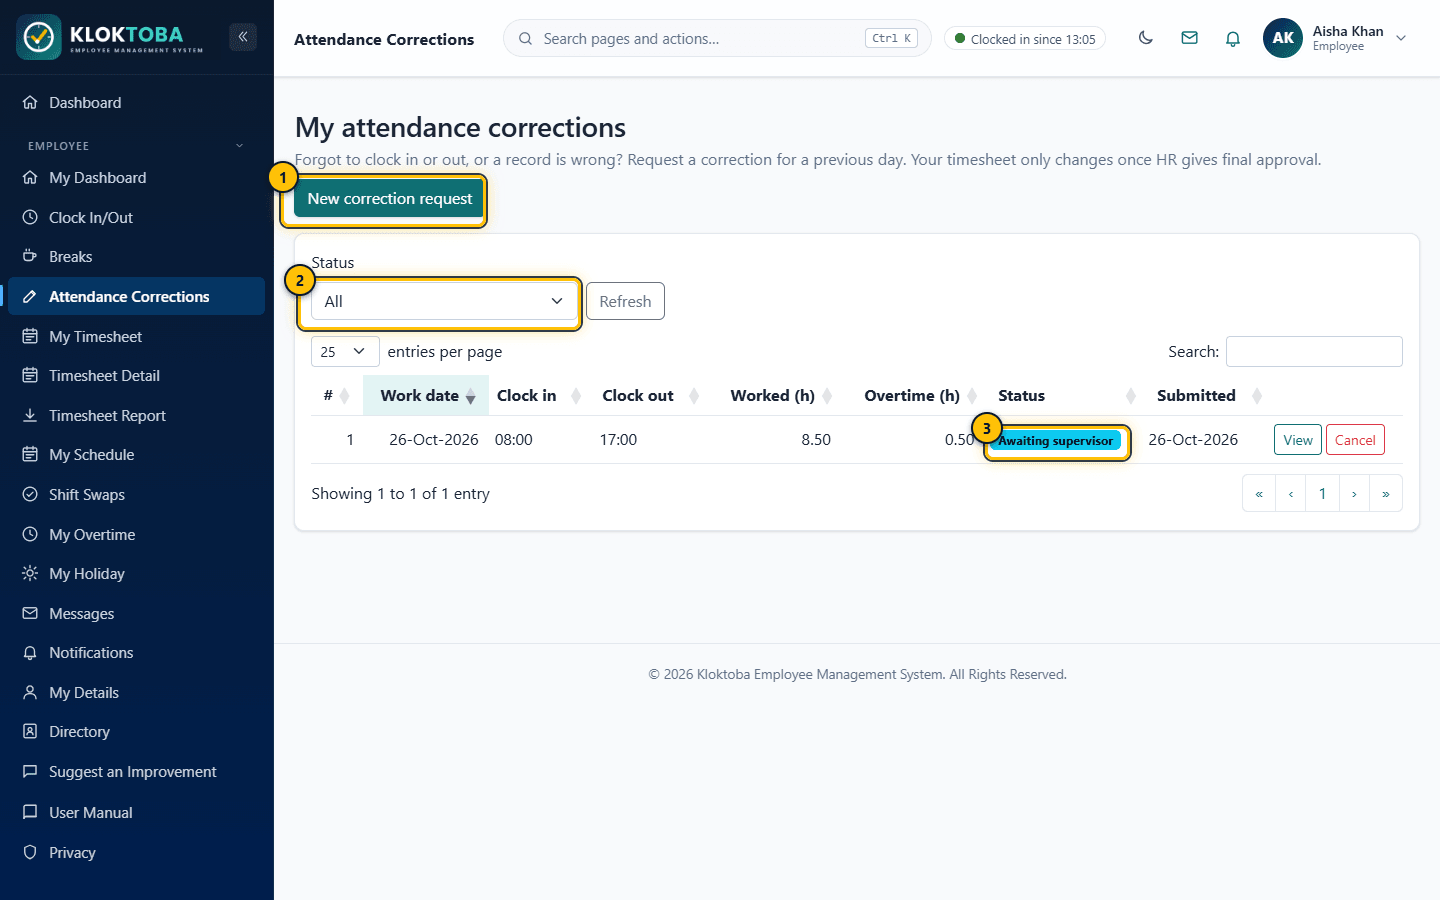
SS-017 – My attendance corrections. Viewed as: Employee. - New correction request
- Filter by status
- Request status
- Choose the Work date, then enter the Clock-in time and Clock-out time. Tick the next-day box if the shift ran past midnight.
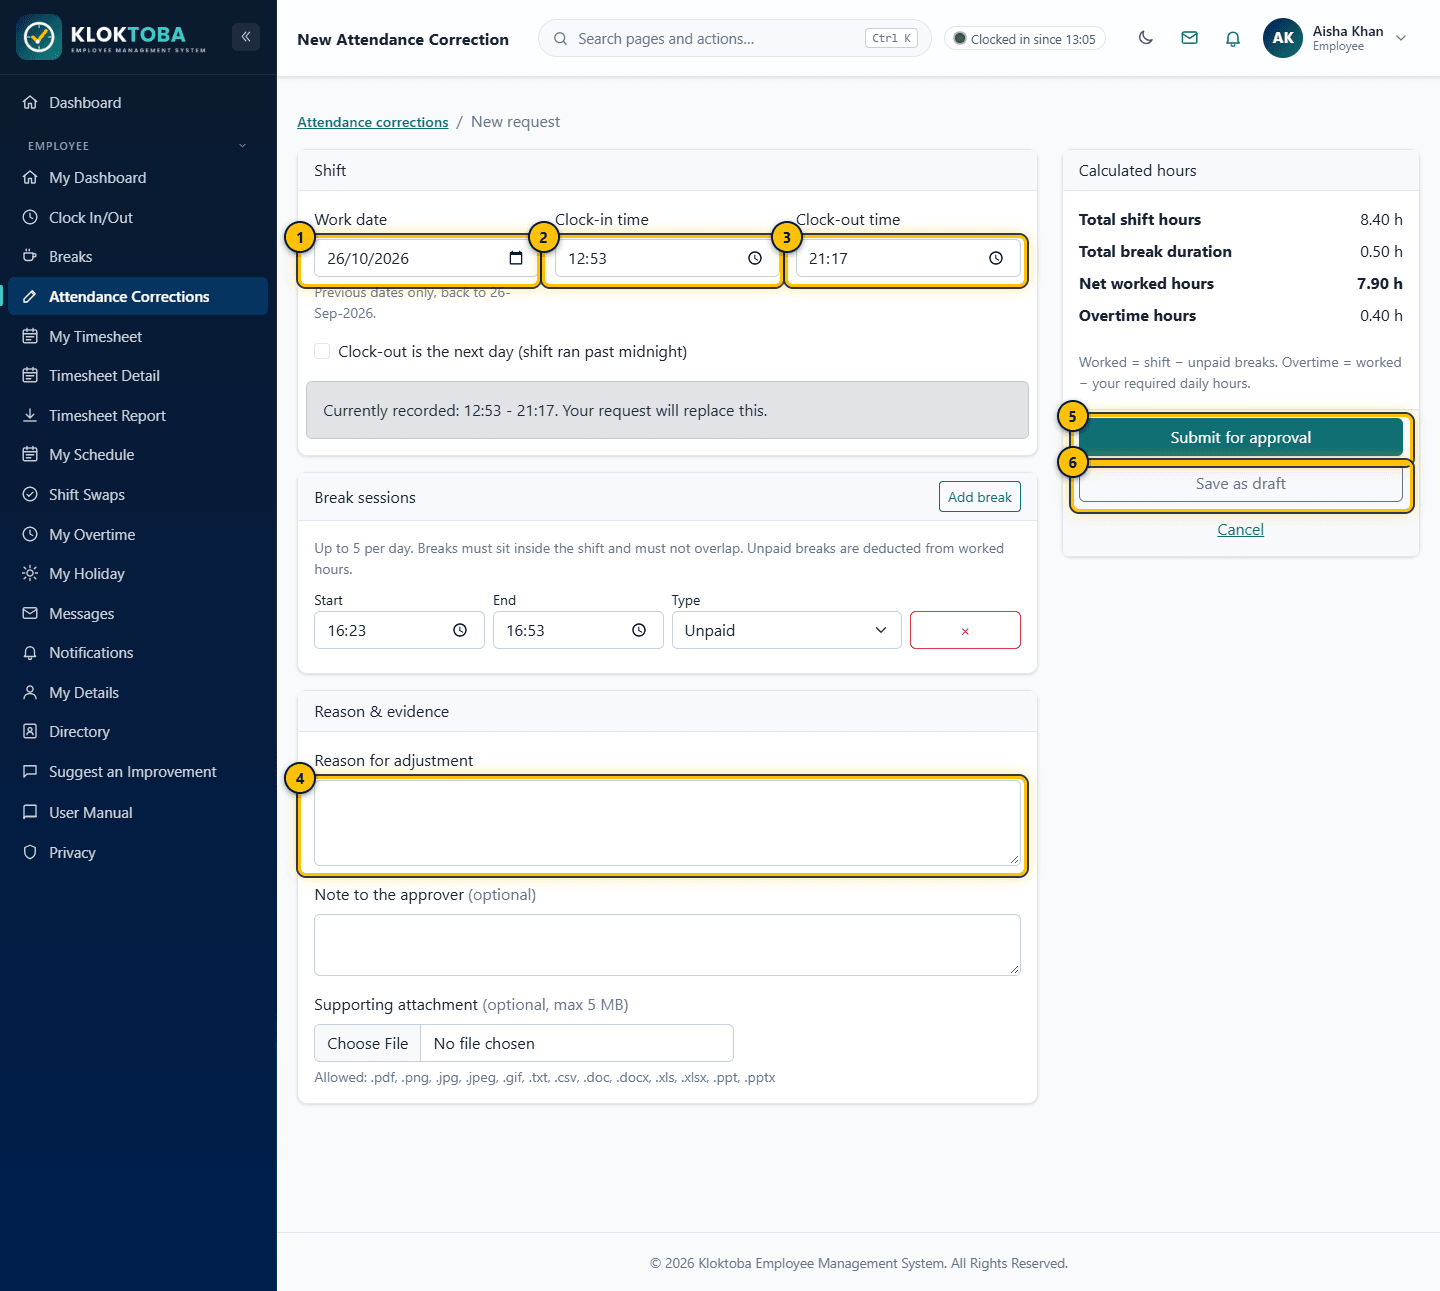
SS-018 – Attendance correction form. Viewed as: Employee. - Work date
- Clock-in time
- Clock-out time
- Reason (required)
- Submit for approval
- Save as draft
- Add any break periods with Add break, explain the Reason for adjustment (required) and optionally add a note to the approver and a supporting attachment (up to 5 MB).
- Select Submit for approval, or Save as draft to finish later.
Expected result
The request is shown as Awaiting supervisor. Your timesheet only changes once HR gives final approval.
Common errors
| Error or mistake | What to do |
|---|---|
| Date not accepted | Corrections can only go back as far as the limit set under Break & Attendance Settings (0 means unlimited). |
| More than one shift that day | Choose which shift you are correcting from the list shown. |
Troubleshooting
| Problem | Solution |
|---|---|
| The request was returned | Your supervisor asked a question. Open it, reply in the note and resubmit. |
Frequently asked questions
- Can I withdraw a request?
- Yes. Use Cancel while it is still a draft, awaiting supervisor, returned or awaiting HR.
- Who approves?
- Your supervisor first, then HR or Admin for final approval.
Chapter 5
Attendance Management
How hours, overtime and exceptions are calculated and where to see them.
5.1 Attendance status
Each employee's day is classified for reports and dashboards:
| Status | Meaning |
|---|---|
| Present | Clocked in and out within the expected working day. |
| Late | Clocked in after the standard start time plus the late-arrival grace period. |
| Incomplete | A clock-in without a matching clock-out. |
| Absent | No attendance on a working day and not on approved leave. |
| OnLeave | Approved holiday covers the day. |
| NonWorkingDay | Weekend or a day off. |
5.2 My Timesheet and hours worked
Step-by-step instructions
- Open Employee > My Timesheet. Use Previous week and Next week to move between weeks.
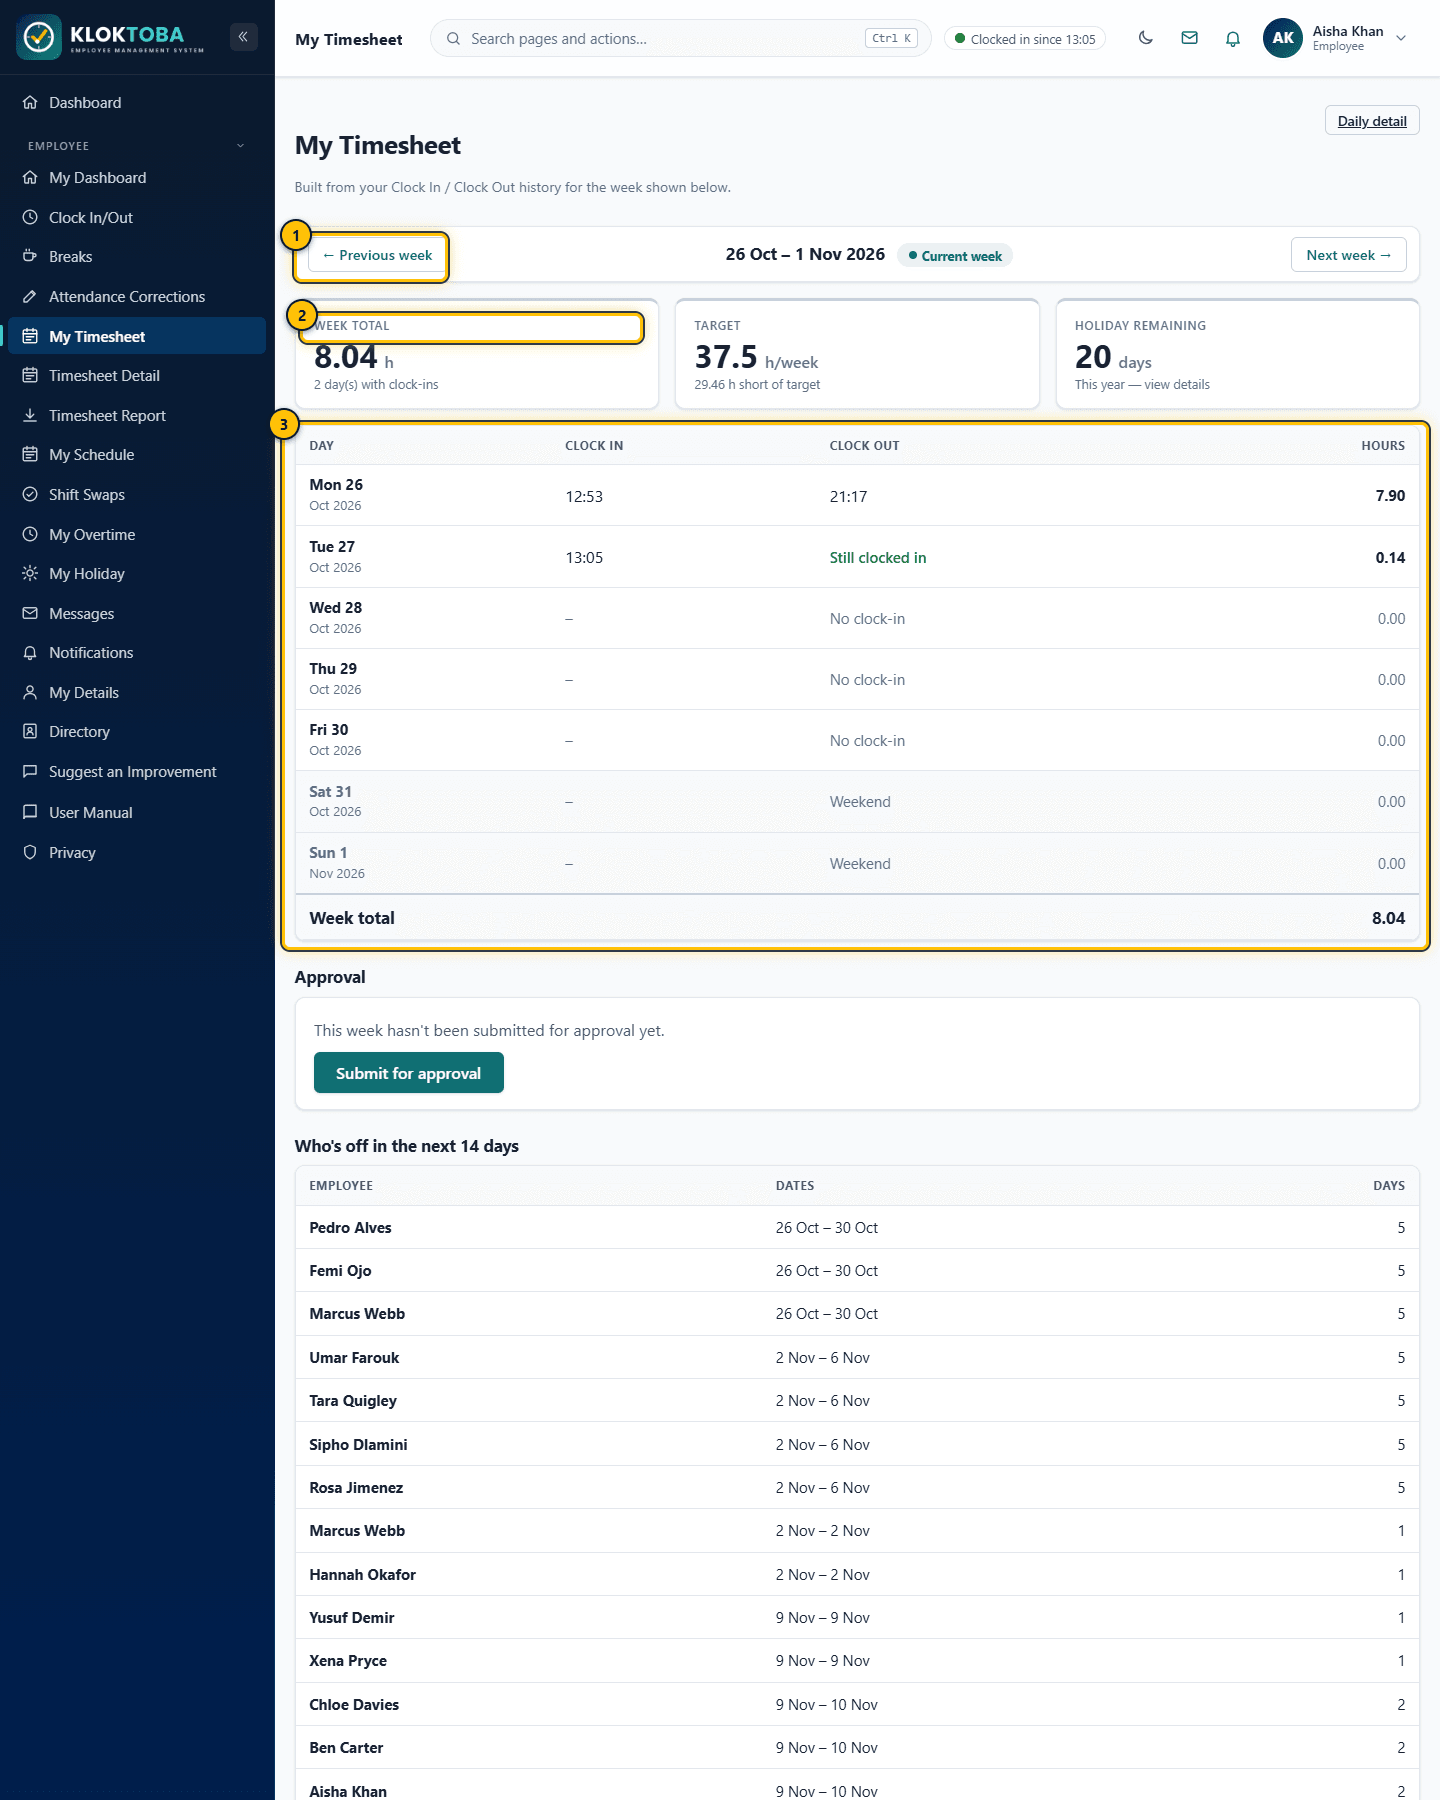
SS-015 – Attendance history - My Timesheet. Viewed as: Employee. - Move between weeks
- Week total against target
- Daily clock-in, clock-out and hours
- Review Clock in, Clock out and Hours for each day, the Week total, your Target and how far over or short you are.
- When happy, select Submit for approval at the bottom. If it is rejected, Re-submit for approval appears.
- Open Timesheet Detail for clock times, break sessions and calculated hours day by day. Use Request a correction from here for any day.
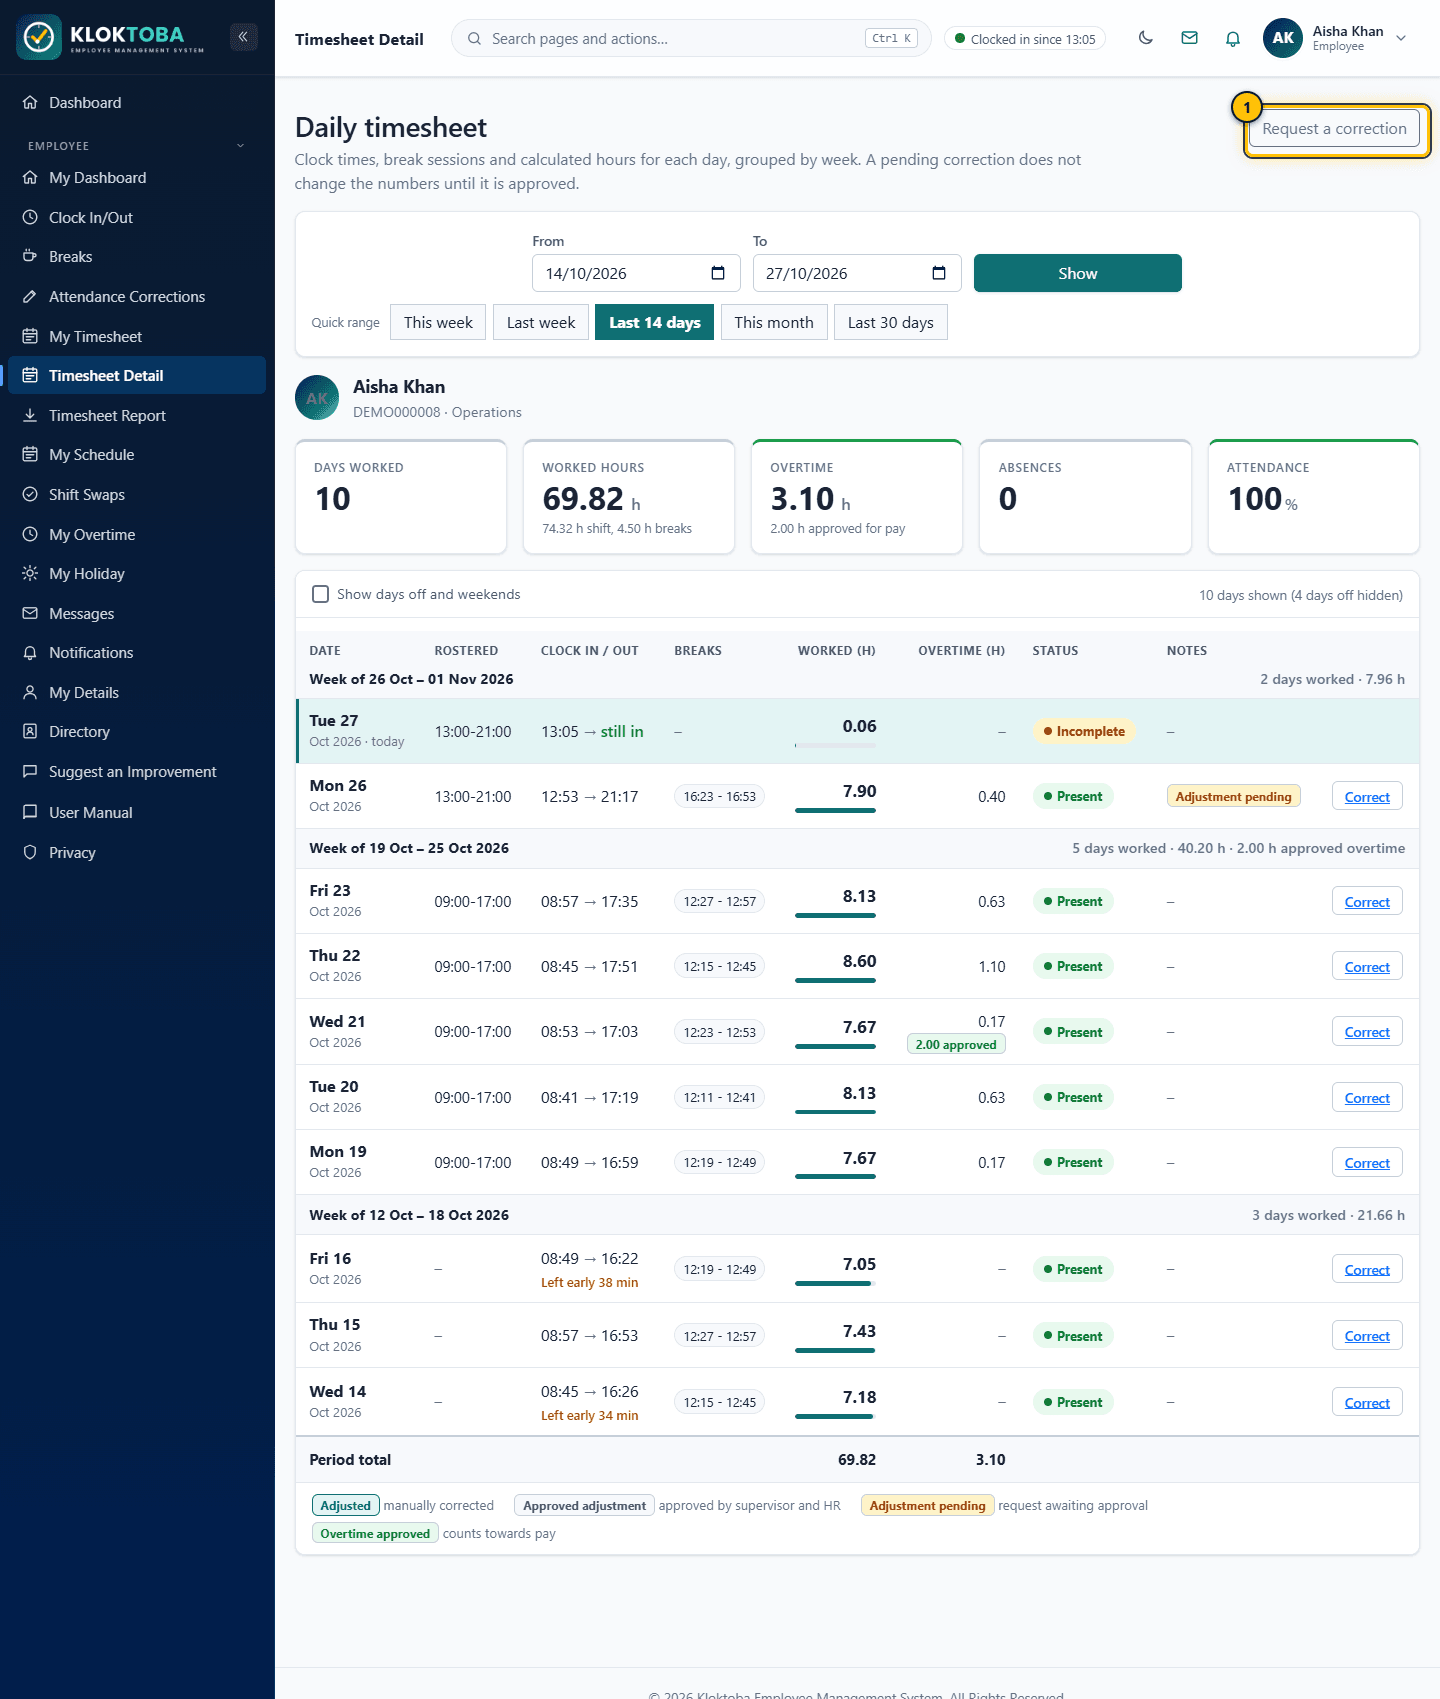
SS-016 – Daily timesheet detail. Viewed as: Employee. - Request a correction for a day
Hours worked = clock-out minus clock-in, minus unpaid breaks and lunch. It is real elapsed time, so a night shift across the spring or autumn clock change counts the hours actually worked. The target is your weekly hours override, or the company standard (for example 37.5 hours a week) divided across five working days.
Expected result
Your supervisor (or HR/Admin) approves or rejects the week, with an optional note.
Common errors
| Error or mistake | What to do |
|---|---|
| Hours look too low | Unpaid breaks and lunch are deducted. A missing clock-out needs a correction. |
Troubleshooting
| Problem | Solution |
|---|---|
| My week was rejected | Read the note beside the status, fix anything needed (via a correction if required) and re-submit. |
Frequently asked questions
- How is hours worked calculated?
- Time between clock in and clock out, minus unpaid breaks and lunch. Paid breaks count as worked time.
- Which timezone is used?
- Times are shown in UK time.
- What if I forget to end a break?
- A break that is never ended stops at your clock-out, so it never wipes out the rest of the day. Submit a correction if the real break was shorter.
5.3 Overtime
Overtime is time worked beyond your weekly target. Going over target never stops you clocking in, but the extra hours only count, and are only paid, once they are approved. Until then the week counts at your weekly target. For example, with a 40-hour target, a 48-hour week counts as 40 hours until the extra 8 are approved.
| How overtime is approved | What counts |
|---|---|
| Overtime requests and slots (approved in advance) | Hours approved through an overtime request from an approved team overtime slot count automatically (see Chapter 7 and Chapter 8). The department's allowance, pay multiplier and weekly cap are set by HR. |
| Two-step approval of overtime worked (after the week) | Any other hours over target need two approvals: your supervisor recommends them, then HR or Admin give the final approval, for all of the hours or only some of them. Only the final approval makes them count. If you have no supervisor, HR or Admin decide straight away. |
The overtime status on a timesheet reads Awaiting supervisor, Awaiting HR (recommended), Approved (with the hours, when only some were approved), Rejected by supervisor or Rejected. While hours are not approved, timesheets show a Counted figure beside the hours worked, and an approved timesheet is approved for the counted hours (shown as Approved ... h (target)). If the overtime is approved later, the approved hours, the salary due and the reports rise to include it.
5.4 Overtime final approval
Step-by-step instructions
- Open HR > Overtime Final Approval. Each row is one person's week over target: Worked / target, Pre-approved (hours already approved through overtime requests), To decide, the Supervisor, the Status and the Final decision.
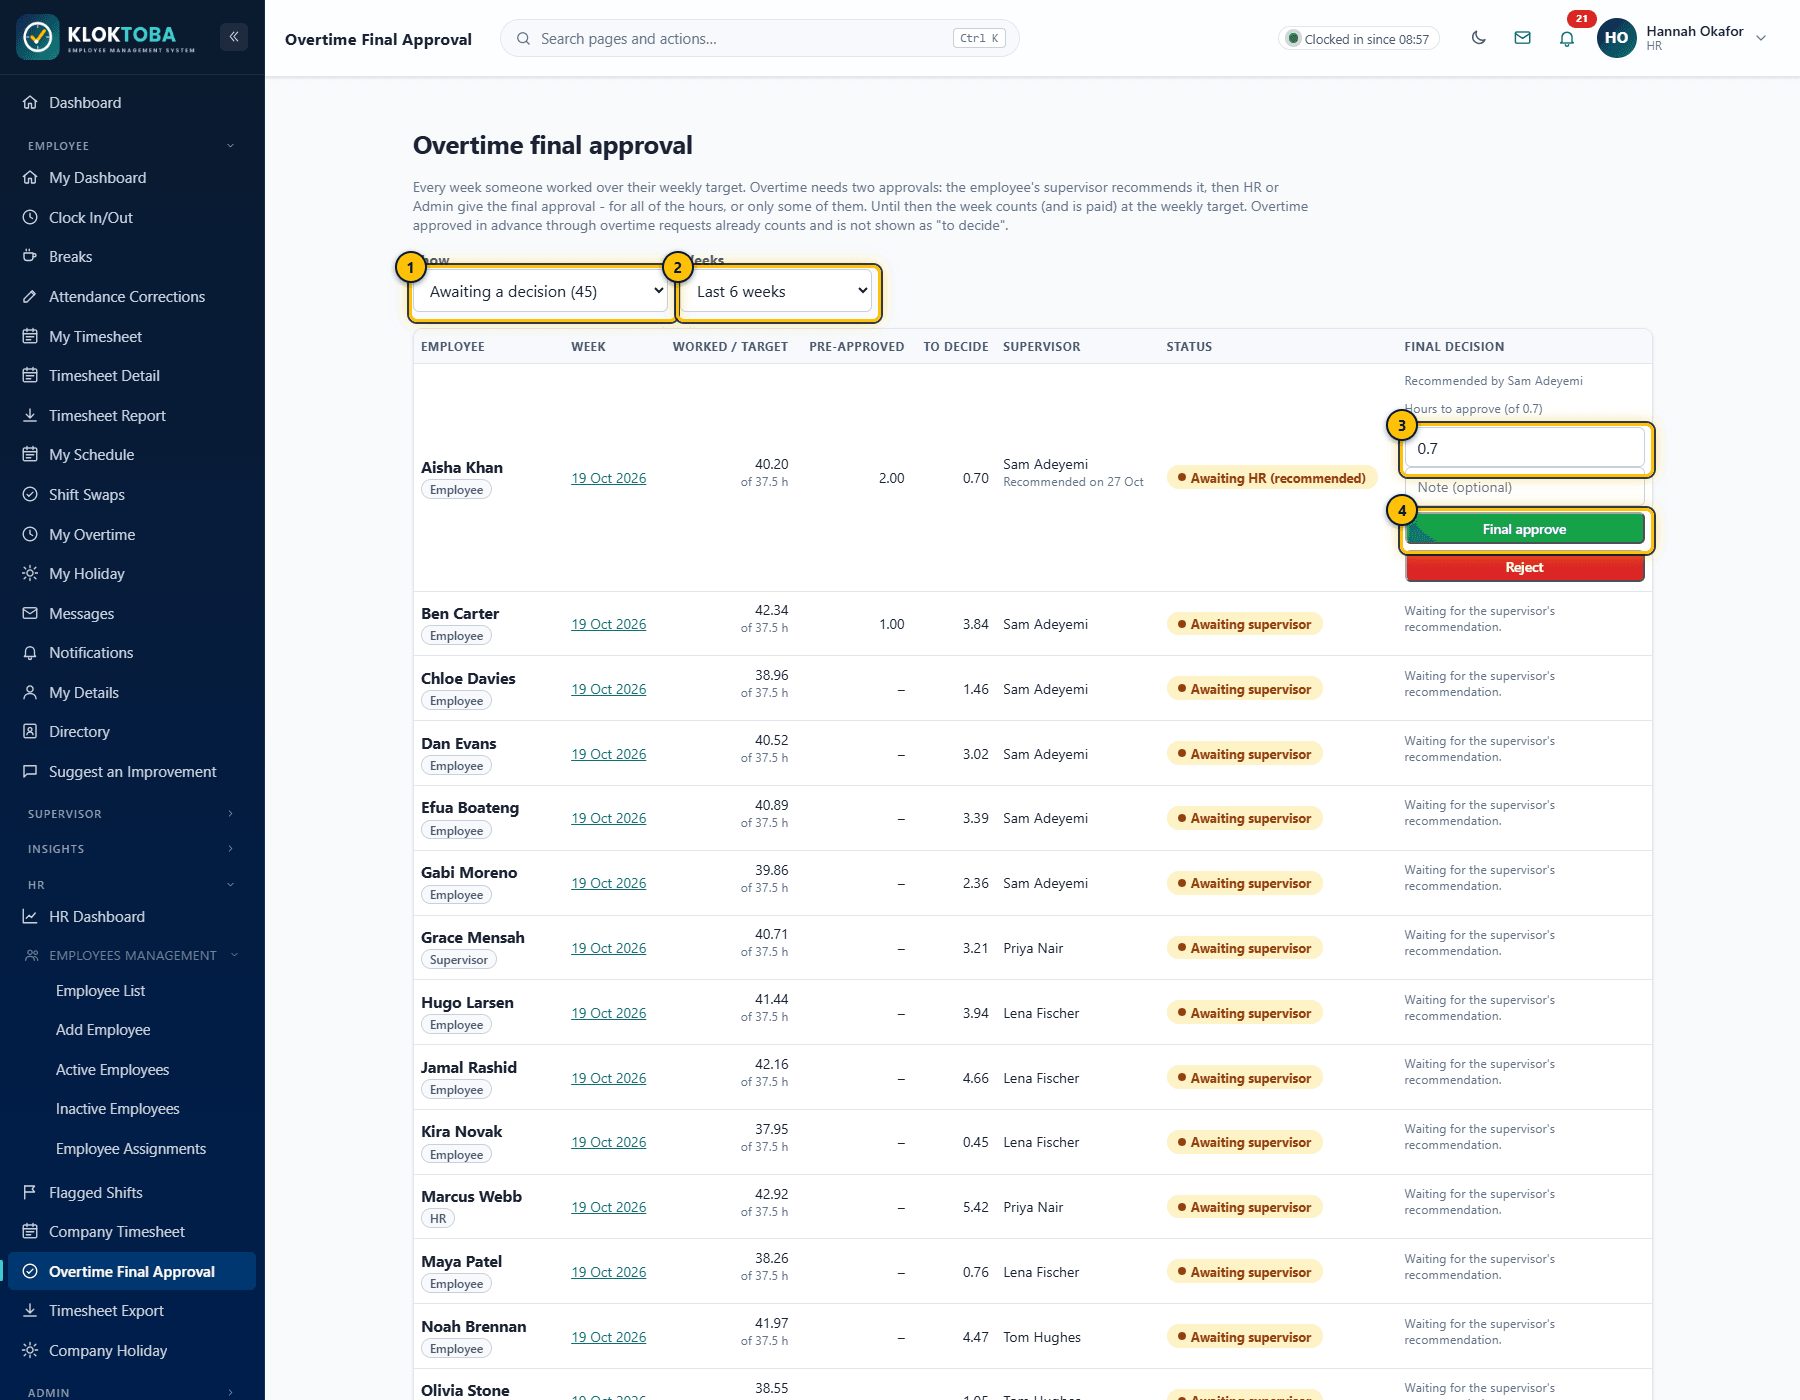
SS-086 – Overtime final approval. Viewed as: HR. - Awaiting a decision, or all weeks over target
- How many weeks to look back
- Hours to approve (all, or fewer)
- Final approve (or Reject)
- Use Show to switch between Awaiting a decision and All weeks over target, and Weeks to look back over the last 4, 6, 8 or 12 weeks.
- For a recommended week, Hours to approve is filled in with all the hours to decide. Keep it to approve all of them, or enter a smaller number to approve only some. Add a note if wanted, then select Final approve, or Reject to refuse them.
Expected result
The approved hours count straight away on the Company Timesheet, in the salary due, the exports and the Monthly Approved Attendance report.
Common errors
| Error or mistake | What to do |
|---|---|
| "Waiting for the supervisor's recommendation." | The employee's supervisor has not recommended the hours yet. |
| "You made the recommendation, so another HR or Admin user must give the final approval." | Ask another HR or Admin user. An Admin can do both steps. |
| Hours rejected | Enter between 0 and the hours still to decide. |
Troubleshooting
| Problem | Solution |
|---|---|
| A week is not listed | Only weeks over target appear. Hours already covered by an approved overtime request are not "to decide". |
Frequently asked questions
- Can I change a final decision?
- Yes. Decide the week again; the latest decision applies.
- Do approved hours earn the overtime premium?
- The premium is paid on hours approved through overtime requests. Hours approved here count at the normal hourly rate.
5.5 Employee timesheet report
Step-by-step instructions
- Open Employee > Timesheet Report.
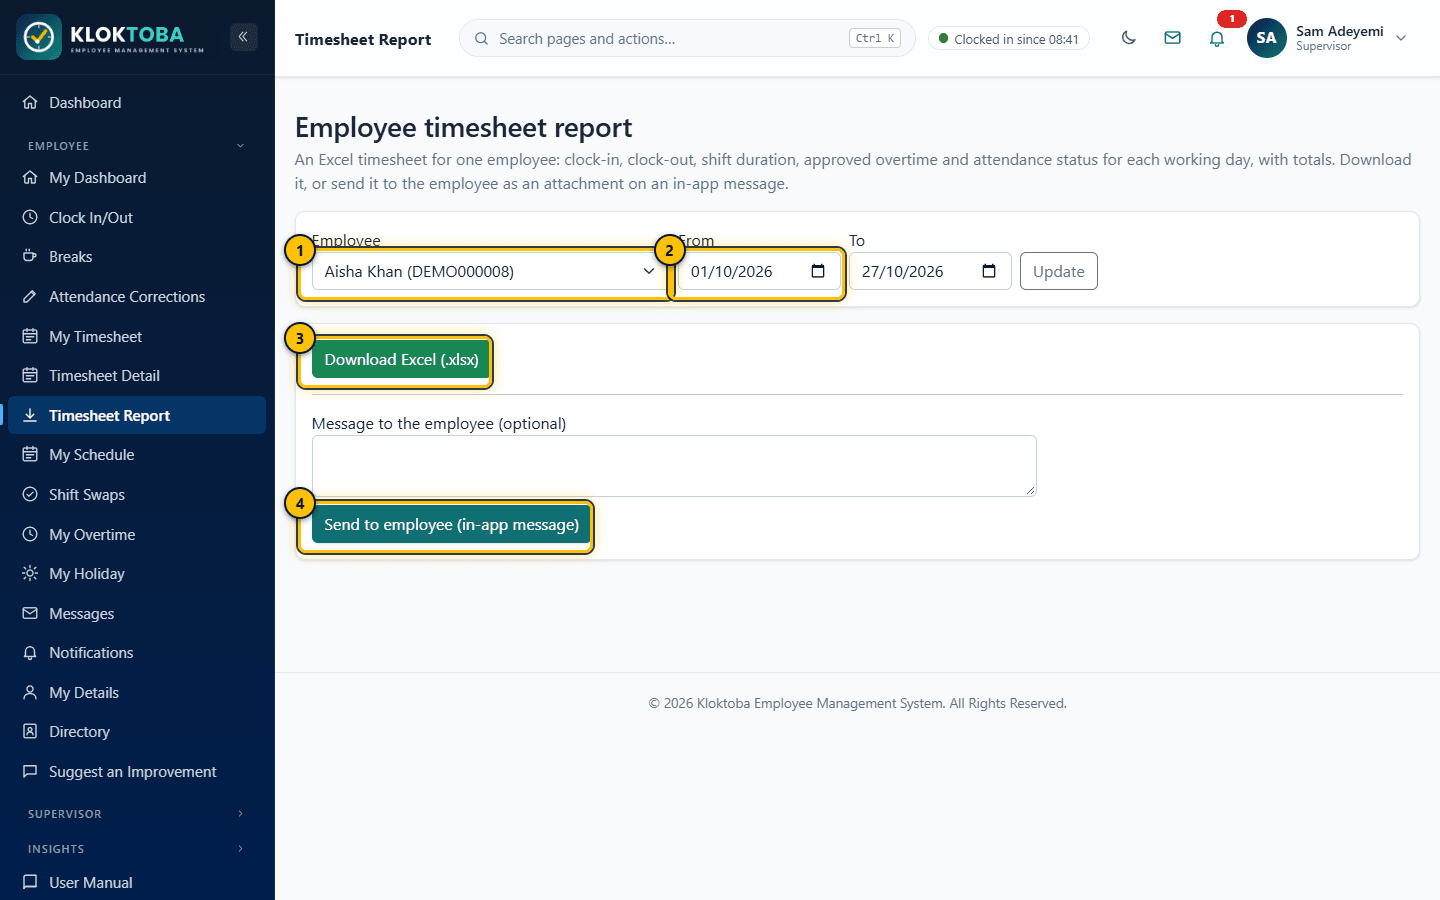
SS-083 – Employee timesheet report. Viewed as: Supervisor. - Choose the employee
- Period
- Download the report
- Send it to the employee with the file attached
- Choose the Employee (employees see themselves; supervisors their direct reports; HR and Admin anyone in the organisation) and the From and To dates, then select Update.
- Select Download Excel (.xlsx). The file lists each work date with clock-in, clock-out, shift duration, approved overtime and attendance status, and a total row.
- Supervisors, HR and Admin can add an optional message and select Send to employee (in-app message) to send the file to the employee as an attachment.
Expected result
The file downloads, or the employee receives an in-app message with the report attached.
Common errors
| Error or mistake | What to do |
|---|---|
| Employee not in the list | You can only choose people you are allowed to see. |
Troubleshooting
| Problem | Solution |
|---|---|
| No days in the file | Check the dates; only days with attendance or a status in the period are listed. |
Frequently asked questions
- Can employees send reports?
- No. Employees can download their own; sending is for supervisors, HR and Admin.
5.6 Exceptions
- Missing clock-in or clock-out alerts are sent as notifications and appear on the Team dashboard (Chapter 12).
- Flagged shifts: a shift left open at midnight is closed automatically at 23:59 and flagged. HR corrects it from Flagged Shifts.
- Late arrival, early departure and excessive break alerts use the thresholds in Break & Attendance Settings.
- Attendance corrections fix wrong or missed records (Manual attendance).
5.7 Flagged shifts
Step-by-step instructions
- Open HR > Flagged Shifts. Each row shows the employee, clock-in and the auto-filled clock-out.
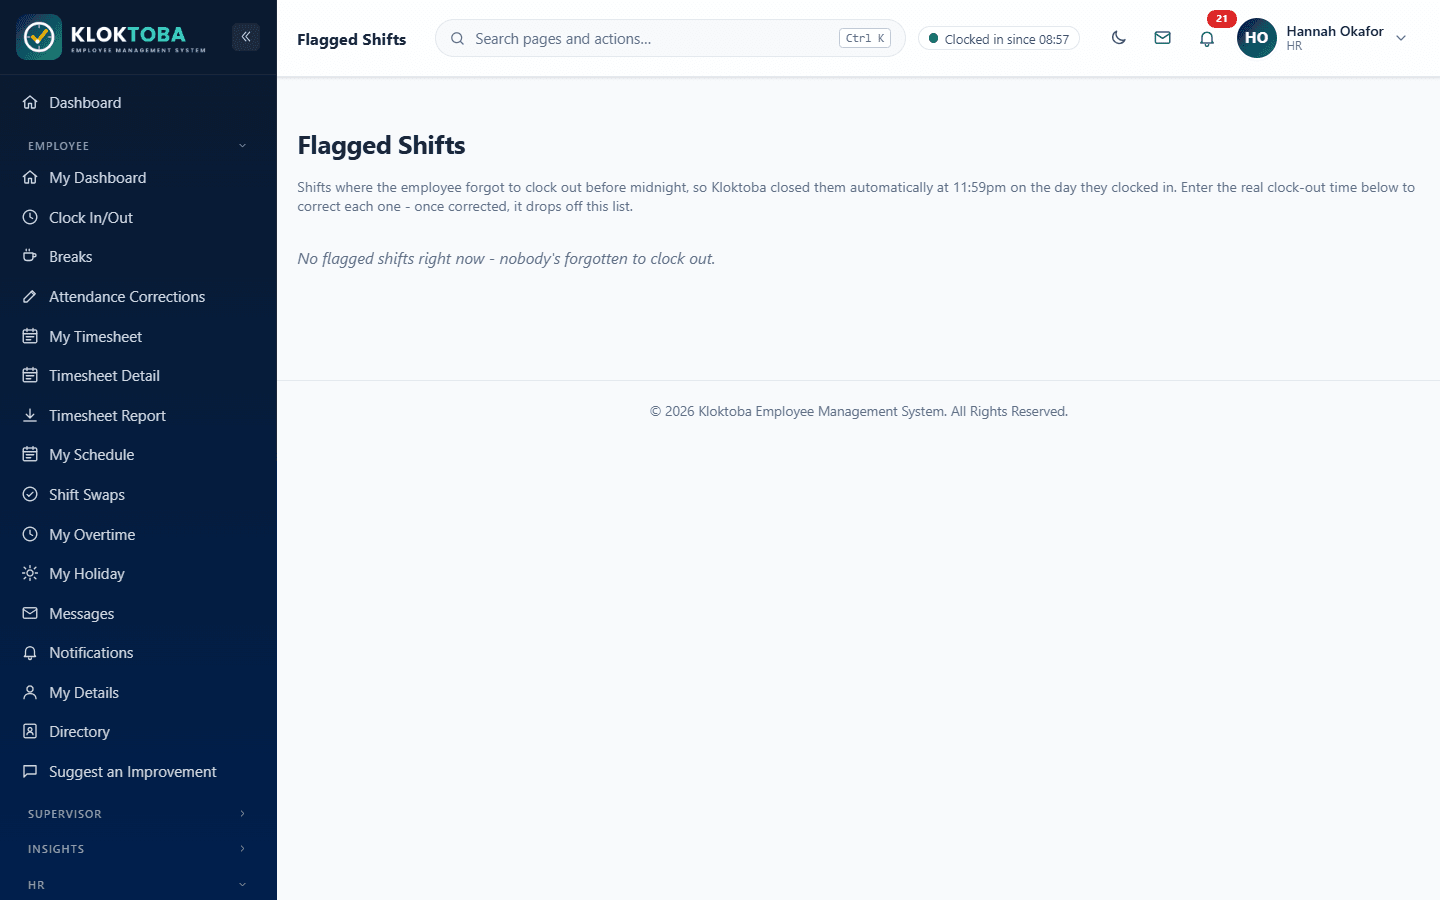
SS-045 – Flagged shifts. Viewed as: HR. - Enter the real clock-out date and time (it must be after the clock-in) and select Save.
Expected result
The shift is corrected, no longer flagged, and drops off the list.
Common errors
| Error or mistake | What to do |
|---|---|
| Time rejected | The new clock-out must be later than the clock-in. |
Troubleshooting
| Problem | Solution |
|---|---|
| The list is empty | Nobody has forgotten to clock out right now. |
Frequently asked questions
- Can supervisors fix flagged shifts?
- They see a notice; only HR and Admin can correct them.
Chapter 6
Break Management
Recording paid and unpaid breaks and the rules that apply.
6.1 Starting and ending a break
Step-by-step instructions
- Clock in first. You cannot take a break while clocked out.
- Open Employee > Breaks. Choose the Break type: Unpaid (deducted from worked hours) or Paid (counts as worked time). The panel shows sessions used and the maximum minutes per break.
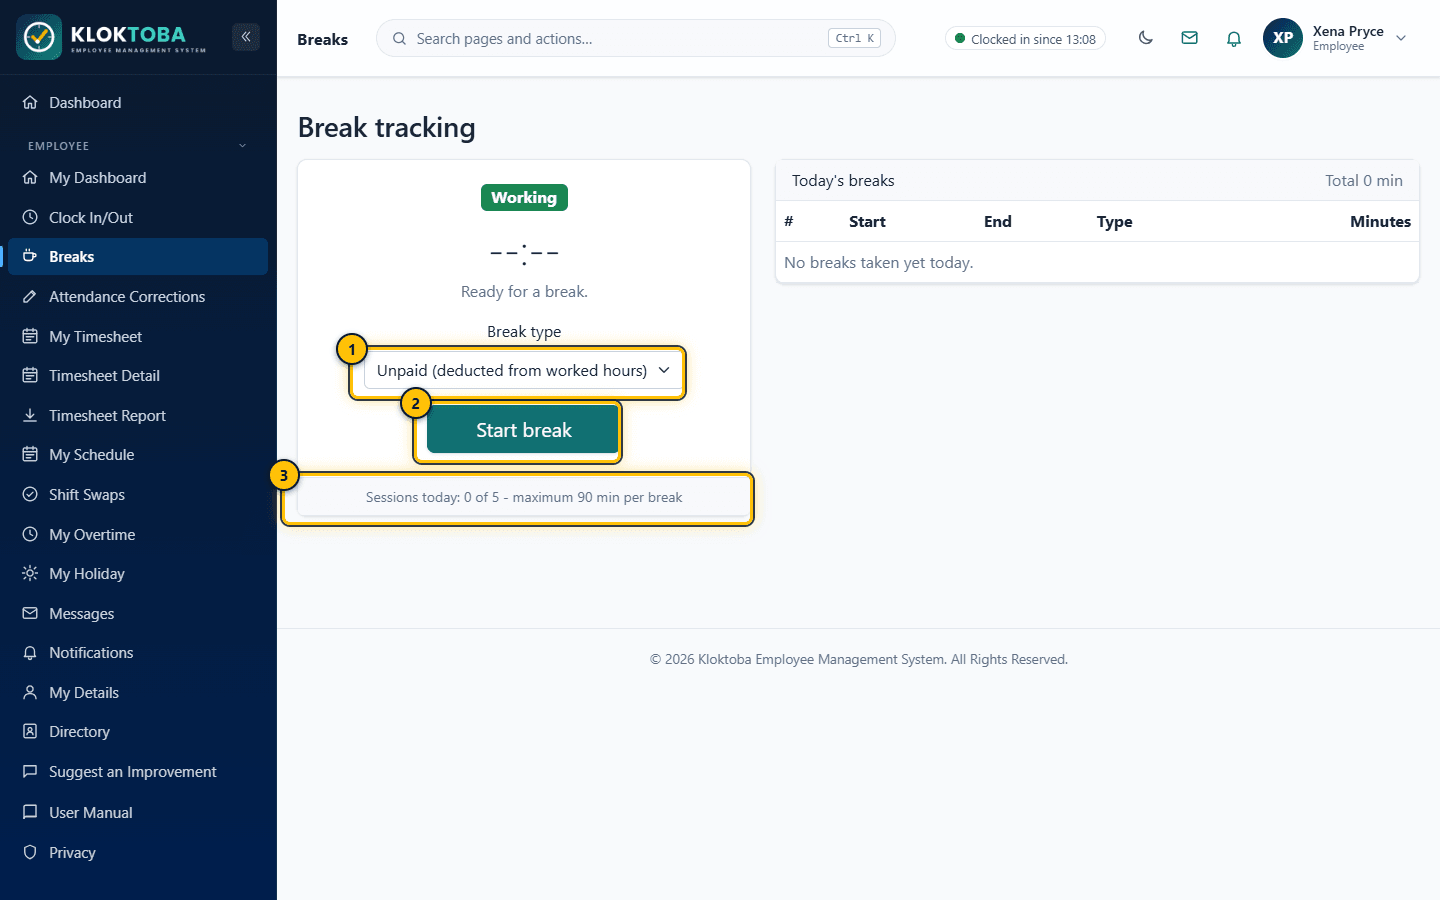
SS-011 – Break Management - start a break. Viewed as: Employee2. - Break type: Unpaid or Paid
- Start break
- Sessions used and the maximum minutes per break
- Select Start break. The status changes to On break and a timer runs.
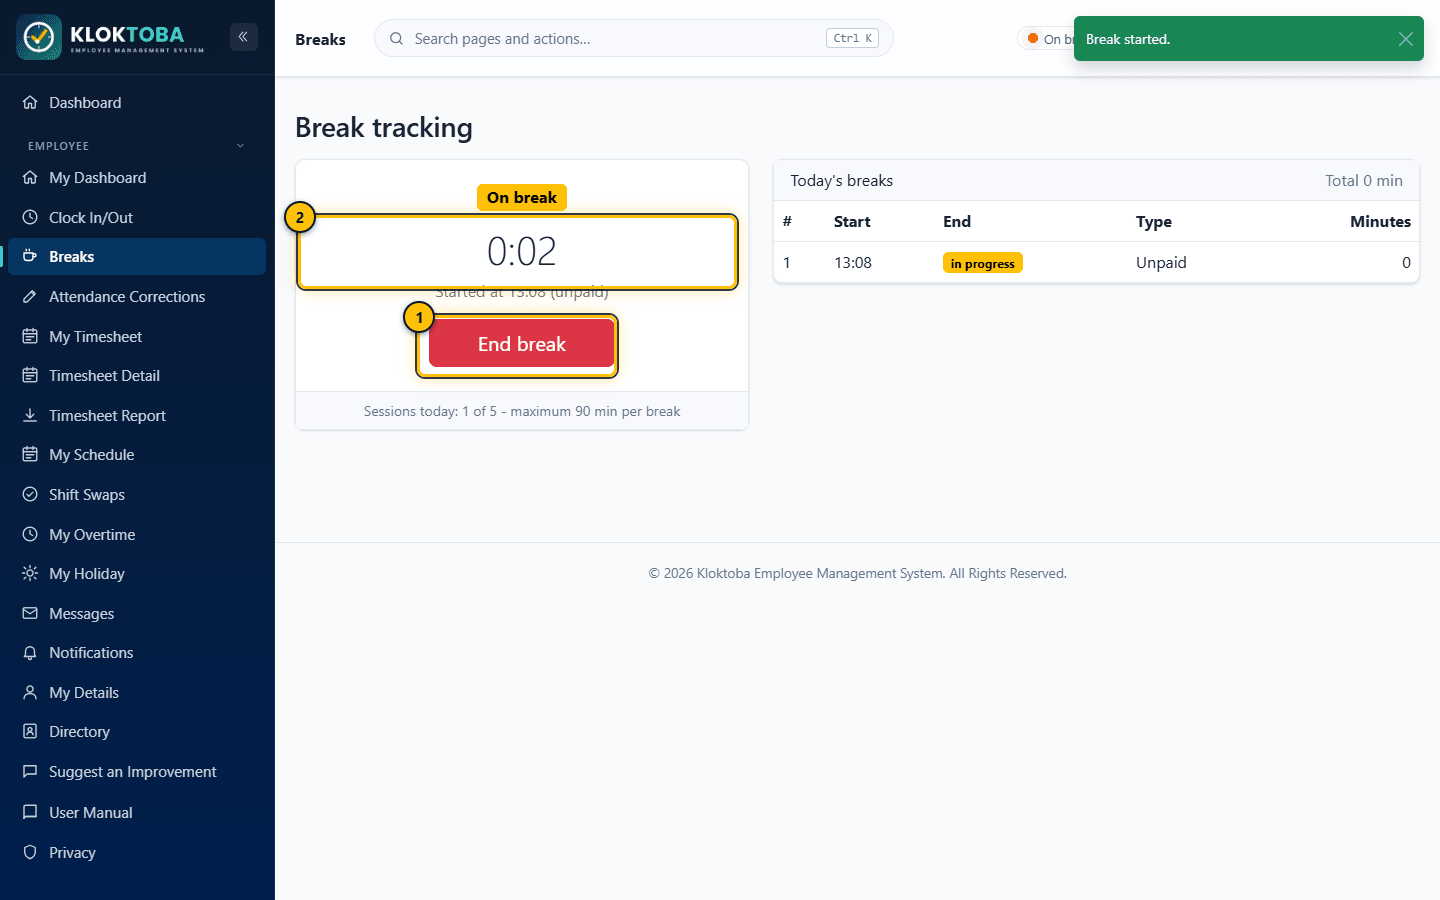
SS-012 – Break in progress. Viewed as: Employee2. - End break
- Running timer
- When you return, select End break. The break appears under Today's breaks with start, end, type and minutes.
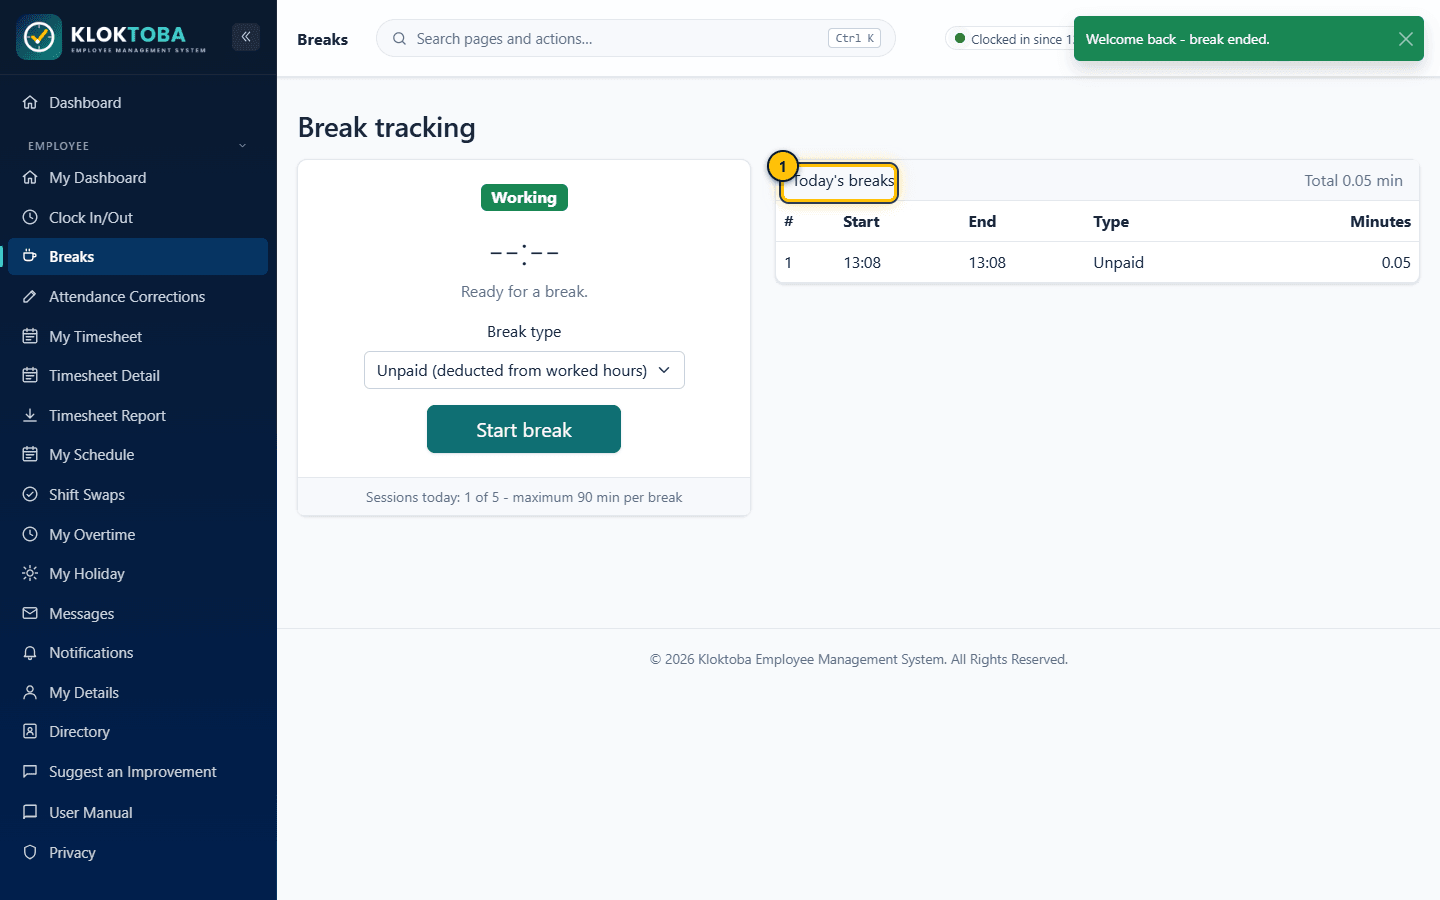
SS-013 – Break ended - today's breaks. Viewed as: Employee2. - Today's breaks with start, end, type and minutes
Expected result
The break is recorded on your timeline and timesheet detail and included in break reports.
Common errors
| Error or mistake | What to do |
|---|---|
| Cannot start a break | You are not clocked in, you have reached the daily session limit, or you are already on a break. |
| Break rejected or an alert raised | It breaks a limit set in Break & Attendance Settings, such as the maximum minutes per break or the daily total. |
Troubleshooting
| Problem | Solution |
|---|---|
| I forgot to end a break | Submit an attendance correction and add the break times. |
Frequently asked questions
- How many breaks can I take?
- The default is 5 sessions a day, up to 90 minutes each, but your organisation sets these.
6.2 Break rules
HR and Admin set the rules under Admin > Break & Attendance Settings. They apply to everyone in the organisation, take effect immediately and are recorded in the audit log.
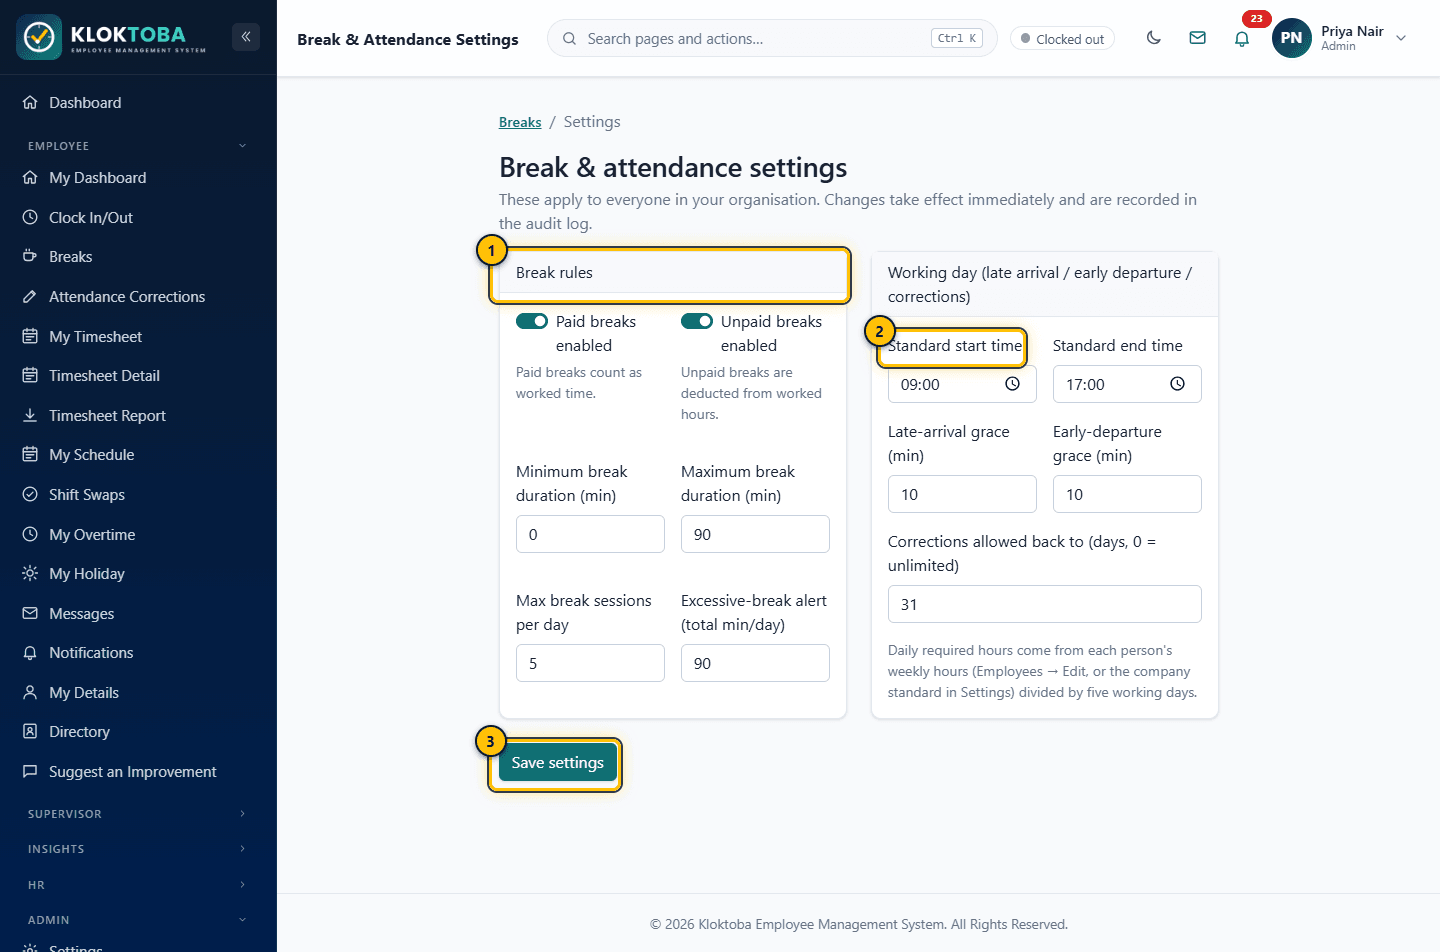
- Break rules
- Late arrival and early departure rules
- Save settings
| Setting | Effect |
|---|---|
| Paid breaks enabled / Unpaid breaks enabled | Which break types employees can choose. |
| Minimum and maximum break duration (min) | Shortest and longest allowed single break. |
| Max break sessions per day | Daily limit on break starts. |
| Excessive-break alert (total min/day) | Total daily break minutes that triggers an excessive-break alert. |
| Standard start and end time | Used to detect late arrival and early departure. |
| Late-arrival and early-departure grace (min) | Tolerance before someone is marked late or early. |
| Corrections allowed back to (days) | How far back employees may request corrections; 0 means unlimited. |
Chapter 7
Leave Management
Holiday allowance and requests, plus rota, shift swaps and overtime requests.
7.1 Leave types and balances
Kloktoba manages annual holiday. Holiday years run 1 January to 31 December with no carry-over. Only weekdays (Monday to Friday) count, and there is no public-holiday calendar yet, so bank holidays are not excluded automatically. The smallest bookable unit is half a day.
Your Allowance is the company standard unless HR has set a personal override. Remaining = Allowance, minus Approved, minus Pending.
7.2 Requesting leave
Step-by-step instructions
- Open Employee > My Holiday. Four figures show Allowance, Approved / taken, Pending approval and Remaining.
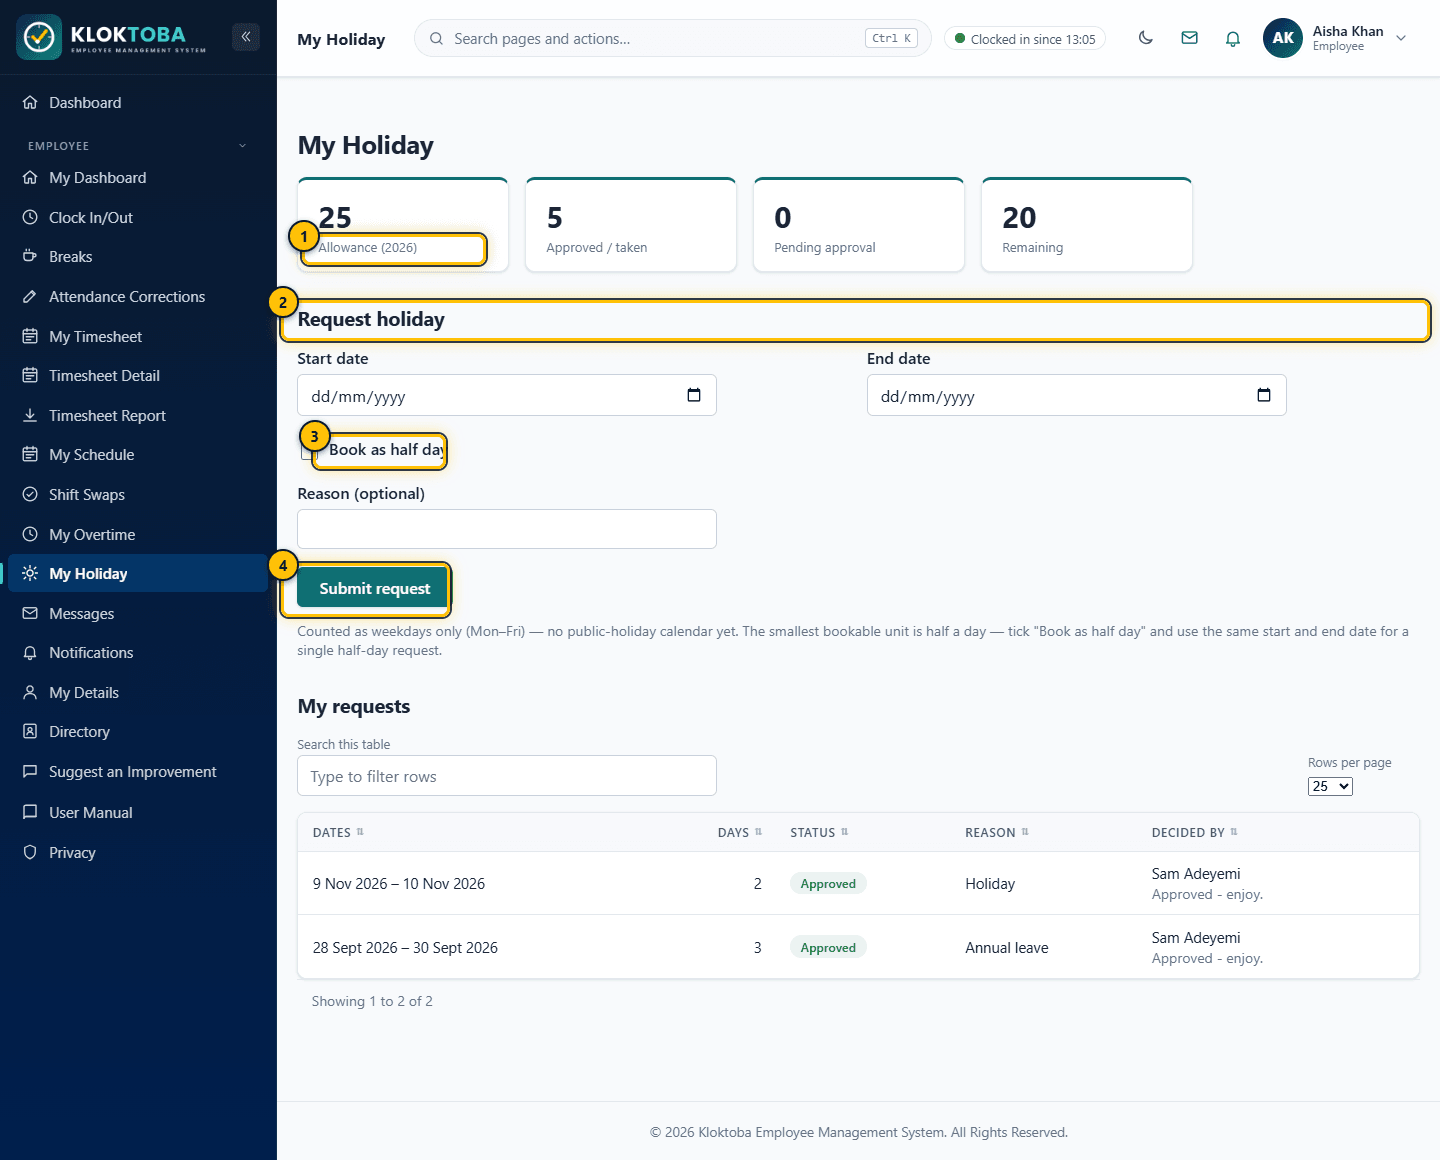
SS-021 – Leave - allowance and request form. Viewed as: Employee. - Allowance, approved, pending and remaining days
- Request form
- Half-day option
- Submit request
- Choose a Start date and End date. Tick Book as half day for a single half-day (start and end must match).
- Add an optional reason and select Submit request.
- Your request appears under My requests as Pending, with the approver shown once decided. Cancel is available only while it is Pending.
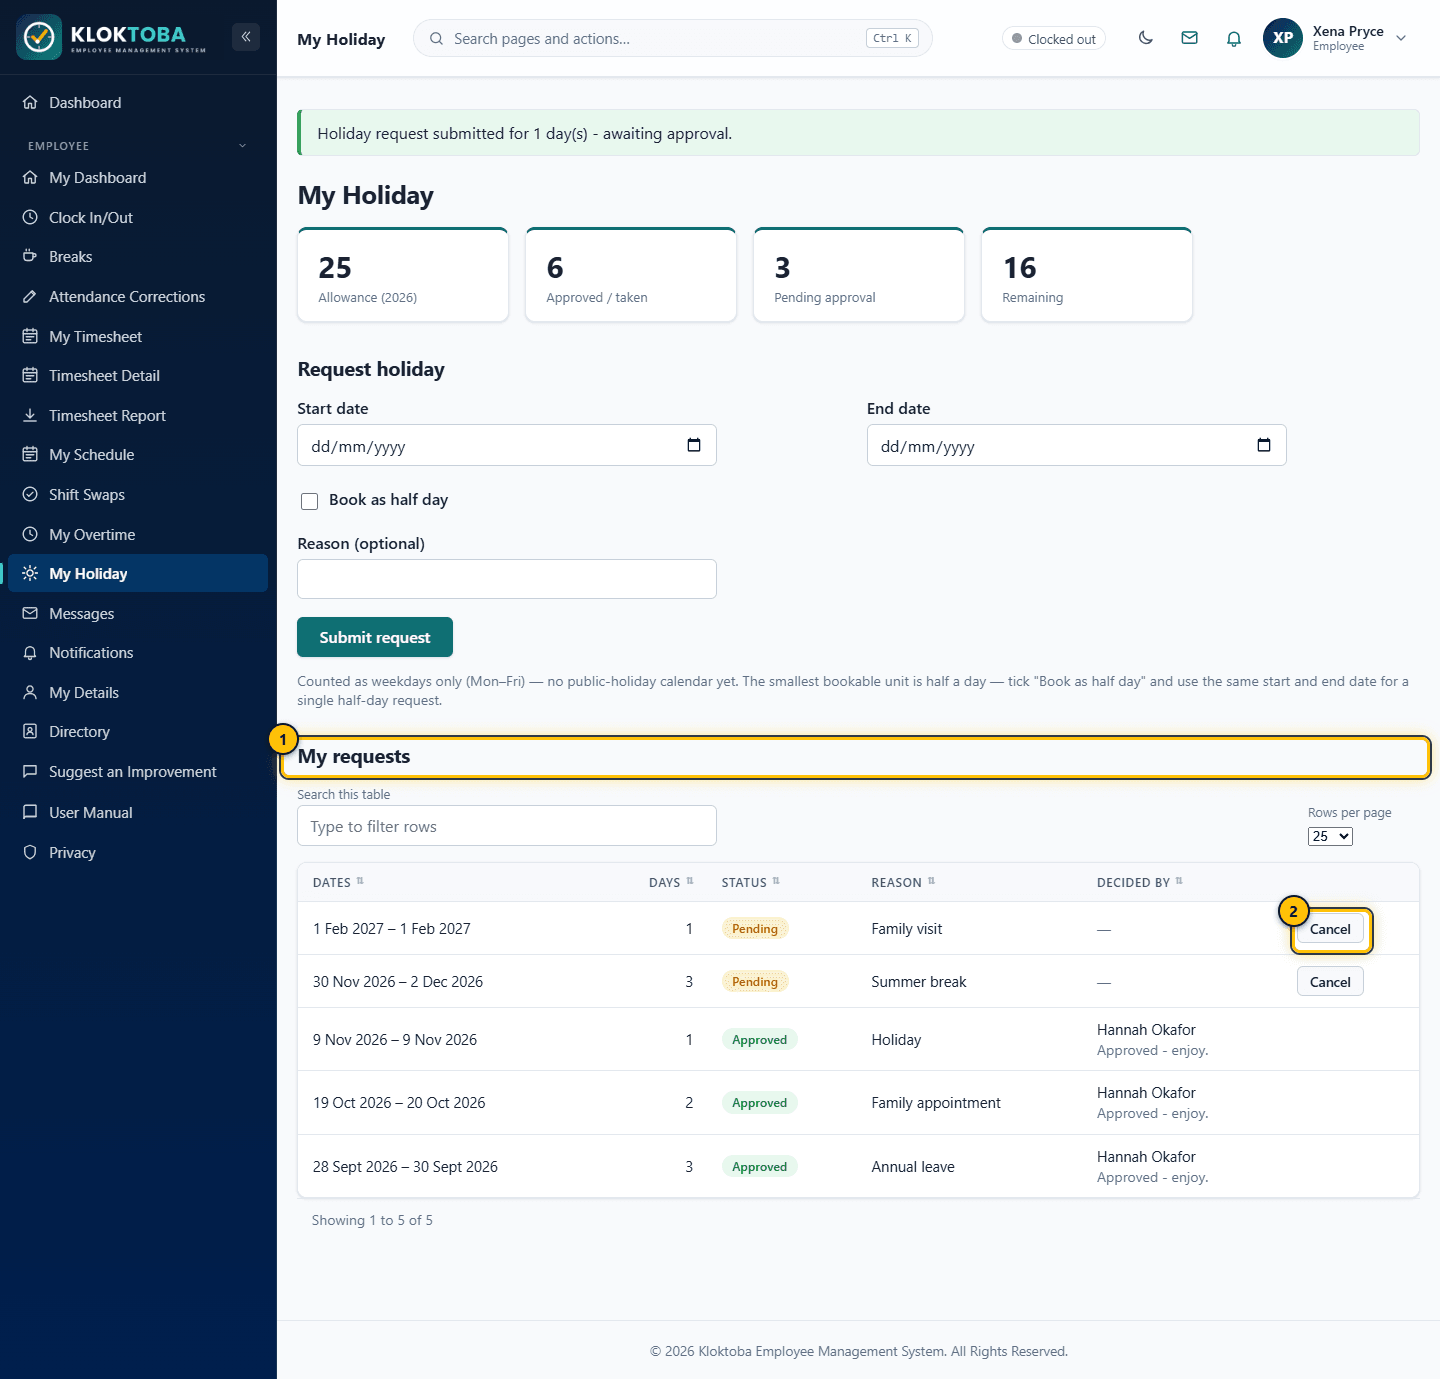
SS-022 – Leave request submitted - history. Viewed as: Employee2. - Request history with status
- Cancel (only while Pending)
Expected result
You see "Holiday request submitted ... awaiting approval". The Remaining figure drops to reflect the pending days.
Common errors
| Error or mistake | What to do |
|---|---|
| Start date in the past | Choose a future date. |
| End before start | Correct the dates. |
| Dates overlap another pending or approved request | Adjust dates or cancel the other request. |
Troubleshooting
| Problem | Solution |
|---|---|
| I cannot cancel an approved request | Cancelling is only possible while Pending. Contact your supervisor or HR. |
Frequently asked questions
- Will I be emailed when it is decided?
- Check My Holiday for the status and decision note. Leave decisions are shown on the page.
- Can I carry over days?
- No. The year runs 1 January to 31 December.
7.3 Approving leave
Step-by-step instructions
- Supervisors open Team Holiday to see direct reports' requests. Pending requests show Approve and Reject with an optional note.
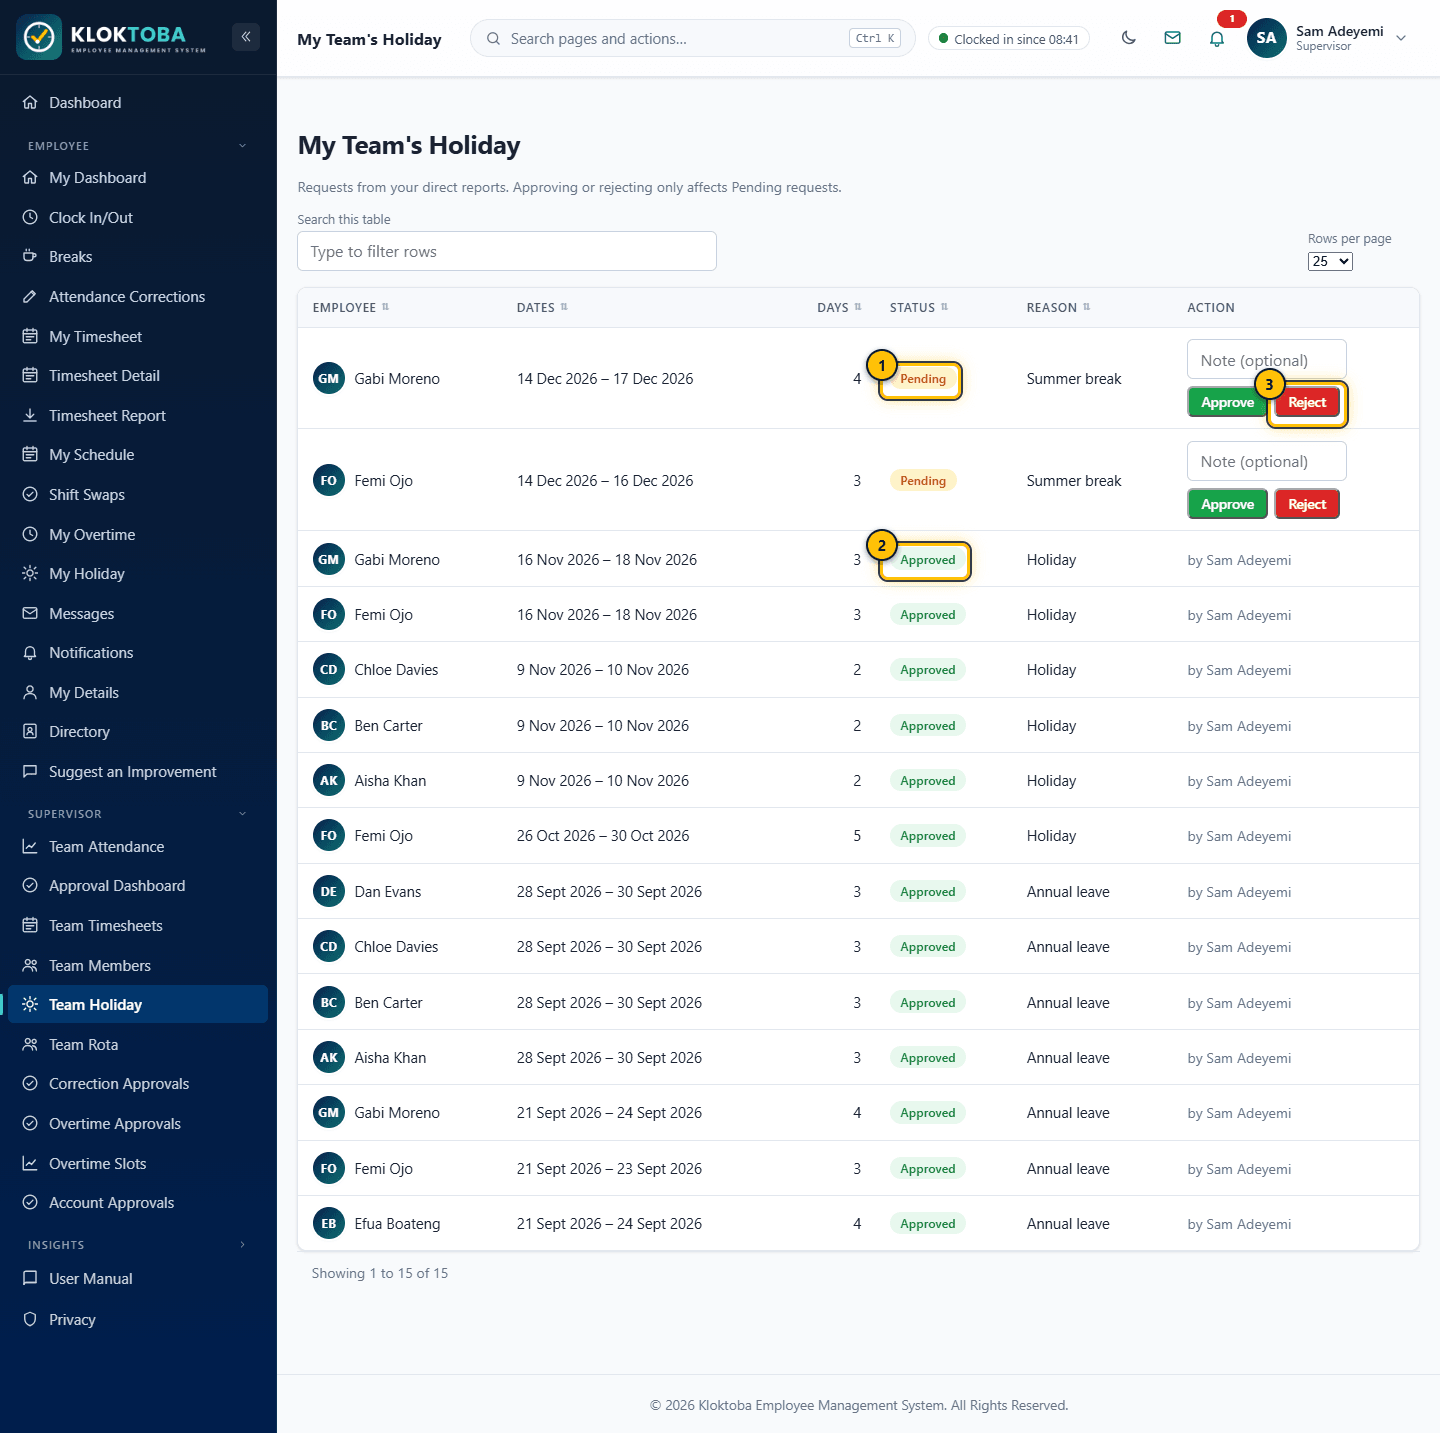
SS-023 – Team Holiday - pending approval. Viewed as: Supervisor. - Pending request
- Approve
- Reject
- HR and Admin open Company Holiday, filter by status, and decide any pending request in the organisation, including their own where no one is above them.
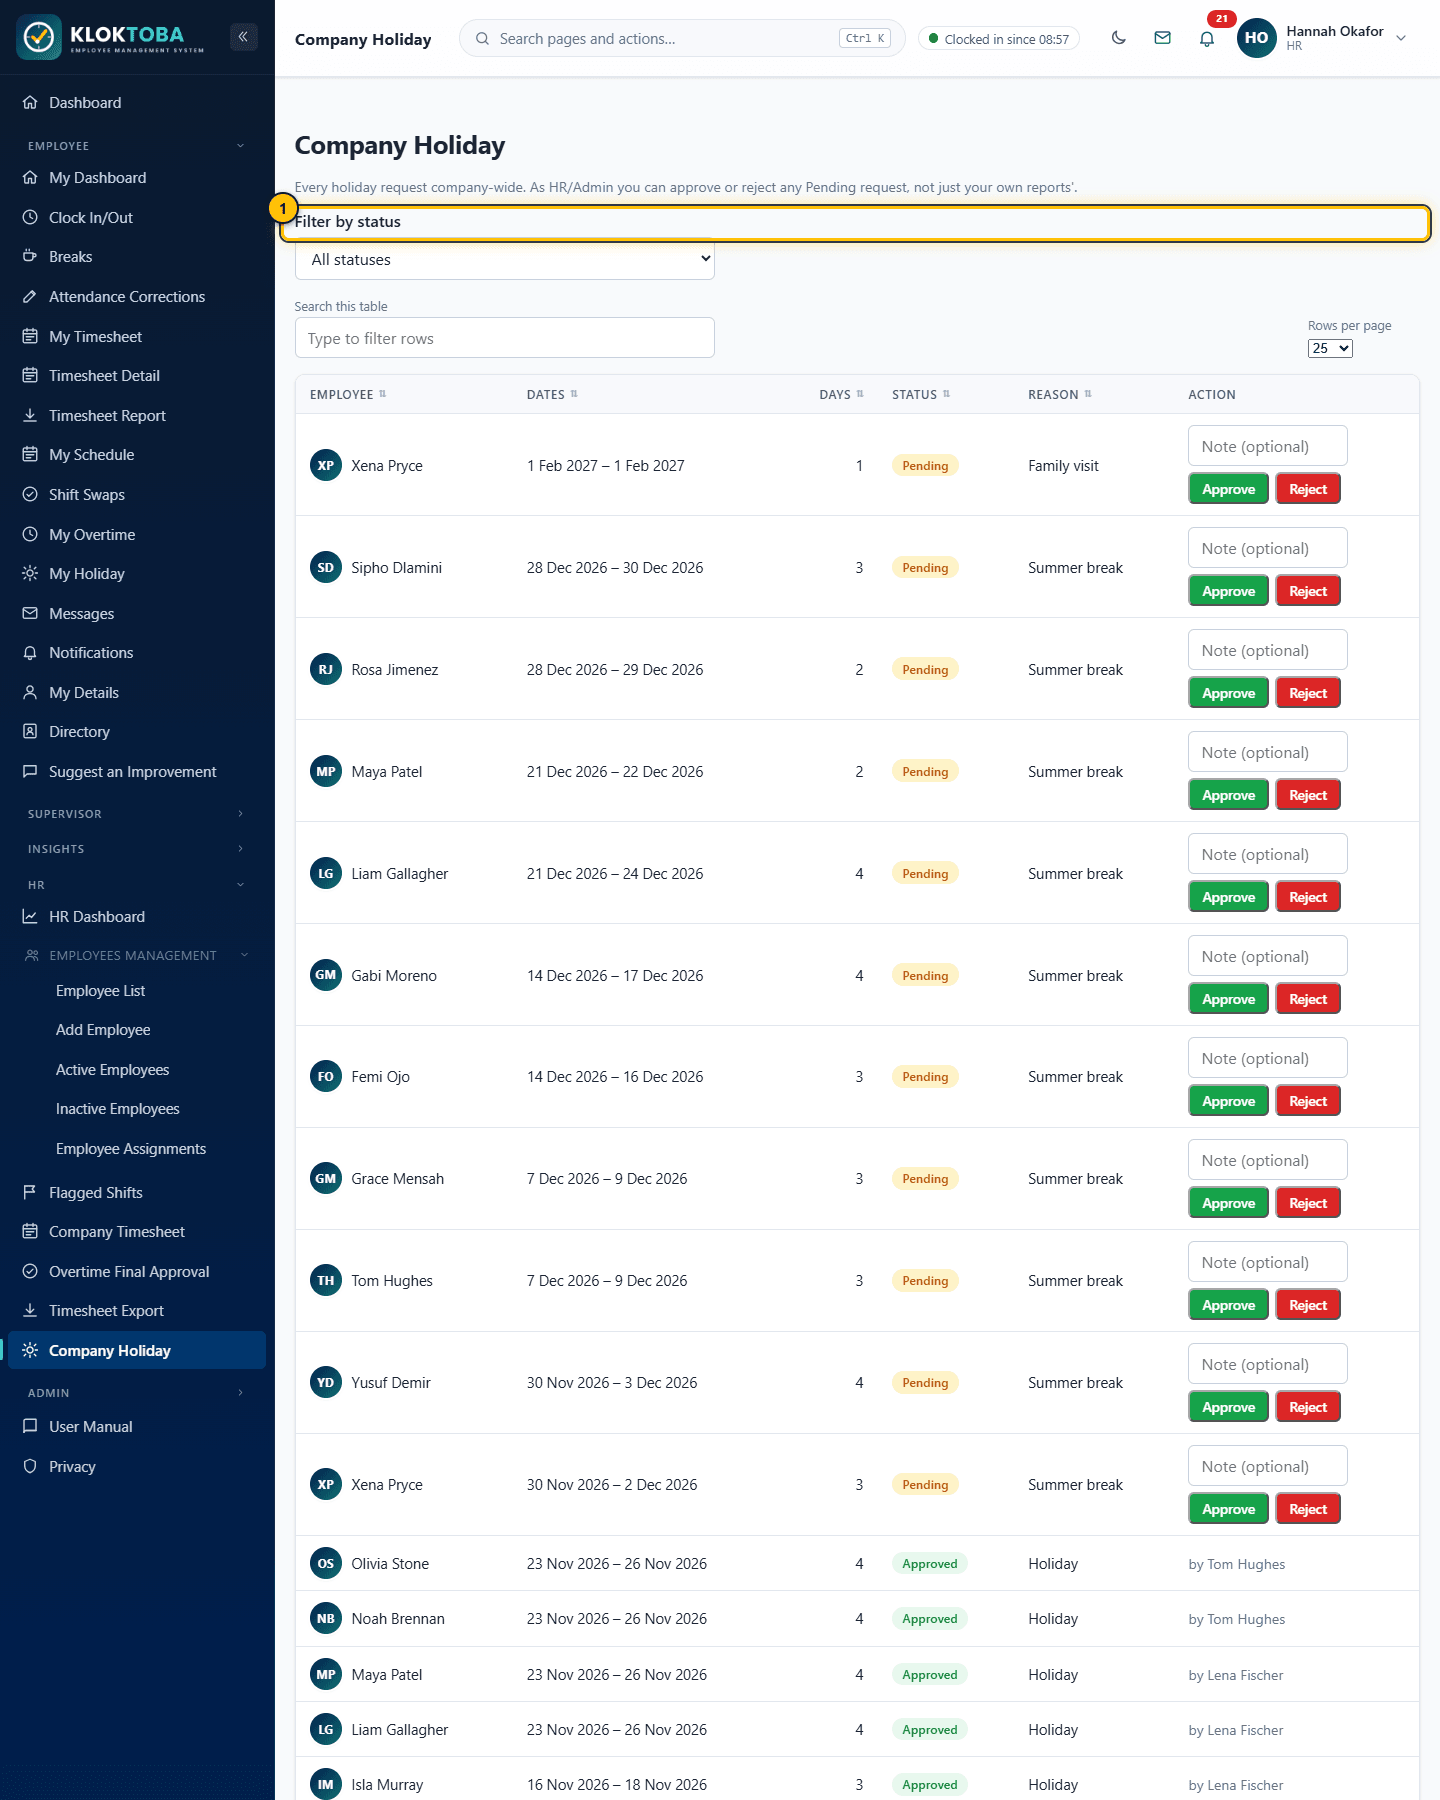
SS-024 – Company Holiday (HR/Admin). Viewed as: HR. - Filter by status
Expected result
The employee sees the new status and your note on My Holiday, and approved days count against their balance.
Common errors
| Error or mistake | What to do |
|---|---|
| Request already decided | Only pending requests can be approved or rejected. |
Troubleshooting
| Problem | Solution |
|---|---|
| A request is missing from Team Holiday | It only lists your direct reports. HR and Admin use Company Holiday. |
Frequently asked questions
- Is there a leave calendar?
- Not yet. Who is off in the next 14 days is shown on the Dashboard and My Timesheet.
7.4 My schedule, shift swaps and overtime
Step-by-step instructions
- Open My Schedule to see the shifts your manager has published for the week, scheduled hours and days off.
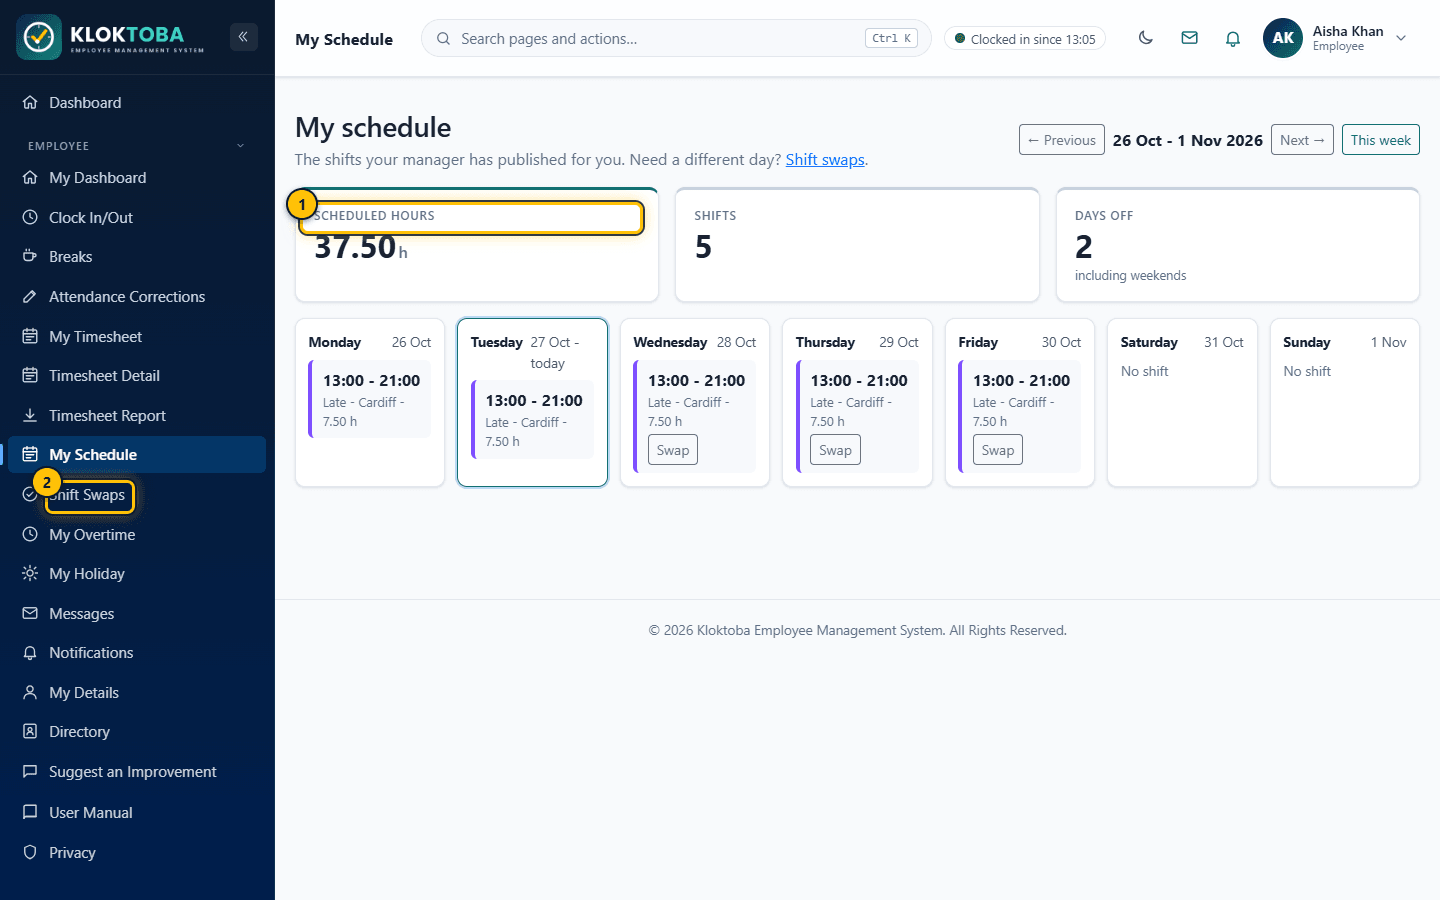
SS-025 – My schedule. Viewed as: Employee. - Scheduled hours for the week
- Start a swap
- To swap a shift with a colleague who has the same supervisor, start the swap from My Schedule. The colleague agrees first, then your supervisor approves. Track it under Shift Swaps.
- To book extra hours open My Overtime. You can only book from an approved team overtime slot, before working the hours or within 14 days afterwards, in steps of 15 minutes up to 12 hours.
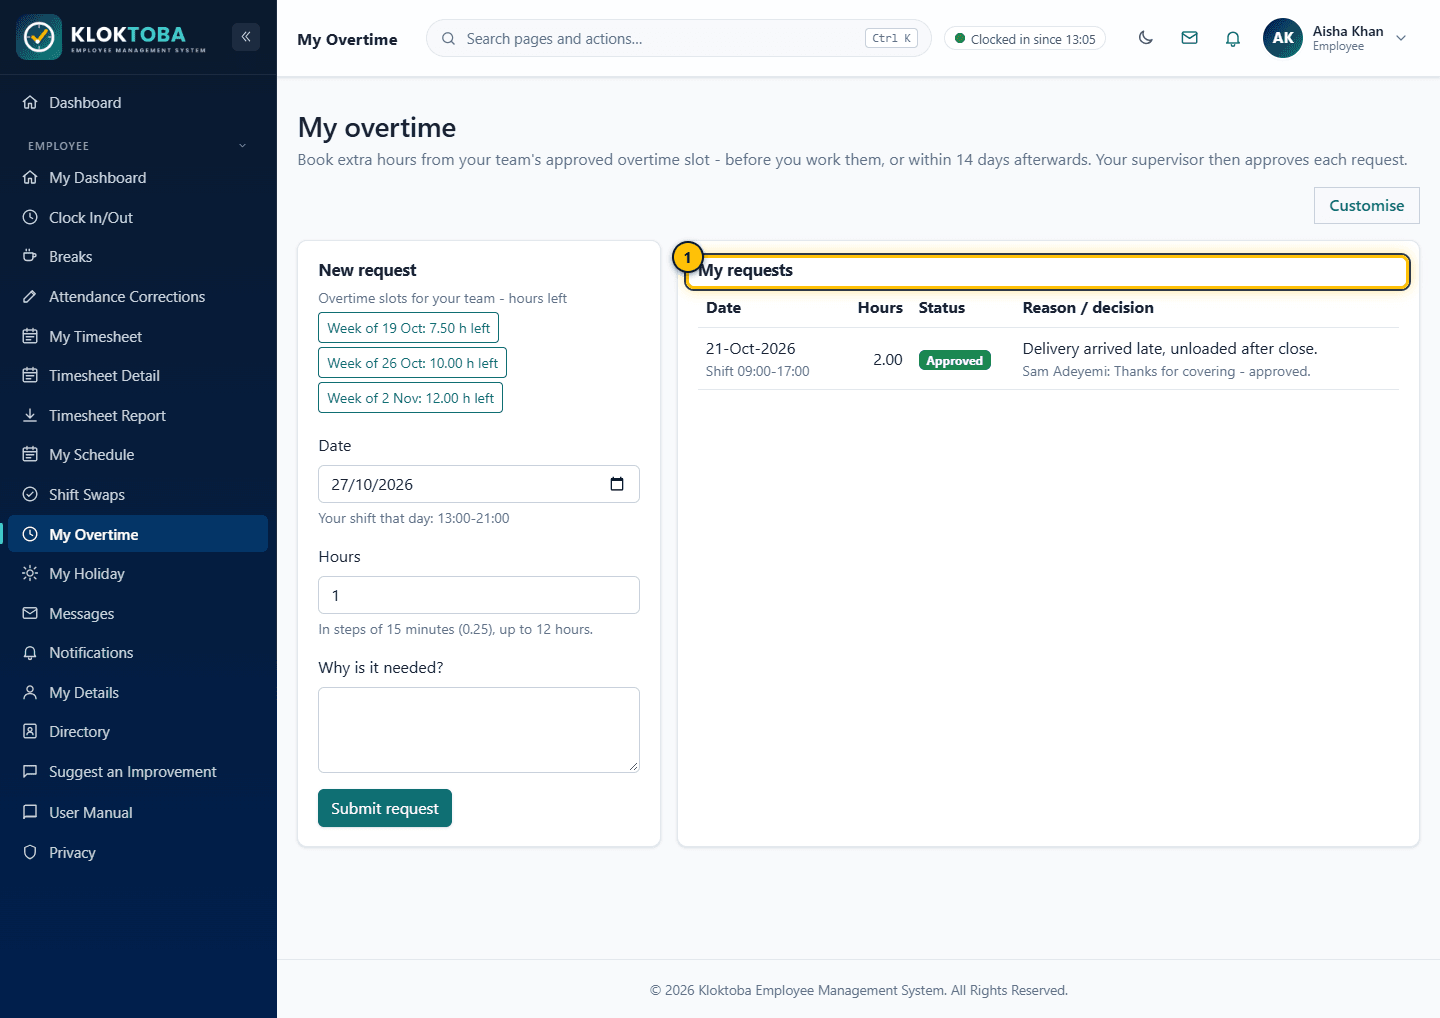
SS-027 – My overtime. Viewed as: Employee. - Your overtime requests and their status
Expected result
Swaps and overtime requests show their status and decision notes.
Common errors
| Error or mistake | What to do |
|---|---|
| No overtime slot available | Ask your supervisor to request a slot from HR or Admin. |
Troubleshooting
| Problem | Solution |
|---|---|
| I cannot swap with a colleague | Both of you must have the same supervisor and their shifts must not overlap yours. |
Frequently asked questions
- Who approves overtime?
- Your supervisor approves each request from an HR-approved slot.
Chapter 8
Supervisor Functions
Everything a Supervisor needs to manage a team. Also available to HR and Admin.
8.1 Approval dashboard
Step-by-step instructions
- Open Supervisor > Approval Dashboard.
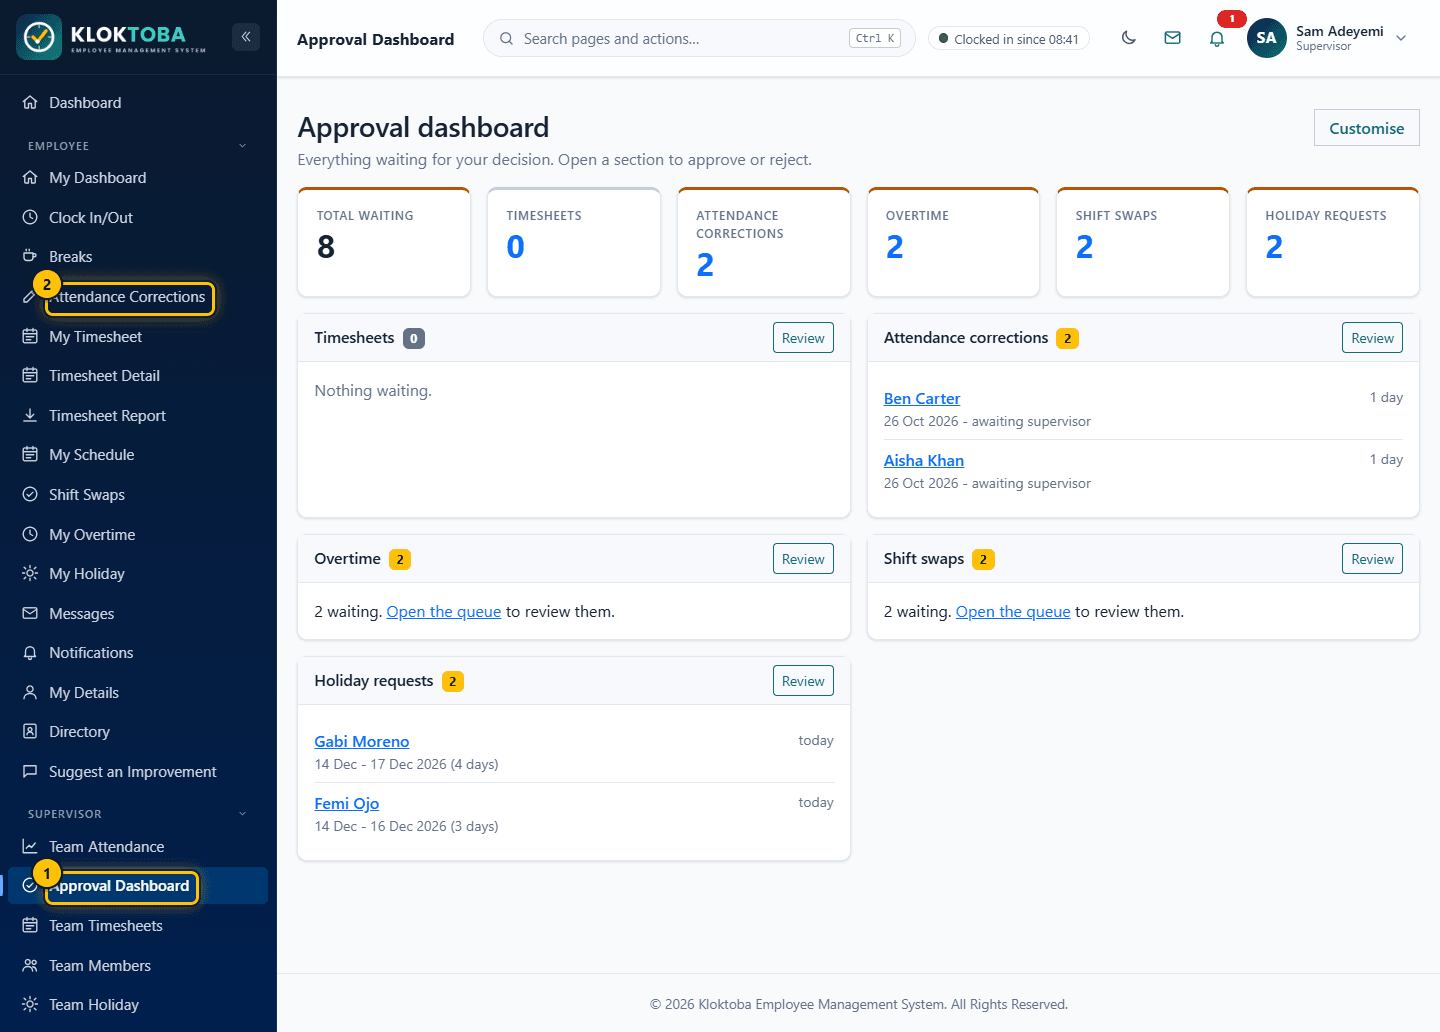
SS-082 – Approval dashboard. Viewed as: Supervisor. - Everything waiting for your decision
- One card per approval type, with a count
- Each card shows how many items are waiting, with the oldest few: Timesheets, Attendance corrections, Overtime (for HR and Admin this includes overtime worked that a supervisor has recommended and that needs final approval), Shift swaps and Holiday requests.
- Select an item, or the card's review link, to open the usual approval screen and decide it there.
Expected result
Counts go down as you decide items on their own screens.
Common errors
| Error or mistake | What to do |
|---|---|
| A card shows "Couldn't load this section" | That one approval type failed to load; the others are unaffected. Try again shortly. |
Troubleshooting
| Problem | Solution |
|---|---|
| An item is missing | Supervisors see their direct reports; HR and Admin see their organisation. |
Frequently asked questions
- Can I approve from the dashboard?
- No. It summarises and links; decisions are made on each approval screen so the usual rules always apply.
8.2 Team attendance and the team dashboard
Step-by-step instructions
- Open Supervisor > Team Attendance.
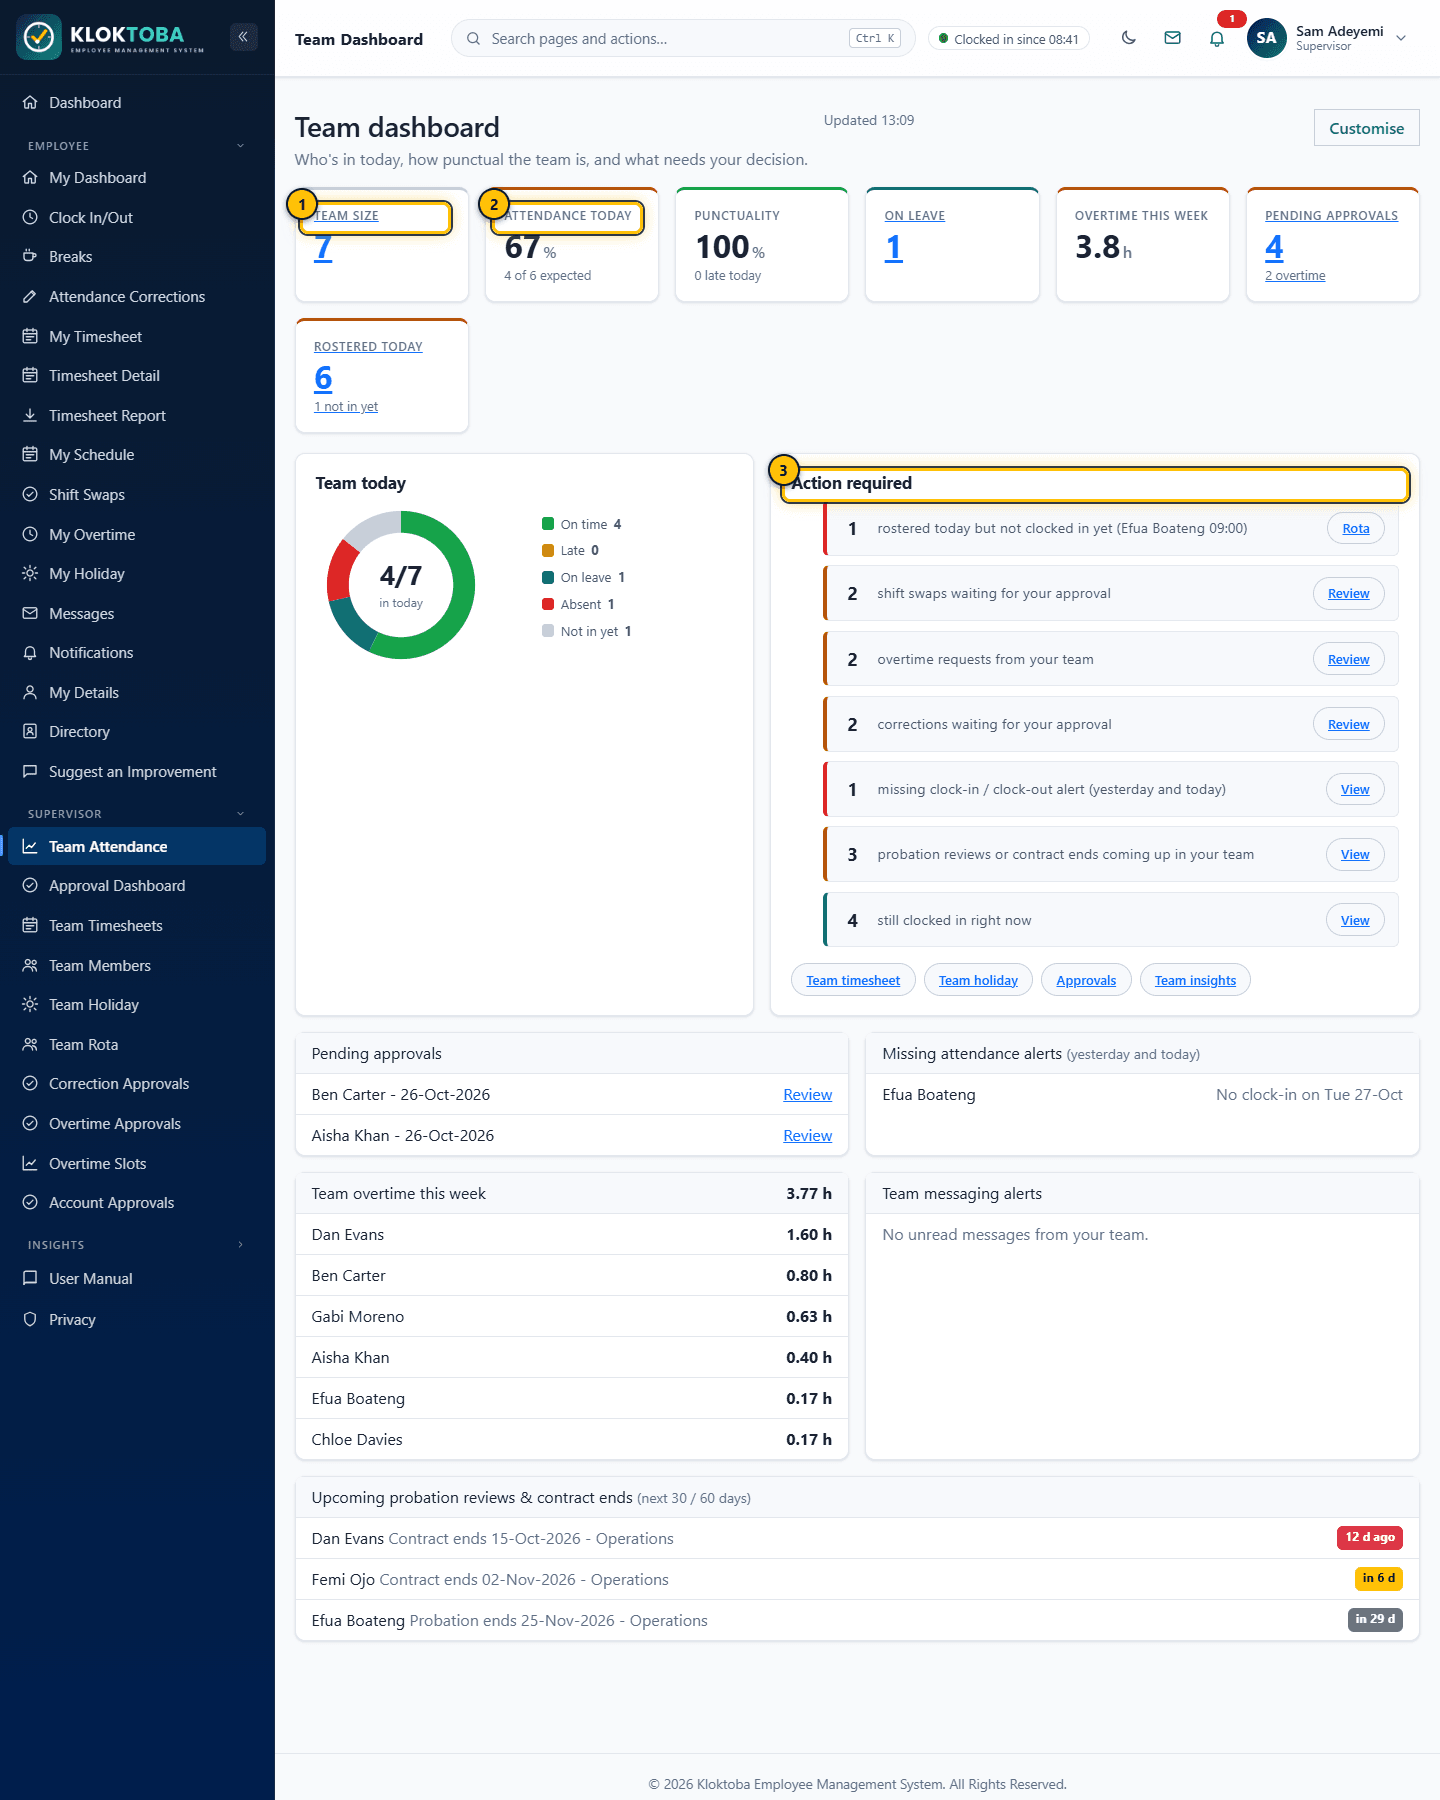
SS-031 – Team dashboard (Supervisor). Viewed as: Supervisor. - Team size
- Attendance today
- Action required queue
- Review Team size, Attendance today, Punctuality, On leave, Overtime this week and Pending approvals.
- Work down Action required: swaps, overtime, corrections, and probation or contract reminders. Each row has a Review link.
Expected result
Items disappear from the queue once you decide them.
Common errors
| Error or mistake | What to do |
|---|---|
| The team shows zero | You have no direct reports yet; HR assigns managers on the employee record. |
Troubleshooting
| Problem | Solution |
|---|---|
| A report is not listed | Only direct reports are included. |
Frequently asked questions
- What does Rostered today mean?
- People with a published shift today and how many have not clocked in yet.
8.3 Team timesheets and recommending overtime
Step-by-step instructions
- Open Team Timesheets. Use the week links to move between weeks. Summary tiles show employees, hours, awaiting approval and over target.
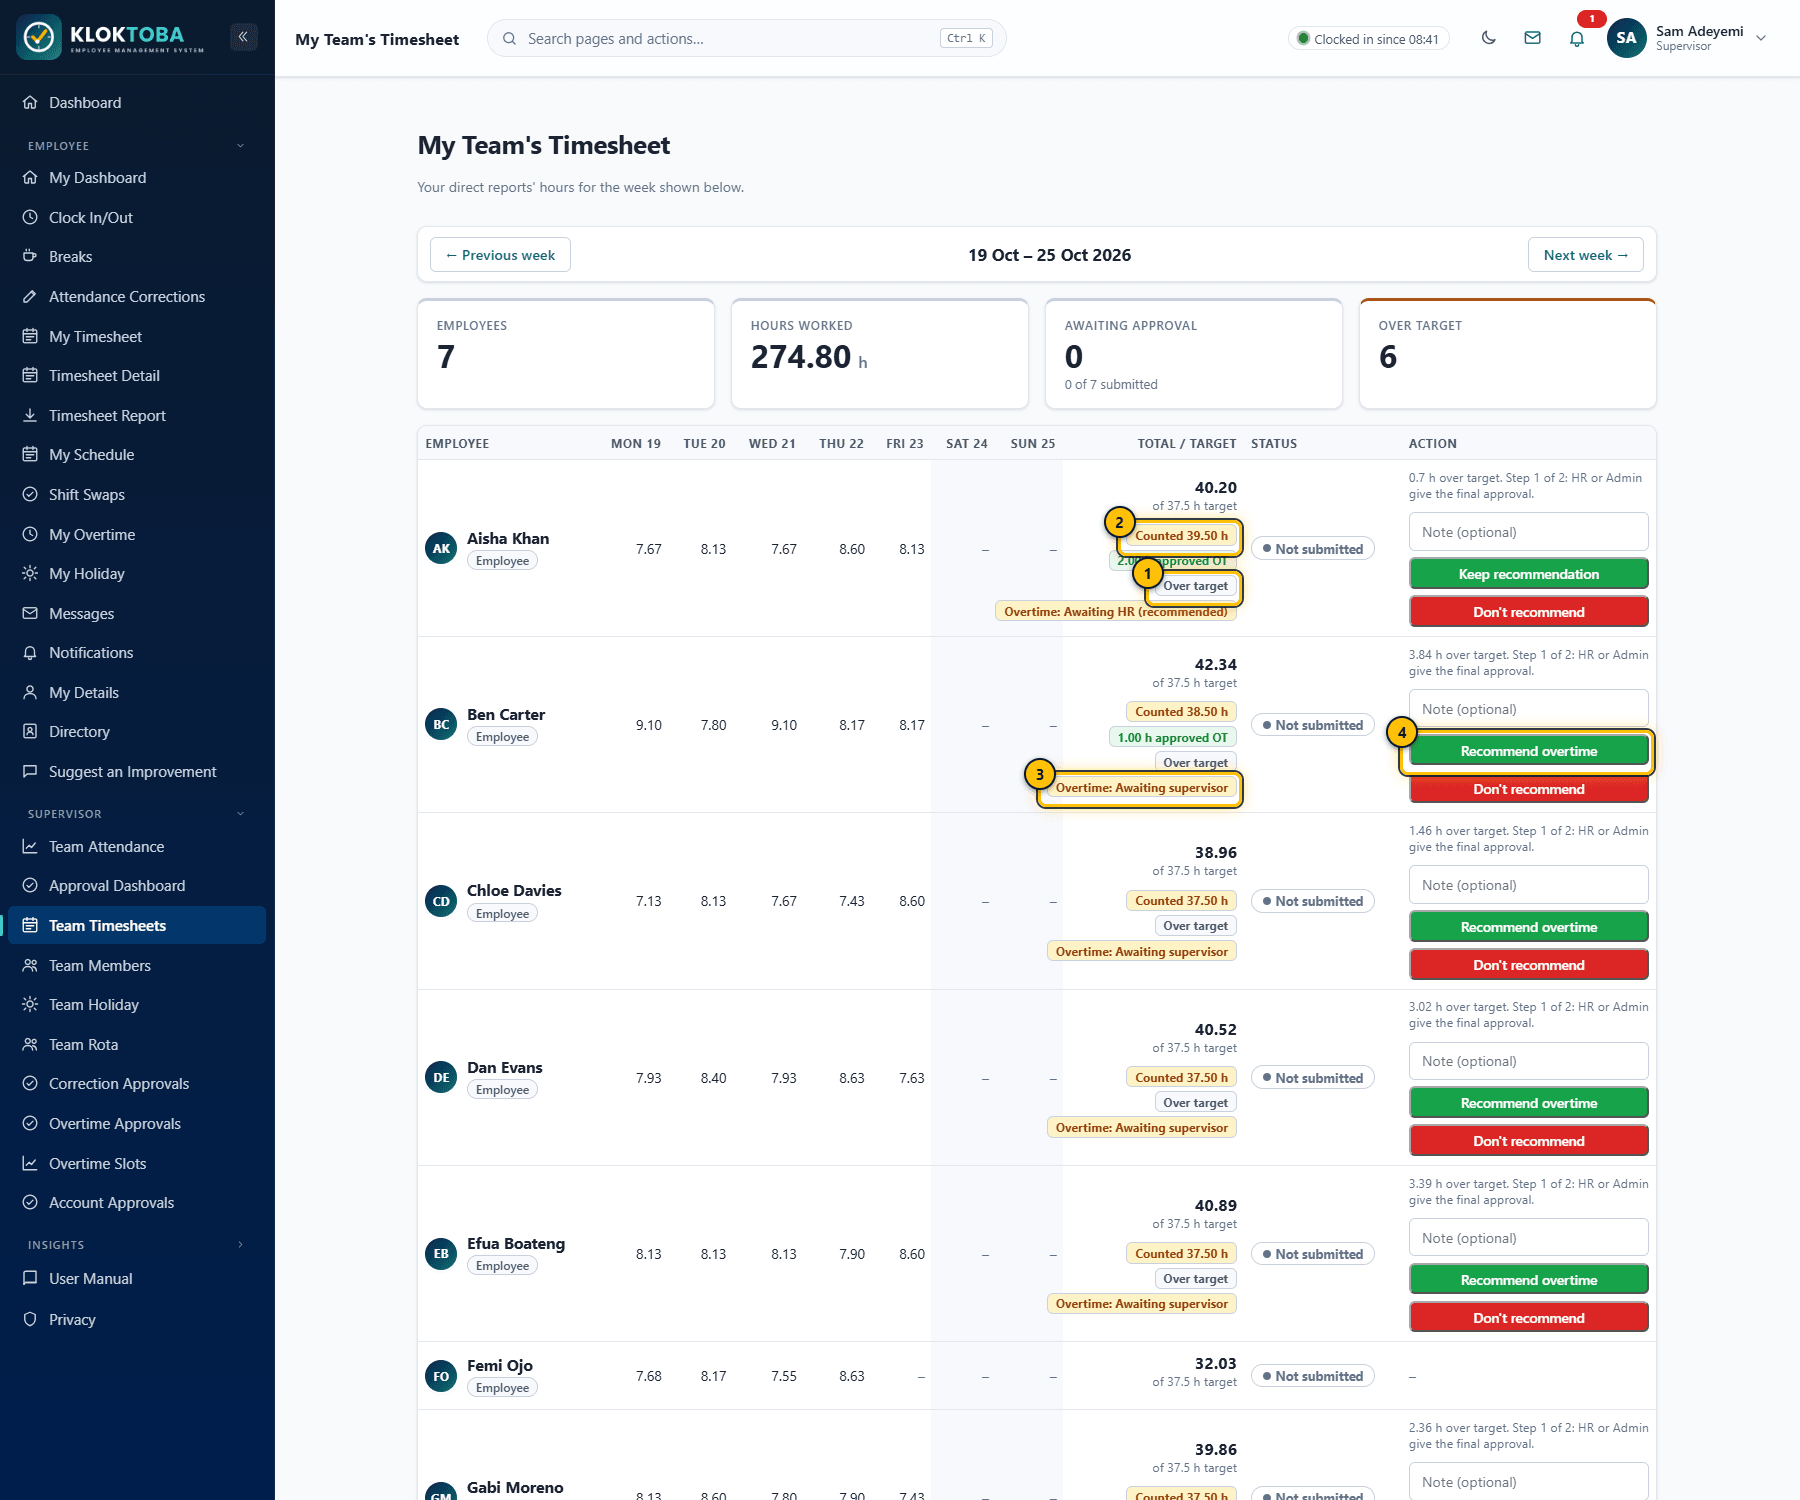
SS-032 – Team timesheets. Viewed as: Supervisor. - People over their weekly target
- Hours that count until the overtime is approved
- Overtime status
- Step 1 of 2: recommend (or don't recommend) the overtime
- For a Pending week add an optional note and select Approve or Reject.
- For a week over target, select Recommend overtime or Don't recommend (step 1 of 2). HR or Admin then give the final approval (Overtime final approval). This is separate from approving the timesheet.
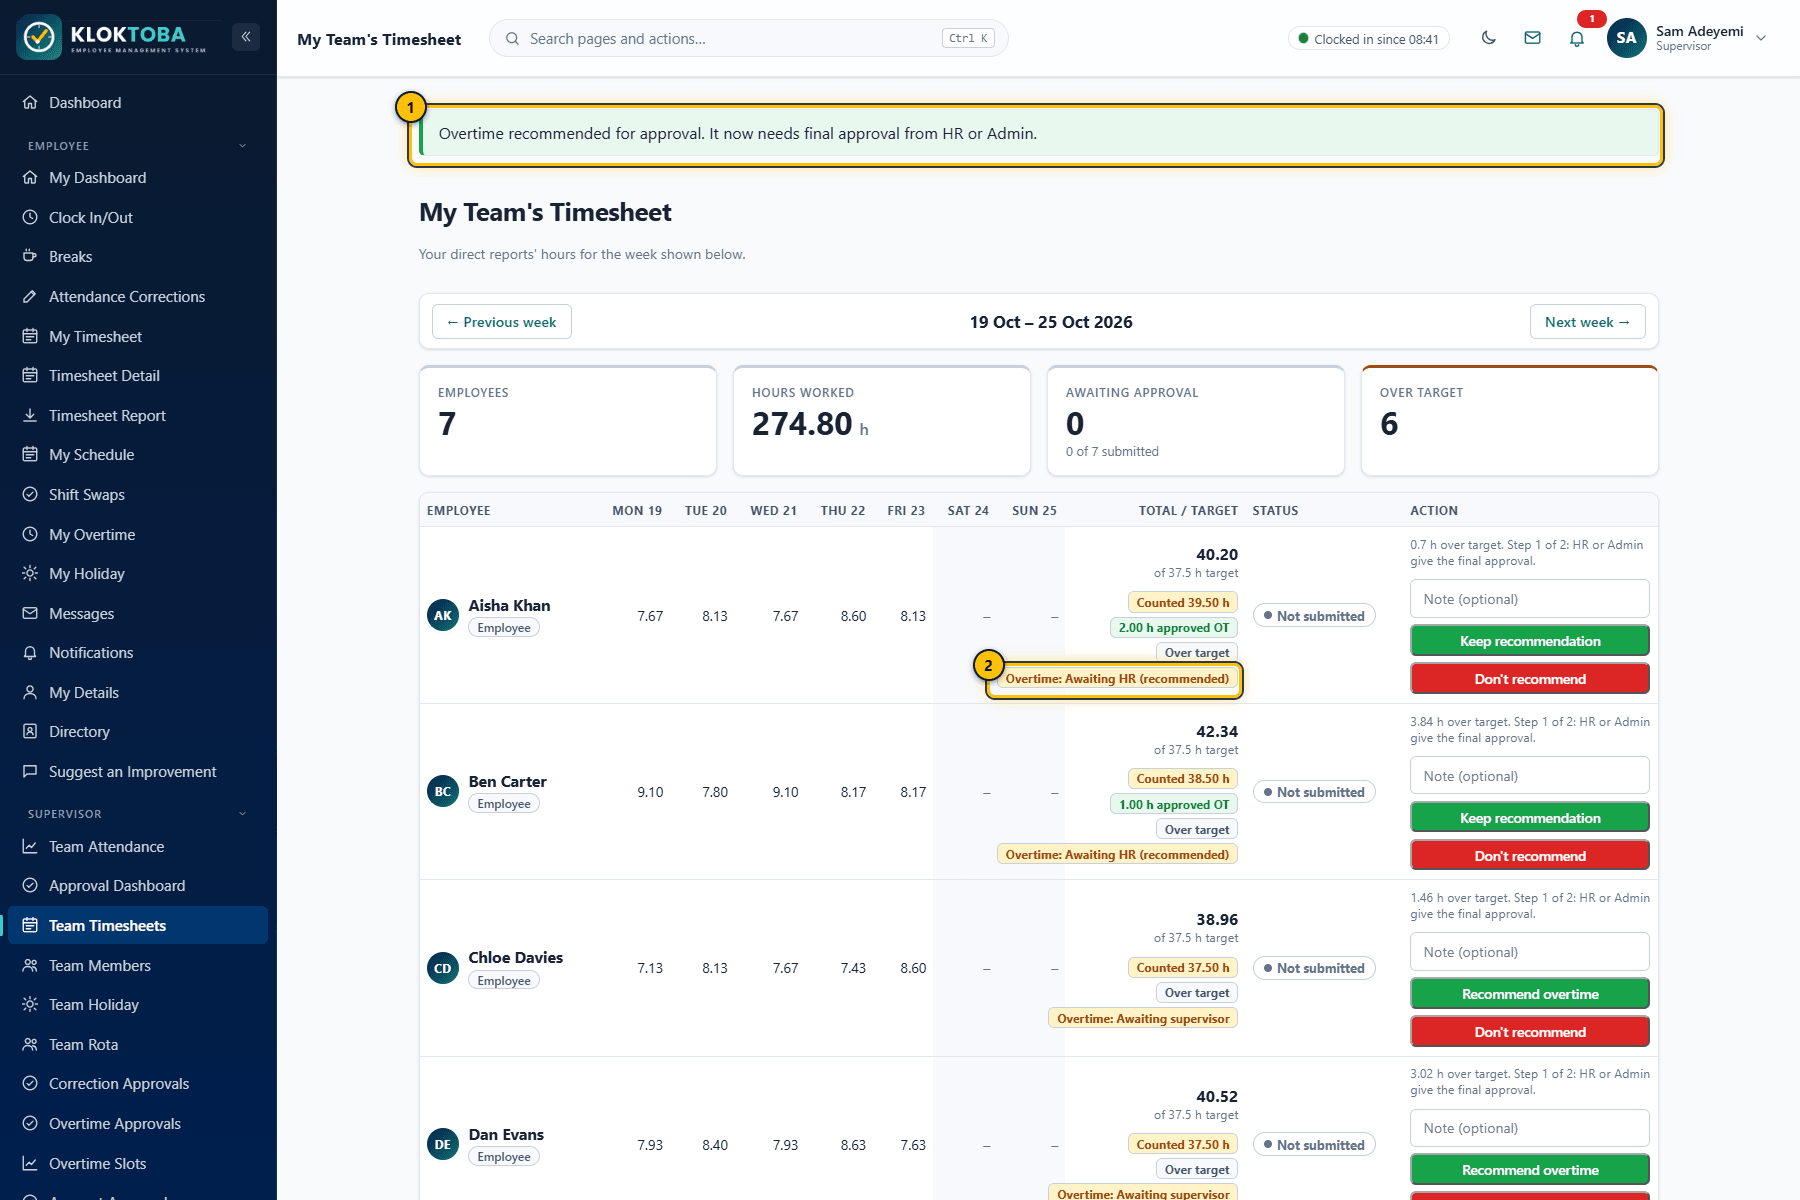
SS-081 – Overtime recommended by the supervisor. Viewed as: Supervisor. - Confirmation: the overtime now needs final approval from HR or Admin
- New status
Expected result
Status updates for the employee. You can change your recommendation until HR or Admin decide. Until overtime has final approval the week counts at the target, shown as Counted on the row.
Common errors
| Error or mistake | What to do |
|---|---|
| Cannot decide someone's timesheet | Supervisors can only decide their direct reports. HR and Admin can decide anyone's. |
| "Only this person's supervisor can recommend their overtime." | Recommending is for the employee's own supervisor. |
Troubleshooting
| Problem | Solution |
|---|---|
| Flagged badge shown | A shift was auto-closed. HR corrects it from Flagged Shifts. |
Frequently asked questions
- Does rejecting overtime change pay?
- Yes: hours over target that are not approved do not count, so the week is paid at the target.
- What if the overtime was requested in advance?
- Hours approved through an overtime request count automatically and are not part of this step.
8.4 Approval queues
Step-by-step instructions
- Correction Approvals: on Awaiting my approval, open a request and Approve, Reject or Return it with a comment. Returning asks the employee for clarification.
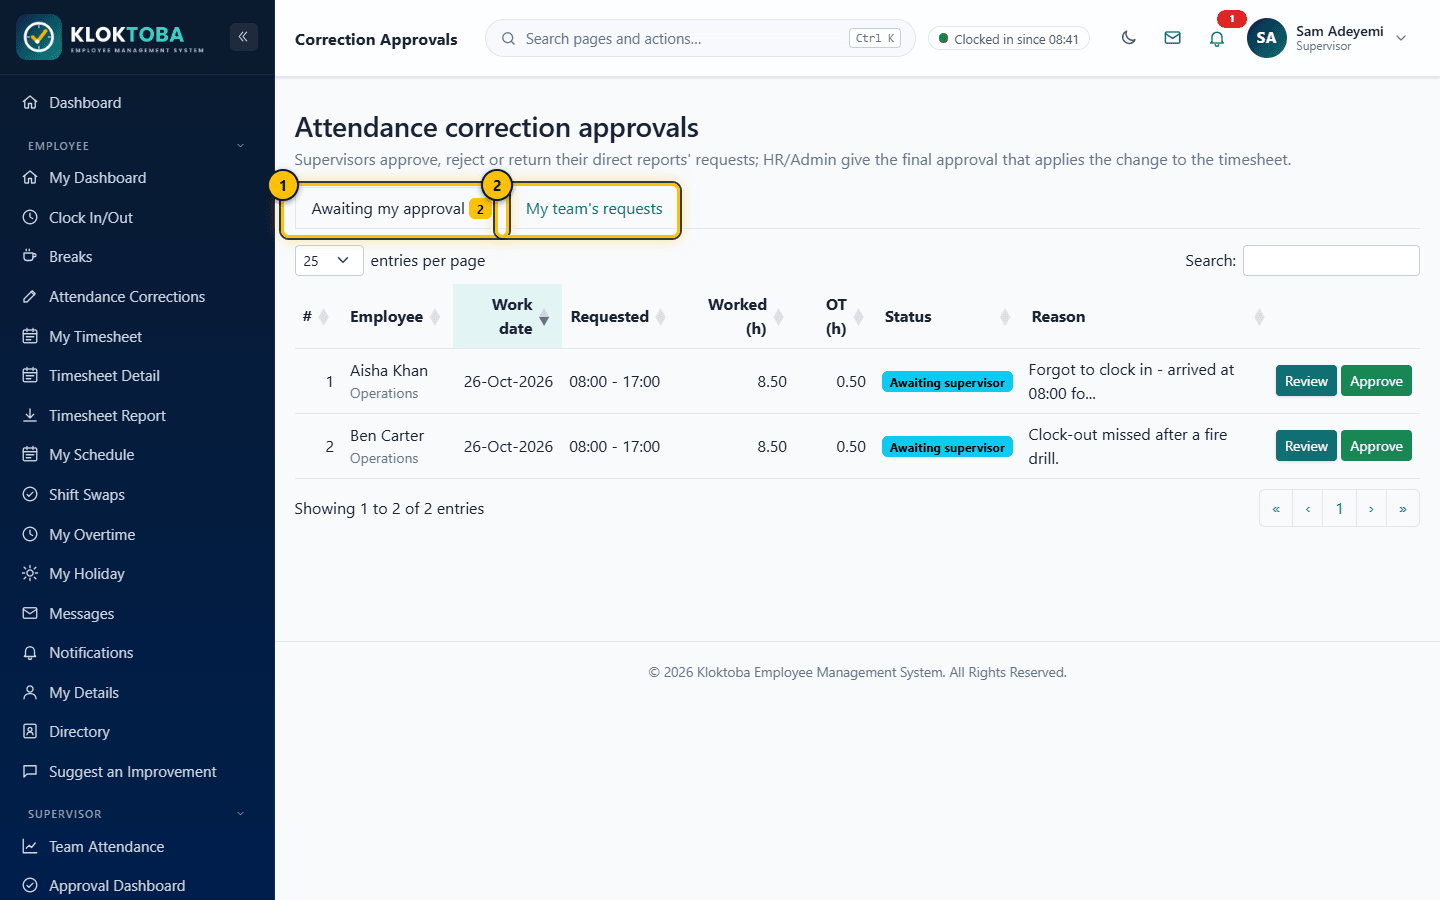
SS-019 – Correction approvals (Supervisor). Viewed as: Supervisor. - Queue awaiting your decision
- Everything your team has submitted
- HR and Admin use Awaiting HR approval to give final approval. Only then does the timesheet change.
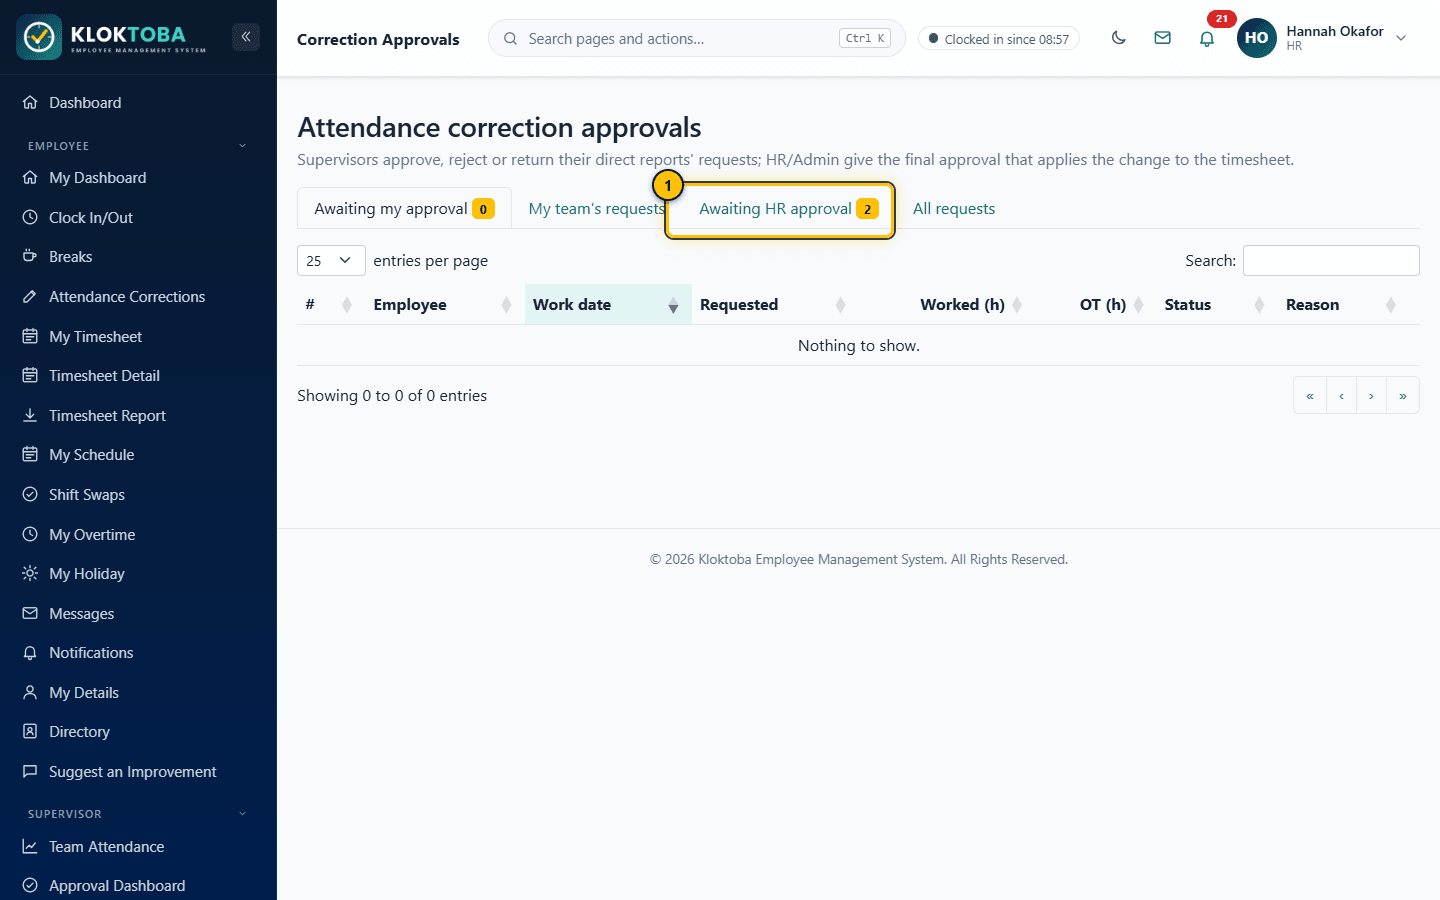
SS-020 – Correction approvals (HR final approval). Viewed as: HR. - HR gives the final approval that changes the timesheet
- Overtime Approvals: filter by Waiting for me, Decided or All, then Approve or Reject. You cannot decide your own request.
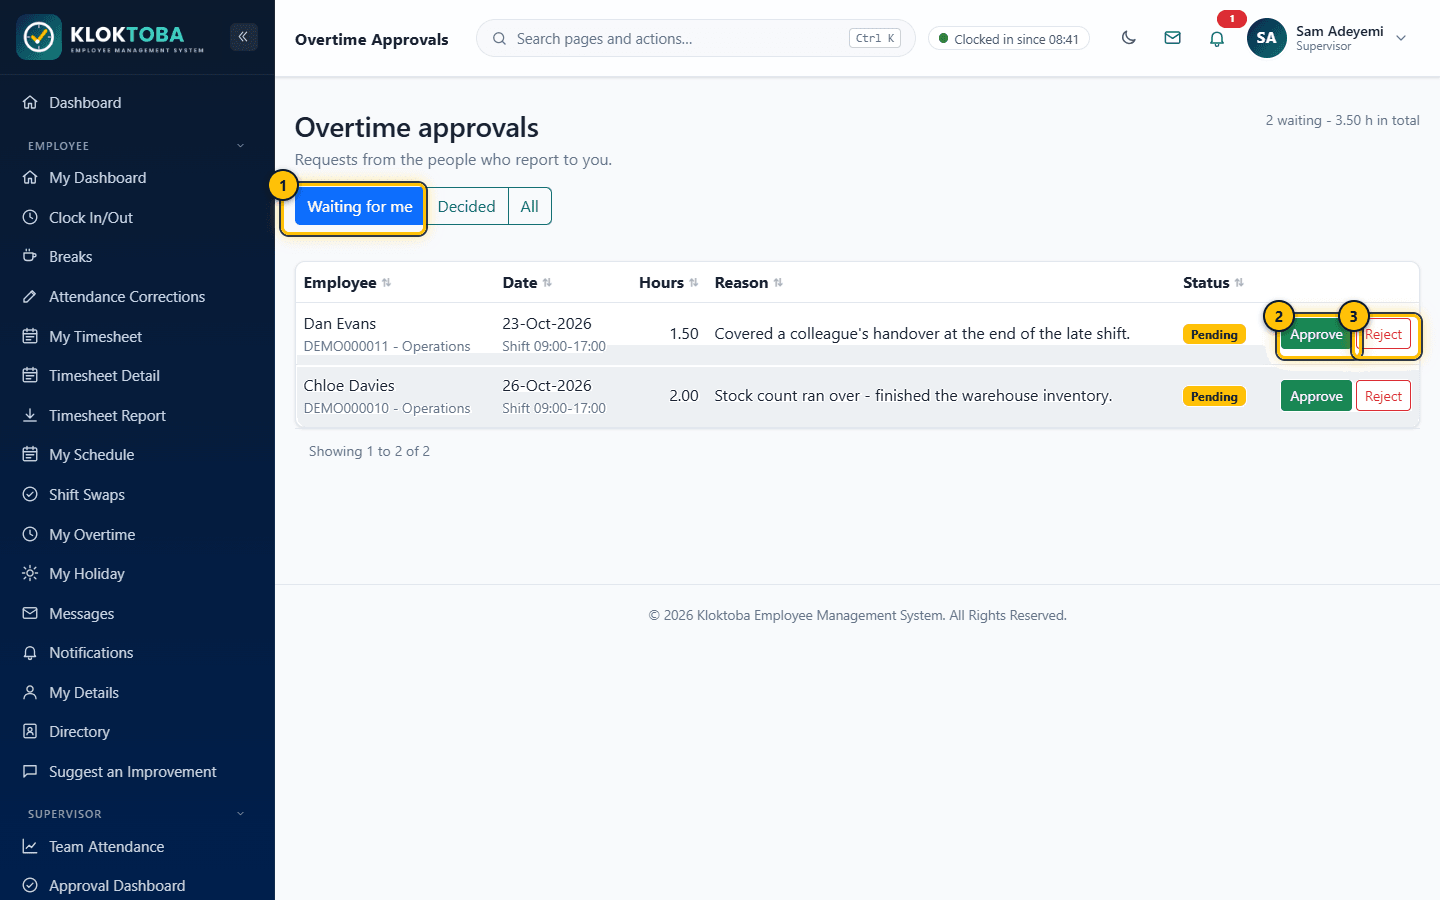
SS-028 – Overtime approvals. Viewed as: Supervisor. - Filter: waiting, decided, all
- Approve
- Reject
- Shift Swaps: under Waiting for my approval, Approve or Reject a swap once both colleagues have agreed.
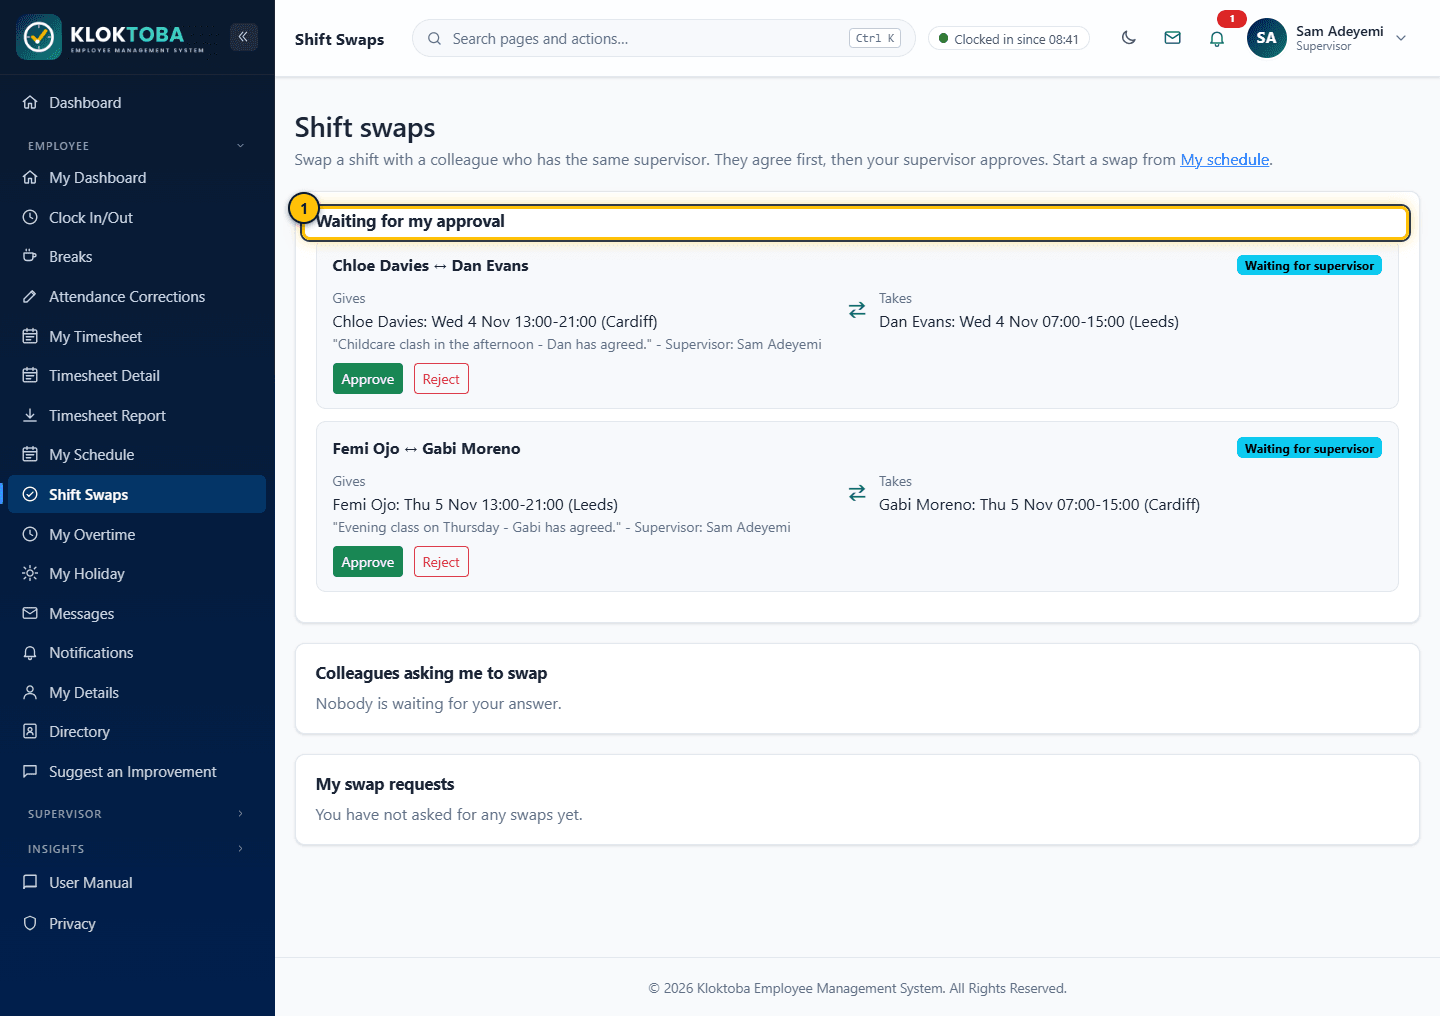
SS-026 – Shift swaps. Viewed as: Supervisor. - Swaps waiting for your decision
Expected result
The employee is notified and the item moves to its next stage or final state.
Common errors
| Error or mistake | What to do |
|---|---|
| Approve button missing | The item is not at your stage, or it is your own request. |
Troubleshooting
| Problem | Solution |
|---|---|
| A request seems stuck | Check which stage it is at: supervisor first, then HR for corrections. |
Frequently asked questions
- What does Returned mean?
- You asked the employee a question. They update and resubmit.
8.5 Team rota, members and insights
Step-by-step instructions
- Open Team Rota. Drafts are visible only to you until you select Publish week. Use Copy last week to start from the previous rota.
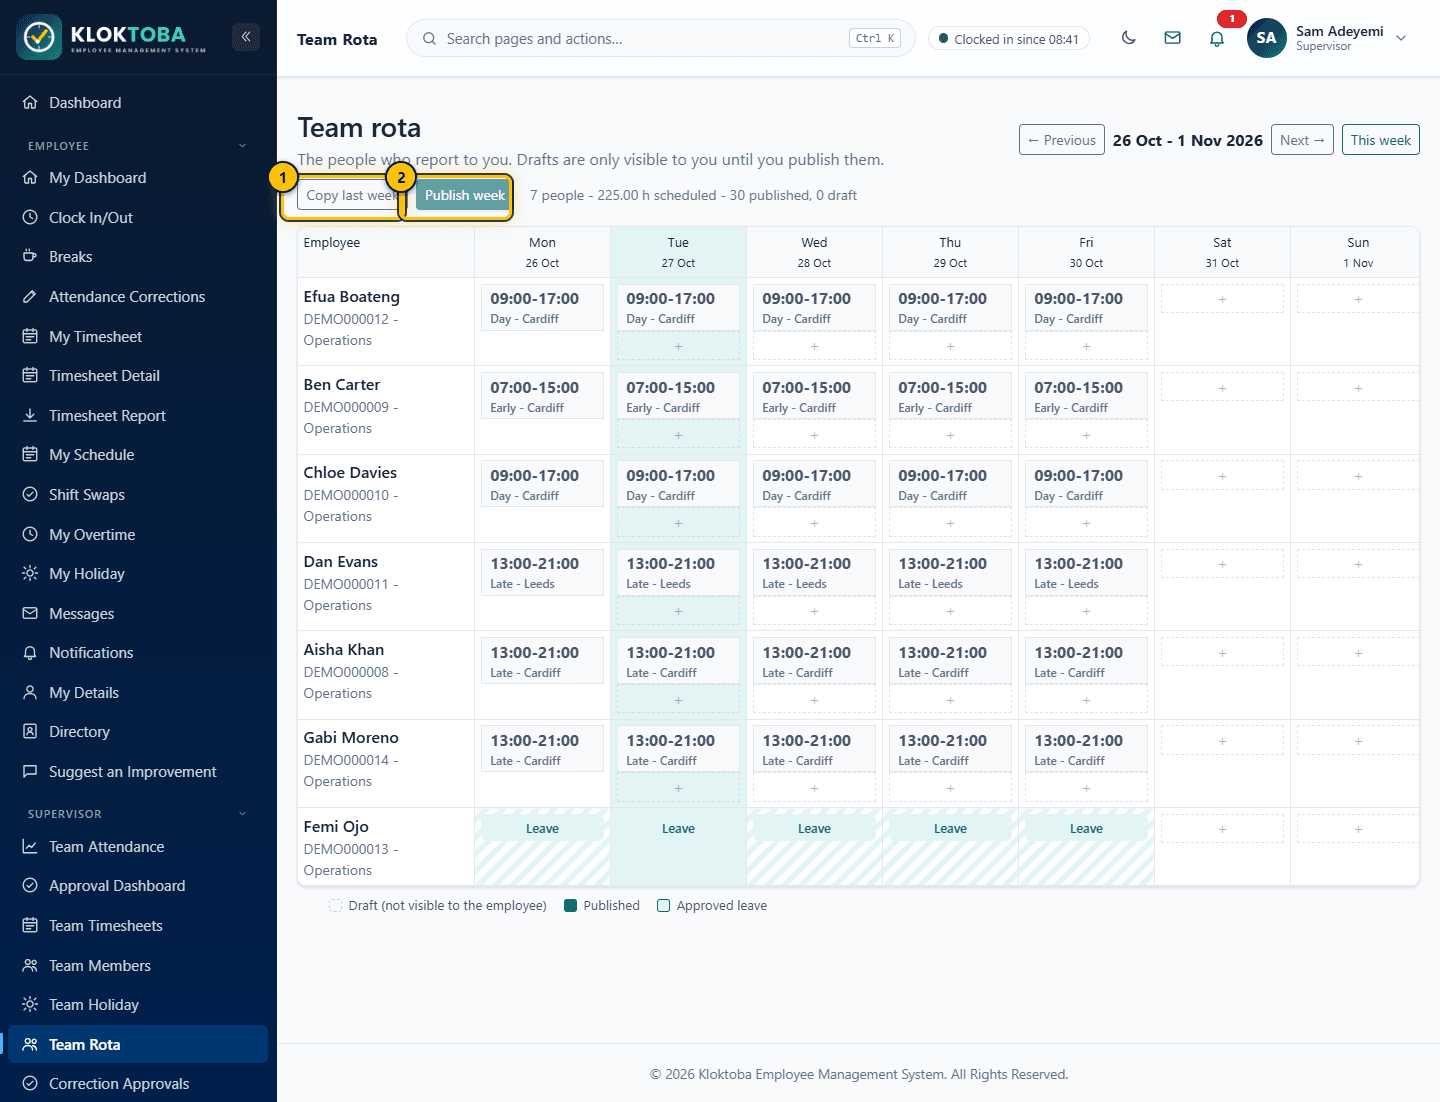
SS-034 – Team rota. Viewed as: Supervisor. - Copy last week
- Publish week
- Open Team Members to see direct reports and Send password reset link for anyone who is locked out.
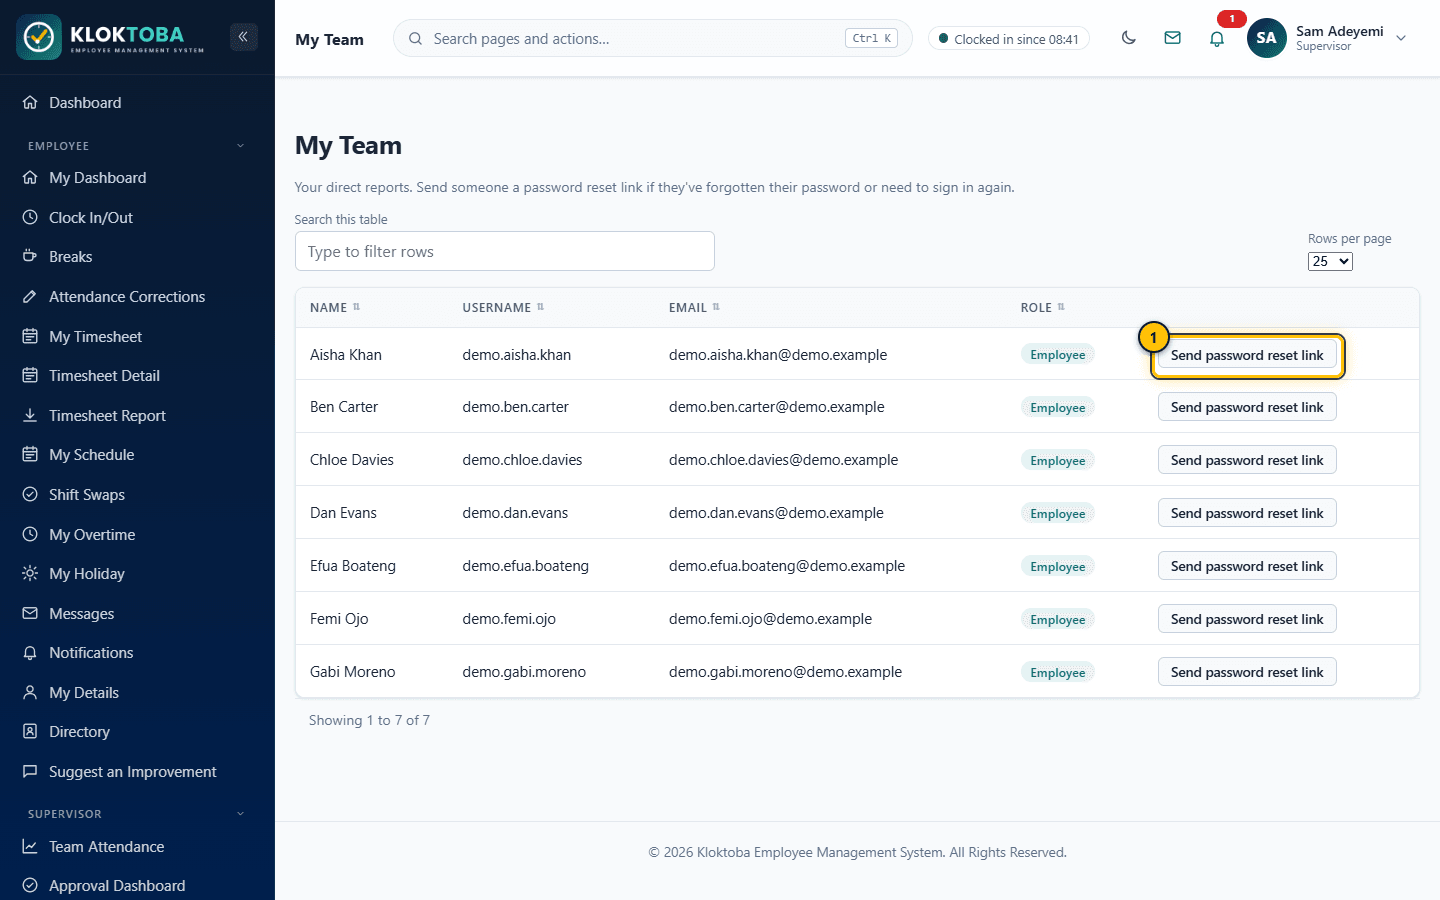
SS-033 – Team members. Viewed as: Supervisor. - Send a password reset link
- Open Insights > Team Insights for headcount, the attendance trend, attendance analytics and holiday use for your team (Chapter 11).
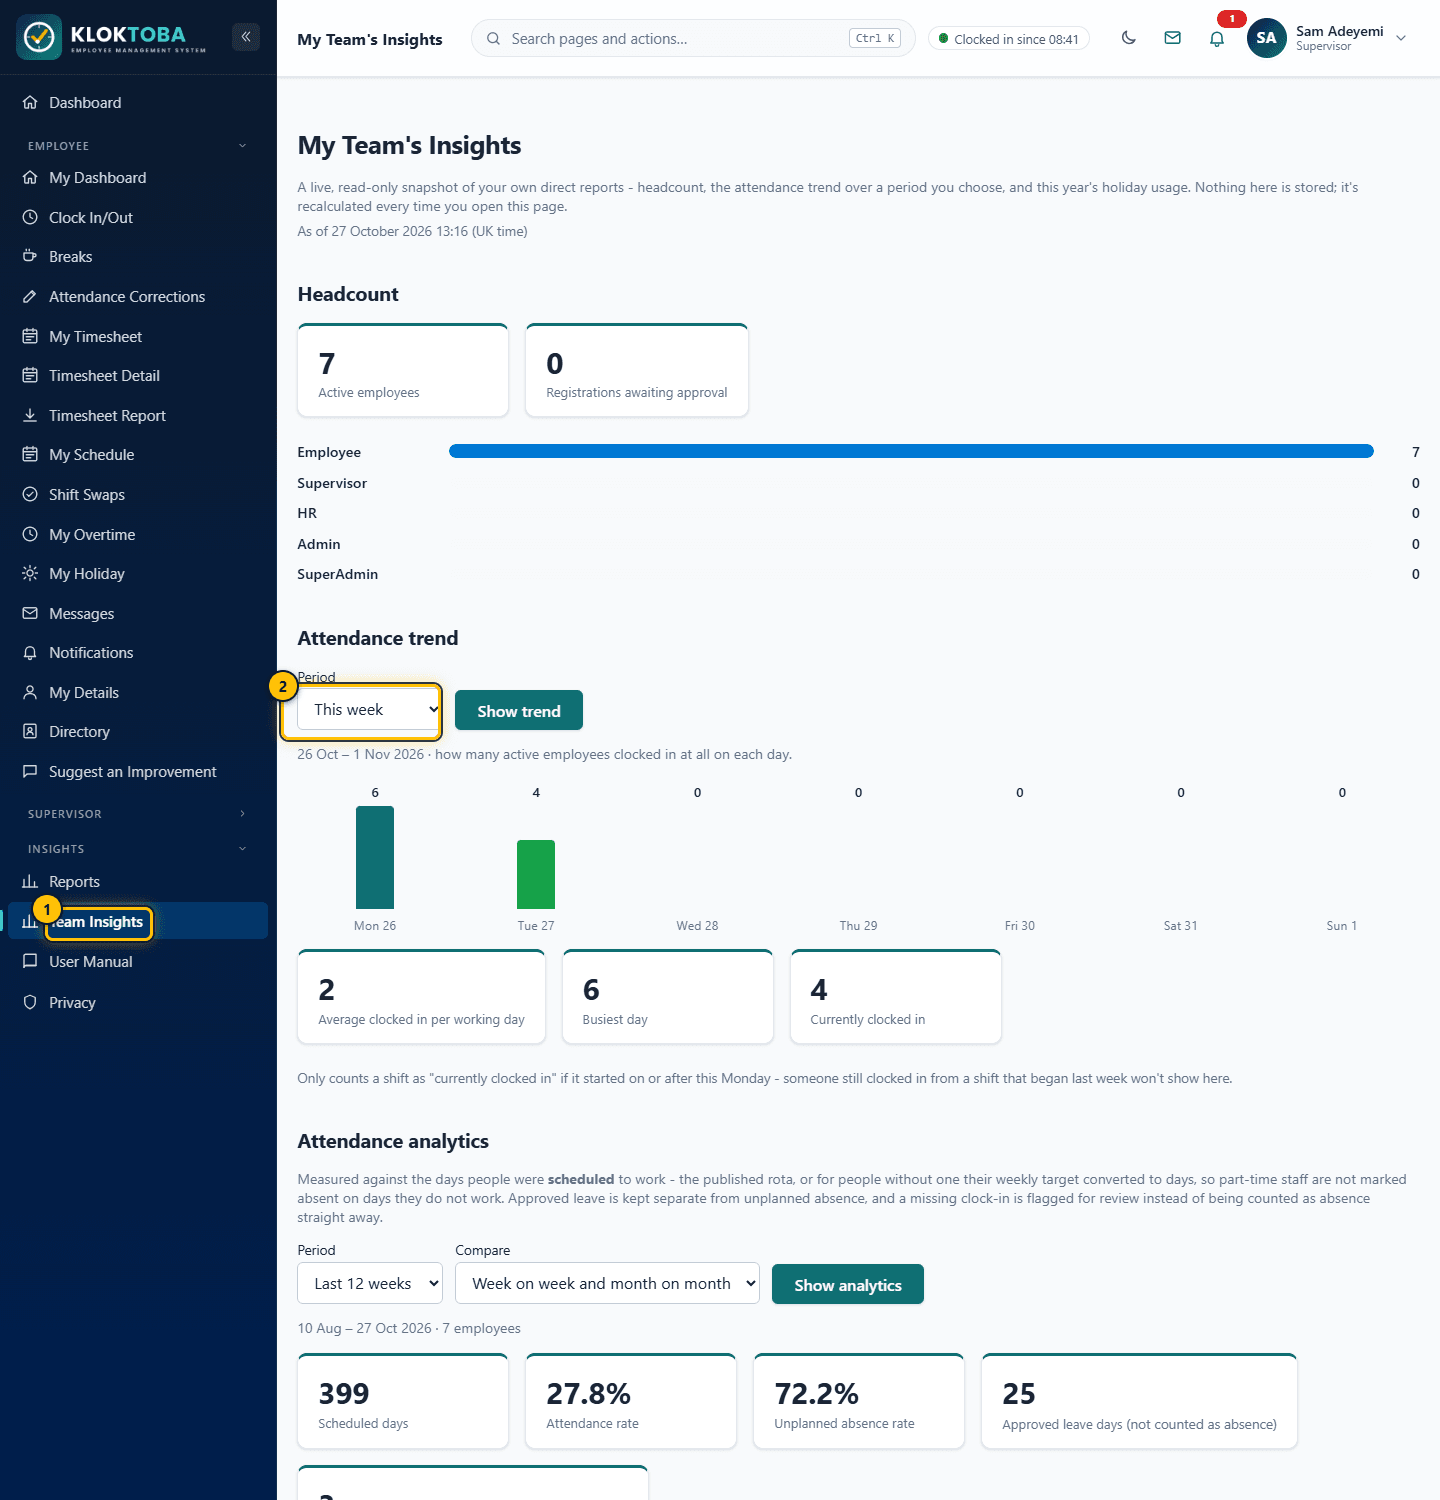
SS-035 – Team insights. Viewed as: Supervisor. - Team Insights is under Insights in the sidebar
- Choose the trend period
Expected result
Published shifts appear on each person's My Schedule and notify them.
Common errors
| Error or mistake | What to do |
|---|---|
| No shift templates | HR or Admin creates them under Shift Templates. |
Troubleshooting
| Problem | Solution |
|---|---|
| Reset link cannot be sent | The person has no email address on file. |
Frequently asked questions
- Can employees see draft shifts?
- No. Only published shifts are visible to them.
8.6 Team reporting
Supervisors run reports for their direct reports from Insights > Reports. See Chapter 11. Exporting to Excel, CSV or PDF is available to HR and Admin. For one person's timesheet as a file, use the Employee timesheet report.
Chapter 9
Organisation Administration
Setting up the organisation, its structure, shifts and company-wide rules.
9.1 Organisation setup and profile
Step-by-step instructions
- Open Admin > Organisation > Organisation Profile.
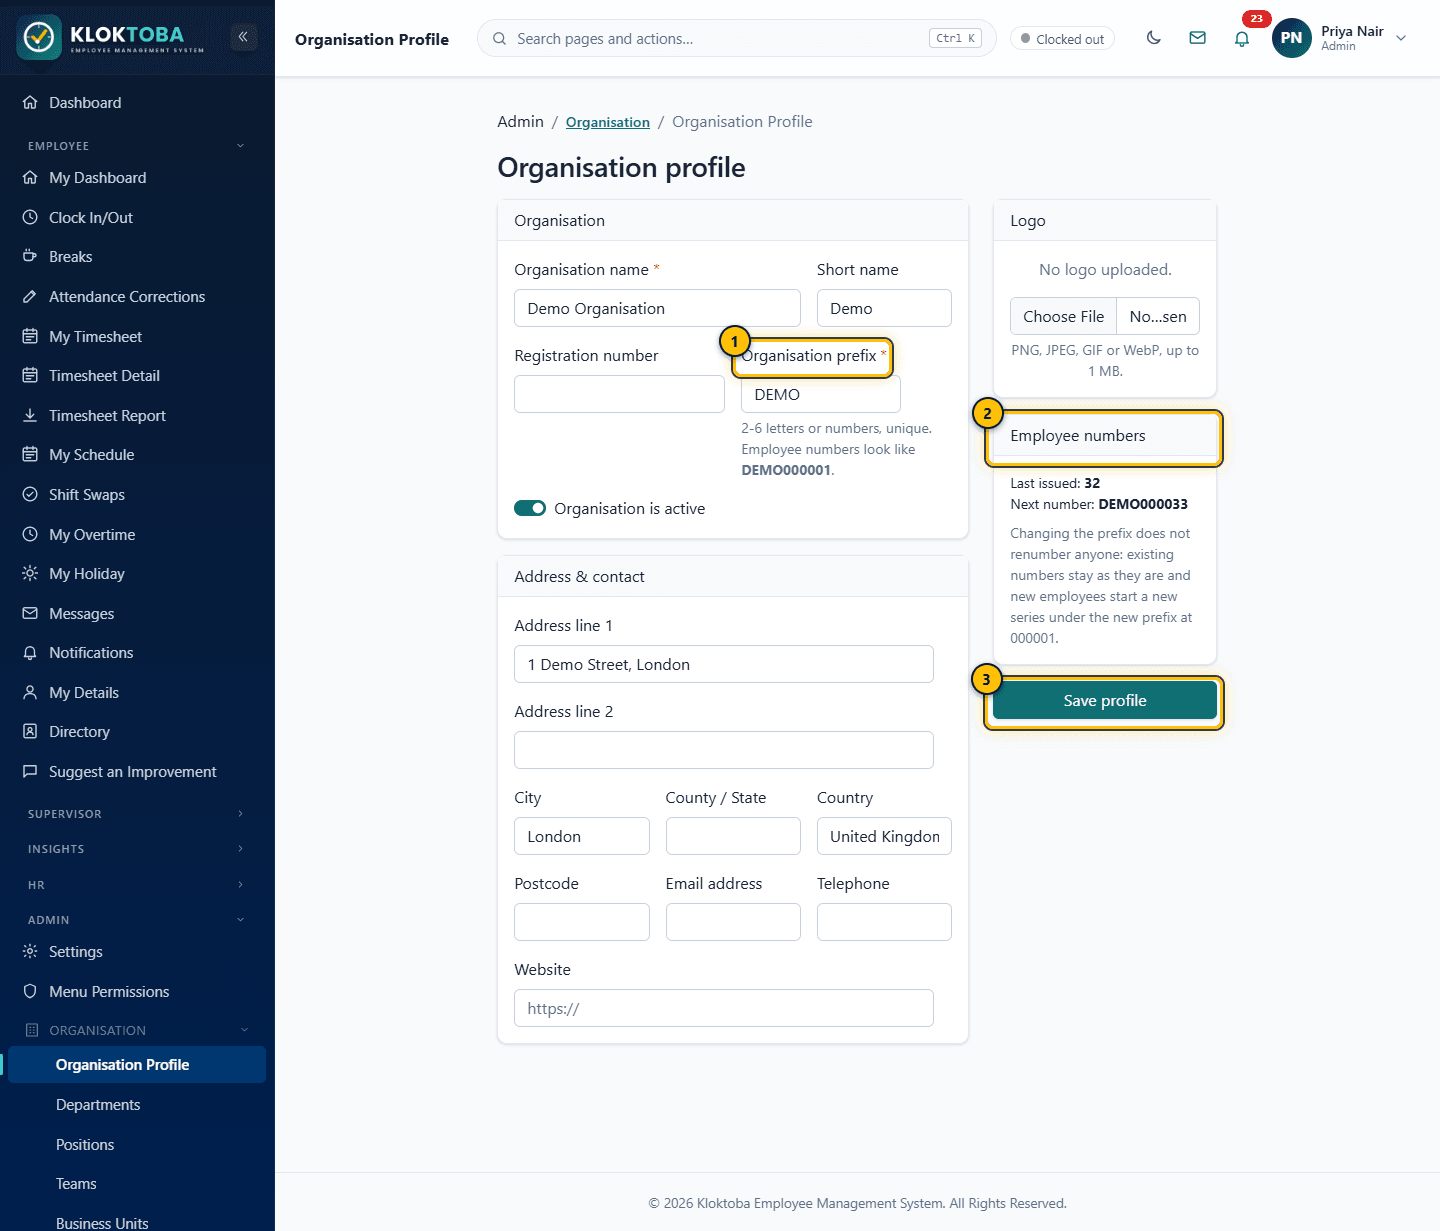
SS-046 – Organisation profile. Viewed as: Admin. - Prefix used in employee numbers
- Next employee number
- Save profile
- Complete Organisation name, Short name, Registration number, Organisation prefix (2 to 6 letters or numbers, unique) and address and contact fields. Upload a logo (PNG, JPEG, GIF or WebP up to 1 MB) if wanted.
- Check Employee numbers: the last issued and next number are shown. Select Save profile.
- Admins can also open Admin > Organisation > My Organisation to edit organisation details and promote an employee to Admin. SuperAdmin sees every organisation and can create new ones, activate or deactivate them and assign a subscription plan.
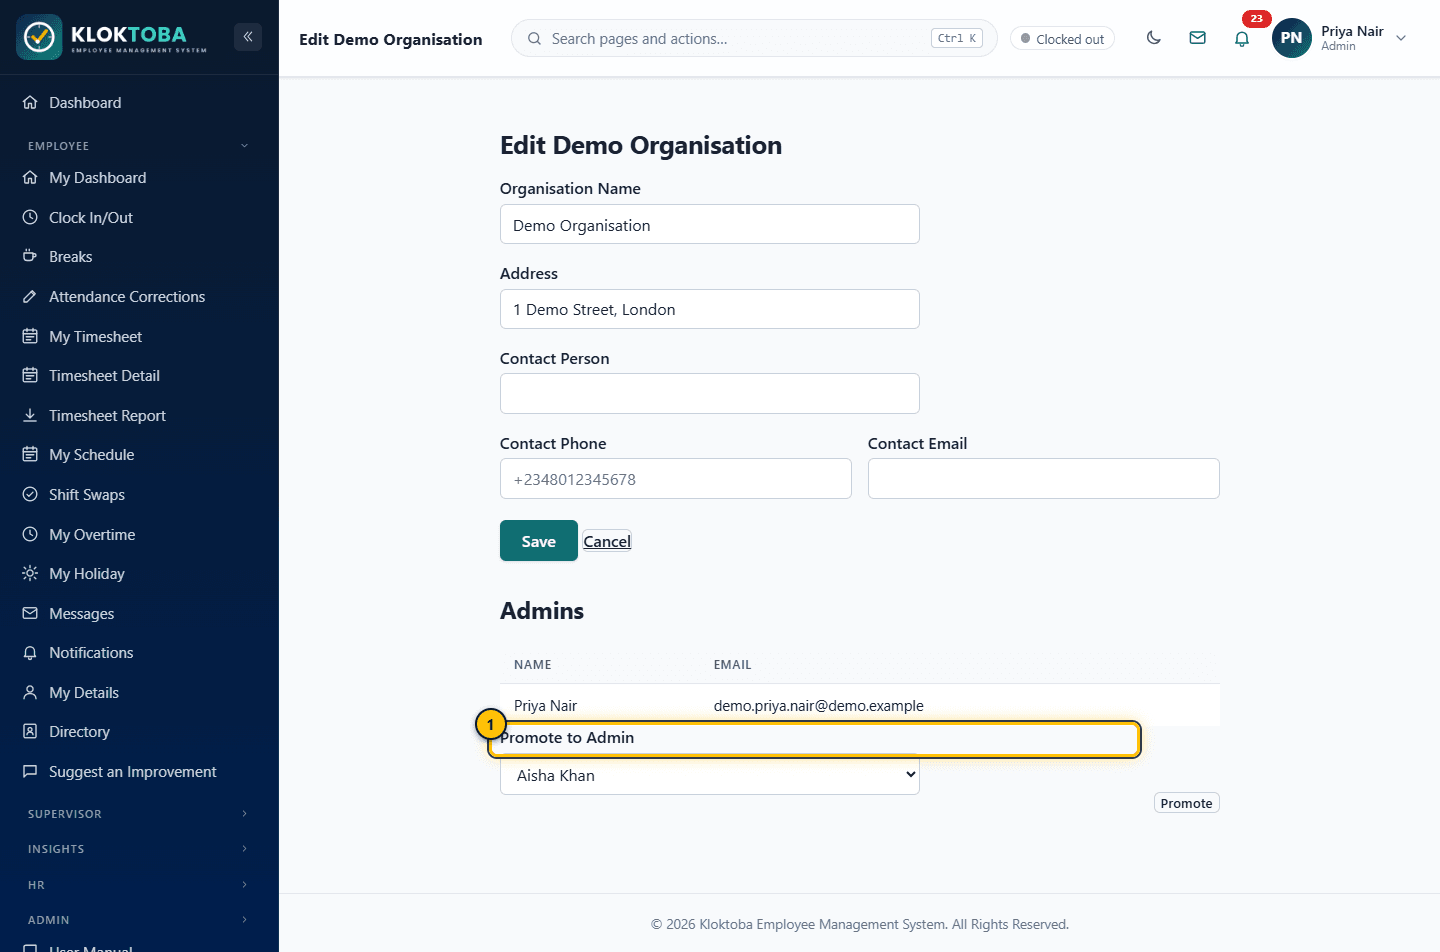
SS-055 – My Organisation and Admins. Viewed as: Admin. - Promote an employee to Admin
Expected result
The profile is saved. New employees use the current prefix.
Common errors
| Error or mistake | What to do |
|---|---|
| Prefix rejected | It must be 2 to 6 letters or numbers and unique. |
Troubleshooting
| Problem | Solution |
|---|---|
| Numbers did not change after changing the prefix | Existing numbers are never renumbered; new employees start a new series. |
Frequently asked questions
- Can I delete an organisation?
- No. An organisation with employees cannot be removed.
9.2 Departments, positions, teams, business units and locations
Step-by-step instructions
- Open Admin > Organisation > Departments. Select New department, enter a code, name and optional manager, then save. Use Edit or Deactivate on a row.
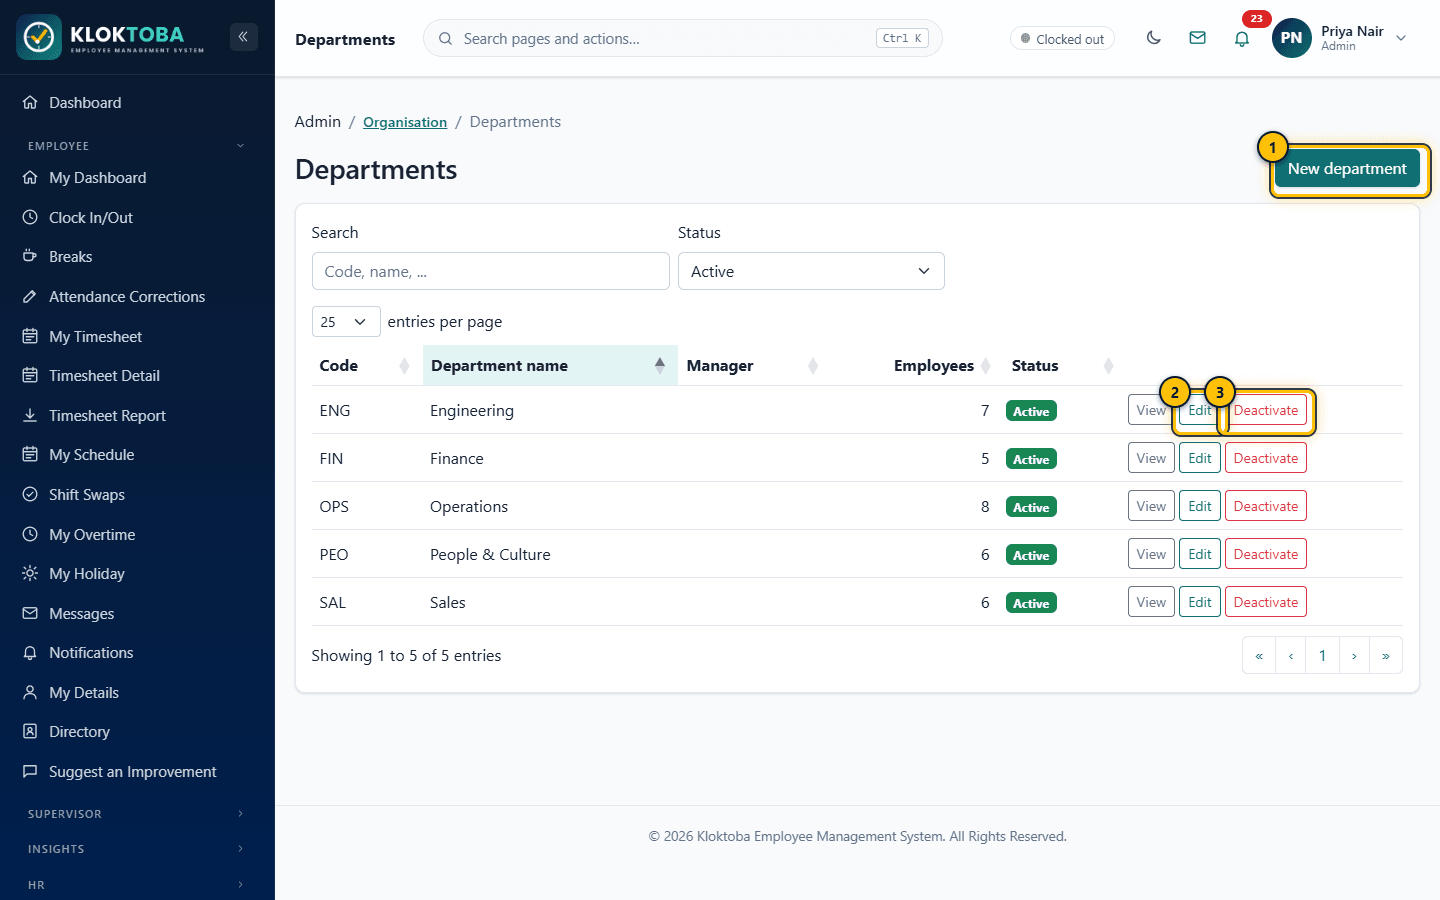
SS-047 – Departments. Viewed as: Admin. - New department
- Edit
- Deactivate
- Open Positions, select New position, and link it to a department.
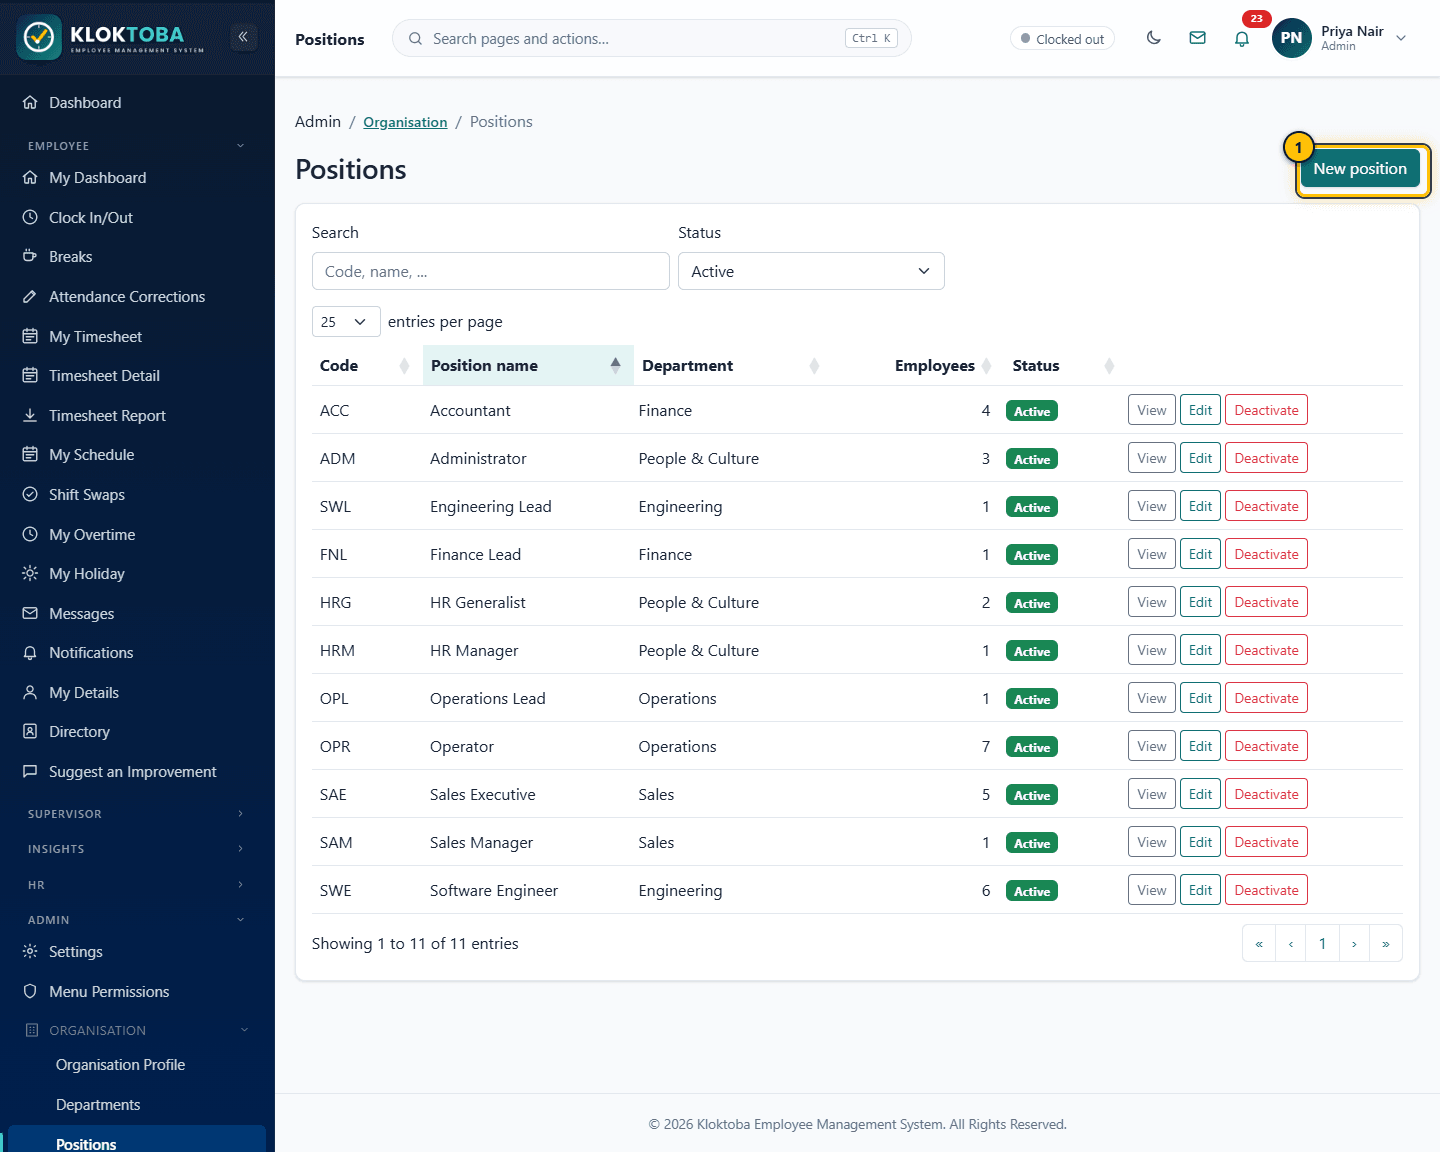
SS-048 – Positions. Viewed as: Admin. - New position
- Open Teams (linked to a department with a team leader) and Business Units the same way.
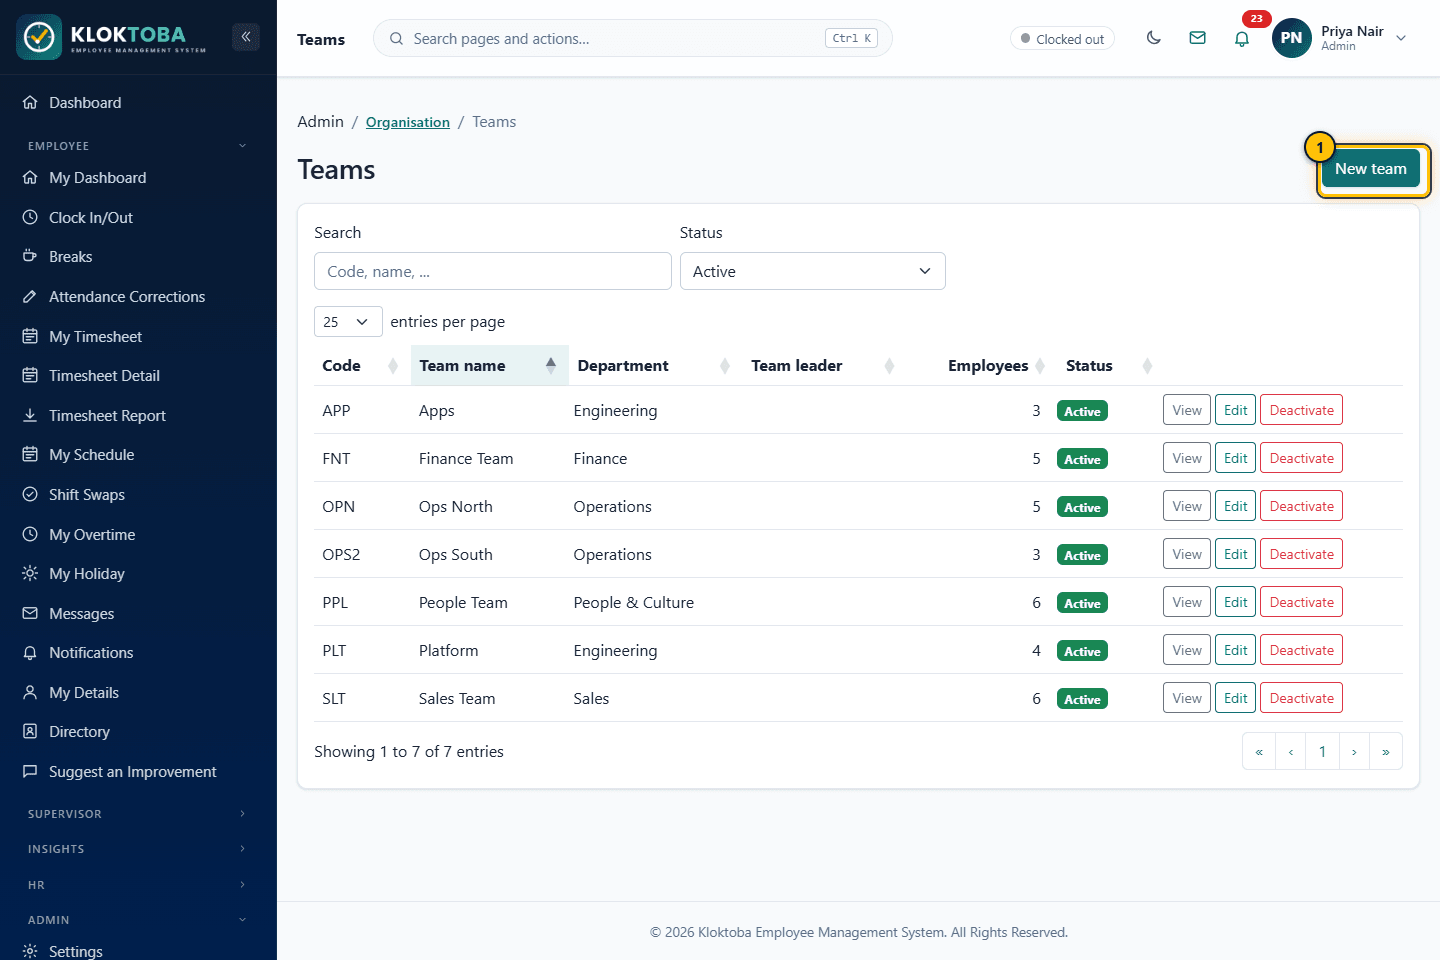
SS-049 – Teams and business units. Viewed as: Admin. - New team
- Open Locations (work locations), select New location and enter code, name, city, country and postcode.
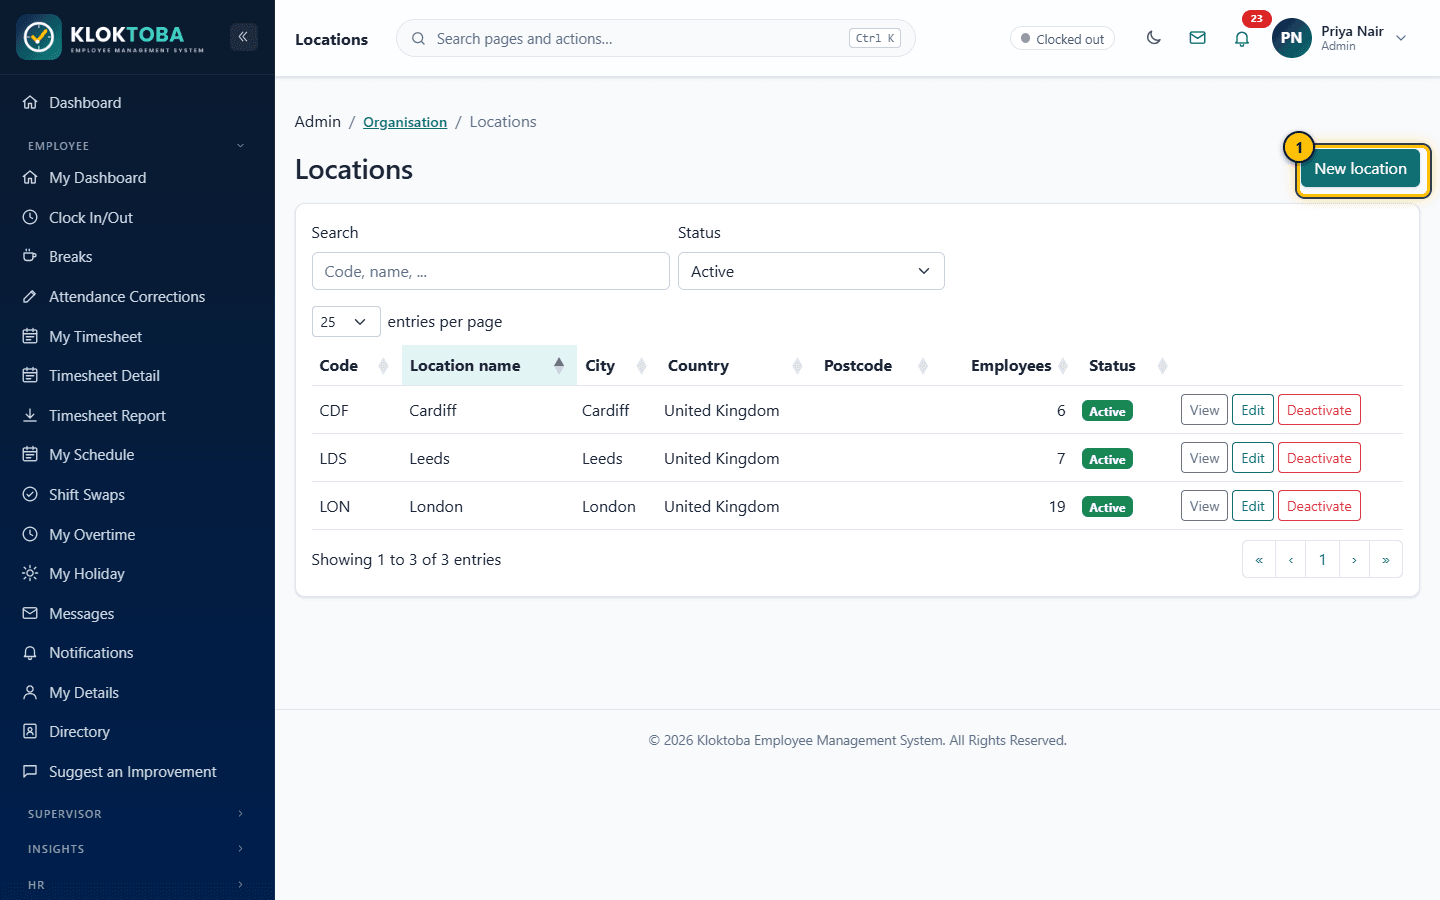
SS-050 – Locations (work locations). Viewed as: Admin. - New location
Expected result
The new item can be selected on Add Employee, Employee Assignments and report filters.
Common errors
| Error or mistake | What to do |
|---|---|
| Duplicate code | Codes are unique within the organisation. |
| Cannot deactivate | Reassign employees first if the item is in use. |
Troubleshooting
| Problem | Solution |
|---|---|
| An item is missing from a dropdown | It may be inactive. Reactivate it or choose another. |
Frequently asked questions
- What is the difference between a business unit and a department?
- A business unit is a broader grouping (for example Head Office); departments sit within the organisation and teams within departments.
9.3 Shift management: templates and overtime allowances
Step-by-step instructions
- Open Admin > Shift Templates. Select Add template to define a shift name, code, start and end time, break and whether it runs overnight. Changing a template never changes shifts already on the rota.
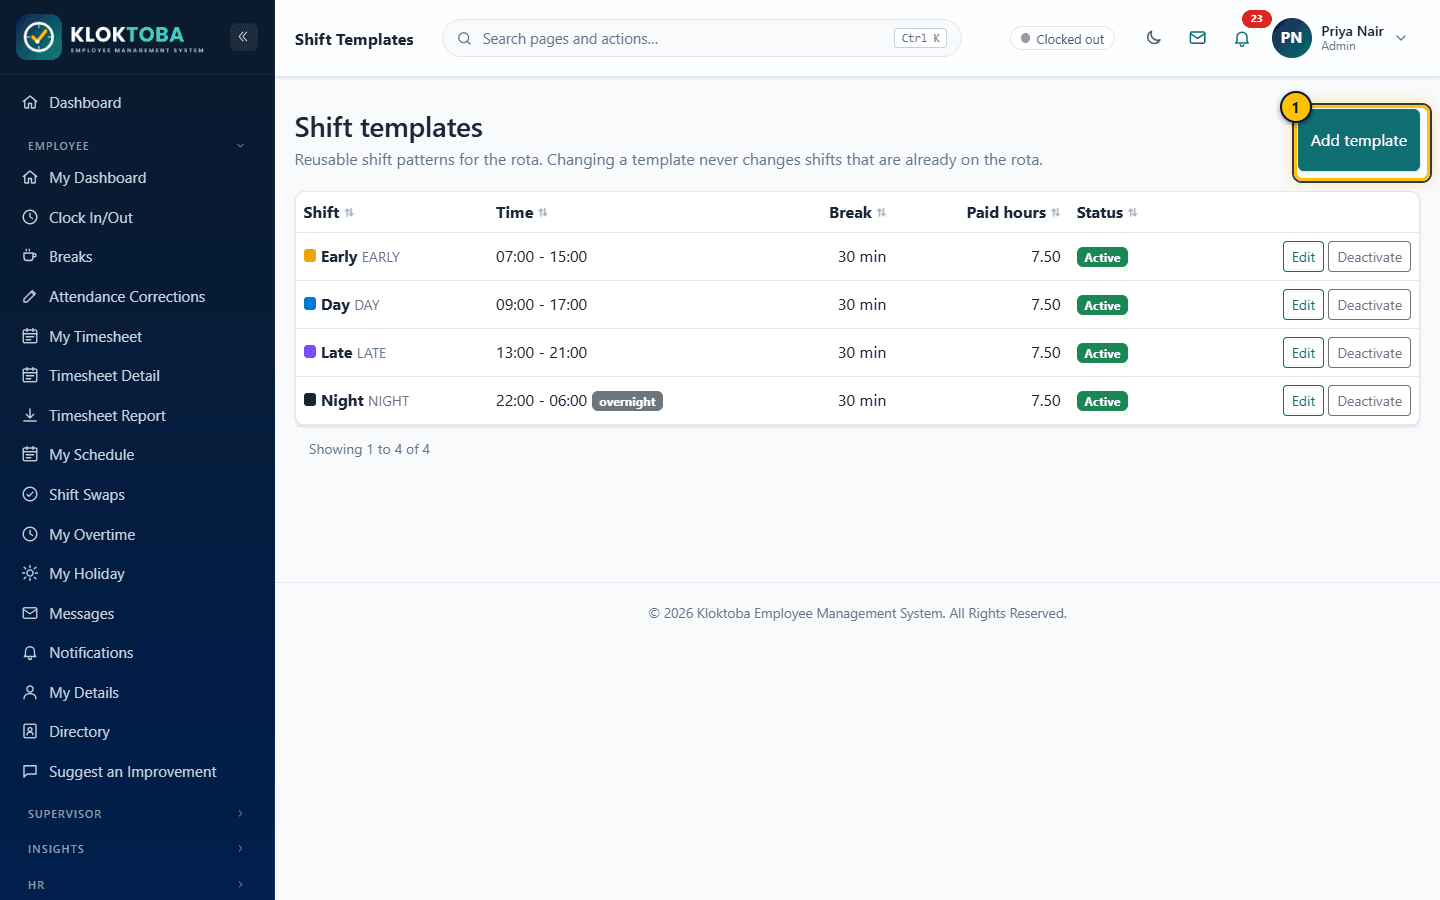
SS-051 – Shift templates. Viewed as: Admin. - Add template
- Open Overtime Slots. Set each department's Allowance % (of its weekly target hours), Pay x multiplier and view the Weekly cap (h). Then decide slot requests from supervisors under Slots waiting for a decision.
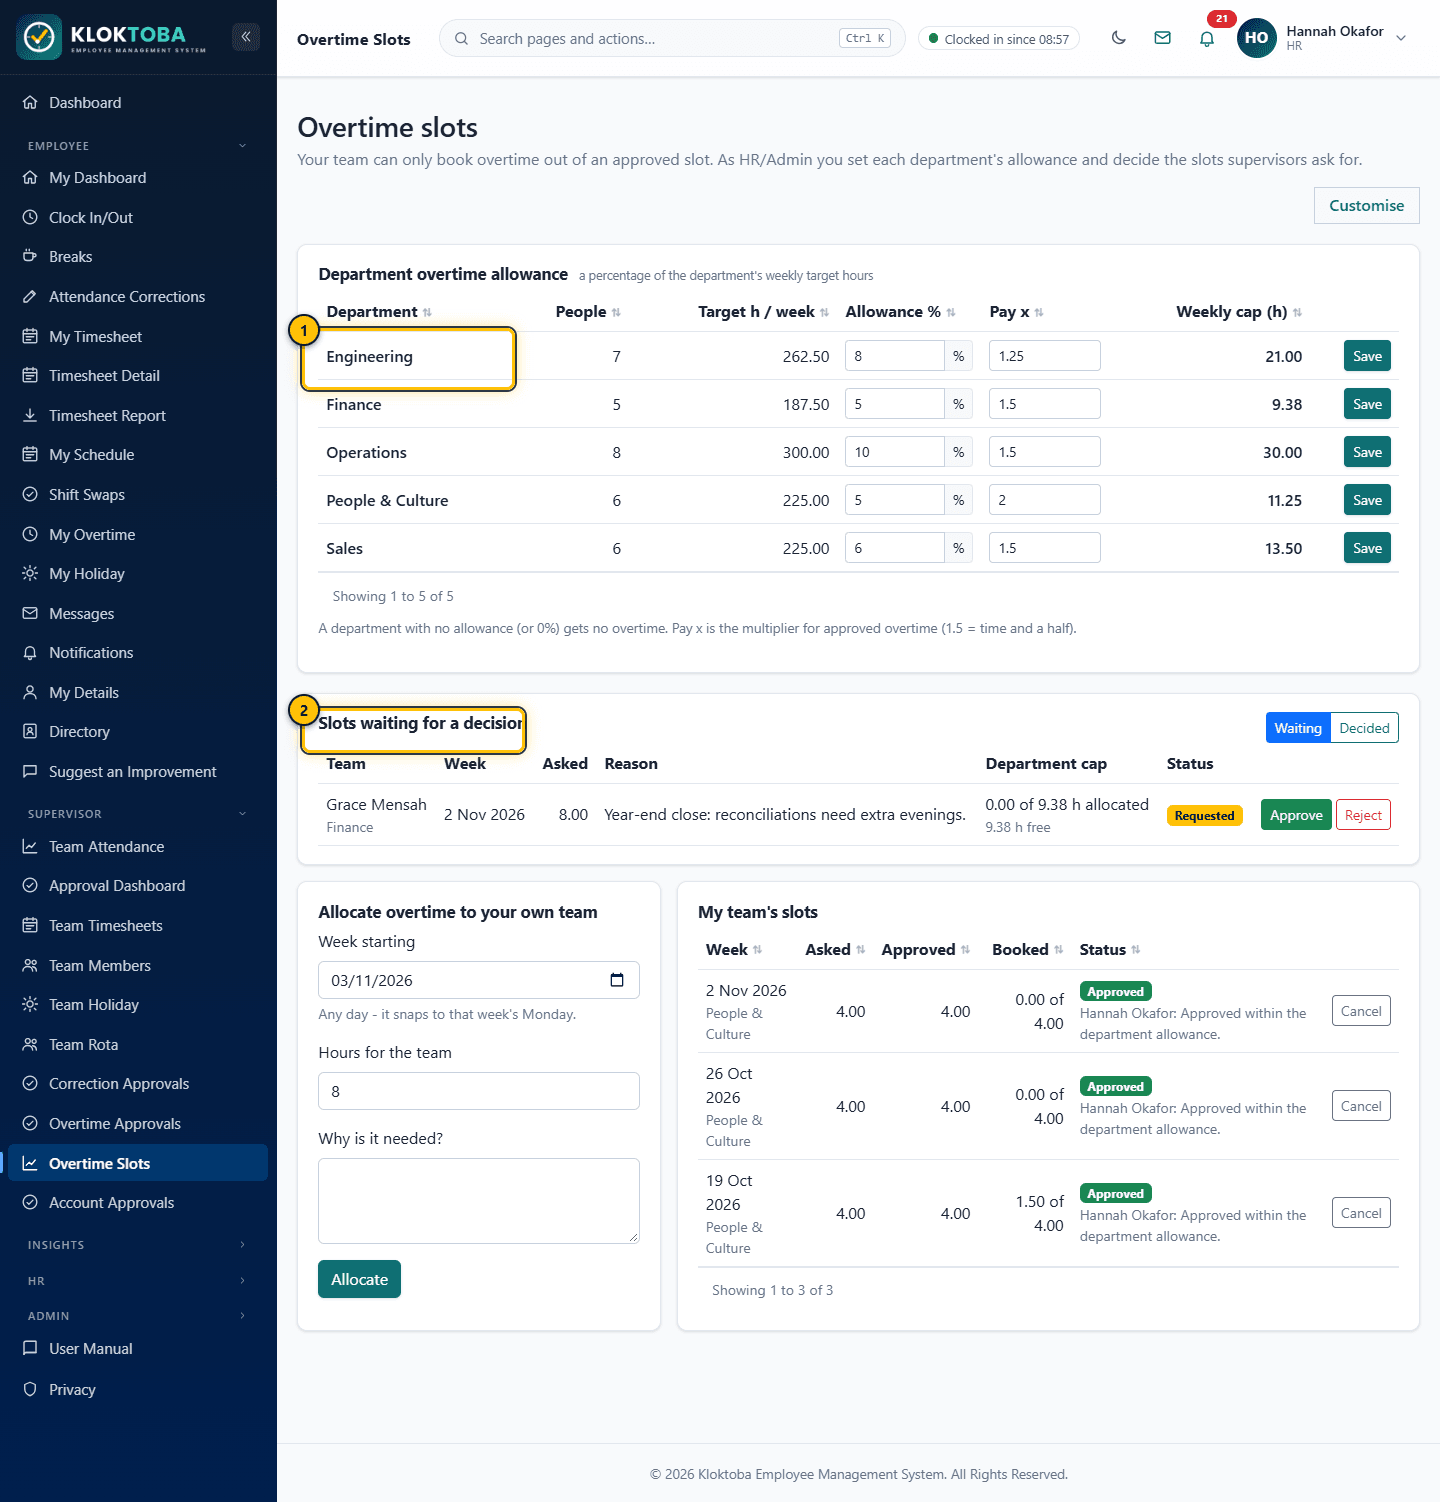
SS-029 – Overtime slots (HR/Admin). Viewed as: HR. - Department allowance, pay multiplier and weekly cap
- Slot requests from supervisors
Expected result
Templates are available when building the rota. Approved slots let a team book overtime.
Common errors
| Error or mistake | What to do |
|---|---|
| No overtime available to a team | A department with no allowance or 0% gets no overtime. |
Troubleshooting
| Problem | Solution |
|---|---|
| Slot cannot be approved | The request exceeds the department cap. Reduce the hours or raise the allowance. |
Frequently asked questions
- What does Pay x mean?
- The multiplier for approved overtime, for example 1.5 for time and a half.
9.4 Company settings and working hours
Step-by-step instructions
- Open Admin > Settings. Cards link to each configuration task.
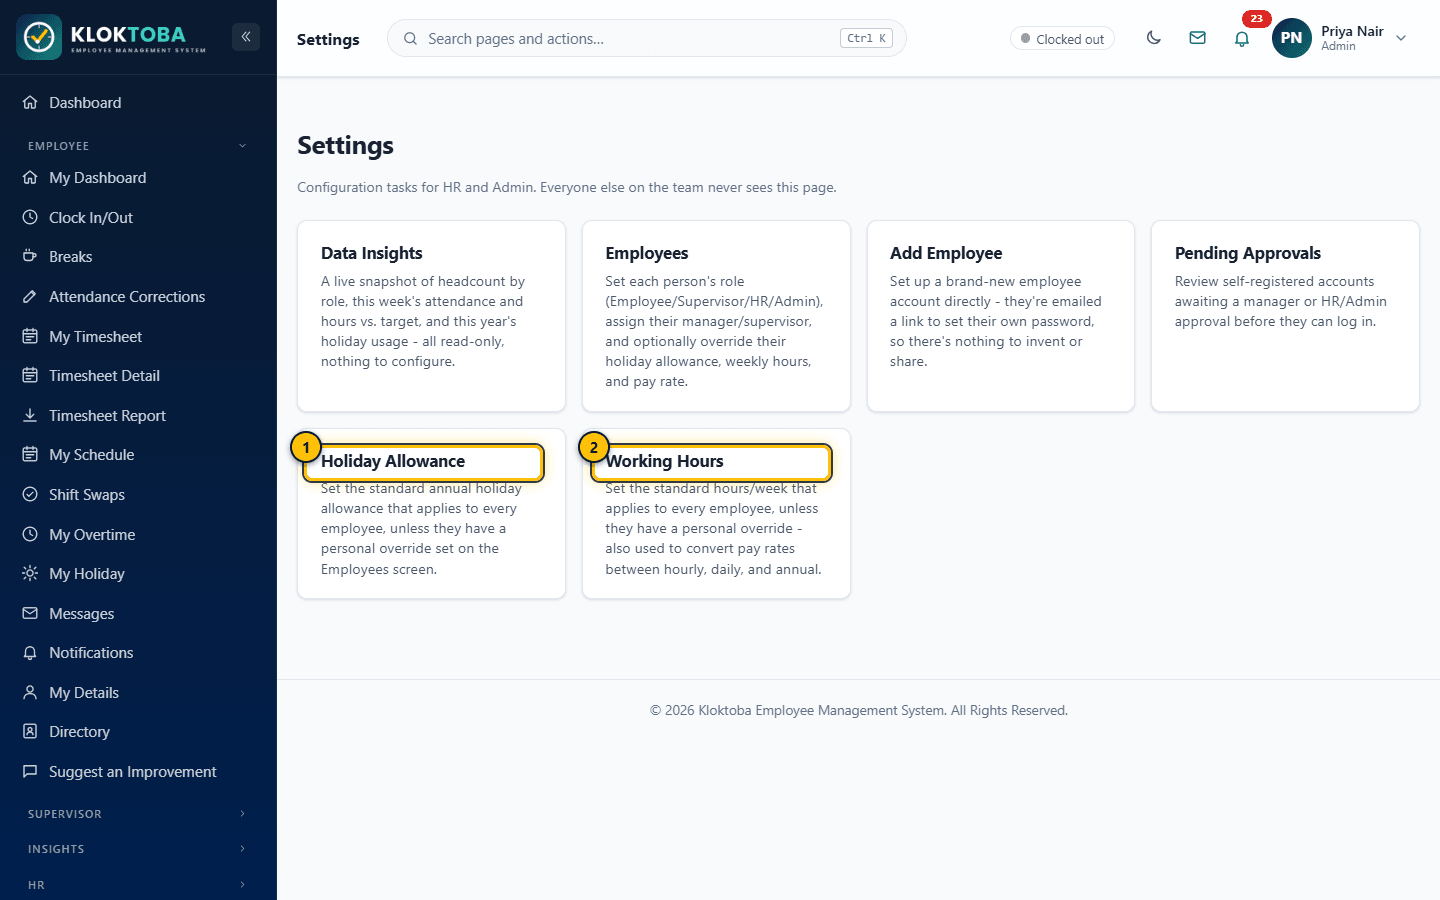
SS-053 – Settings hub. Viewed as: Admin. - Holiday allowance
- Working hours and currency
- Select Holiday Allowance to set the standard annual allowance.
- Select Working Hours to set standard hours per week and the currency used for pay rates and Salary due.
Expected result
Defaults apply to everyone without a personal override.
Common errors
| Error or mistake | What to do |
|---|---|
| A person's allowance did not change | They have a personal override on their employee record. |
Troubleshooting
| Problem | Solution |
|---|---|
| I cannot see Settings | It is in the Admin group. Ask an Admin or check Menu Permissions. |
Frequently asked questions
- Are settings per organisation?
- Holiday allowance, working hours and currency are company-wide.
9.5 Notification Management
Step-by-step instructions
- Open Admin > Notification Management. The list shows every template with its type, code, active state and dates. Search, sort by clicking a heading, or filter by type and status.
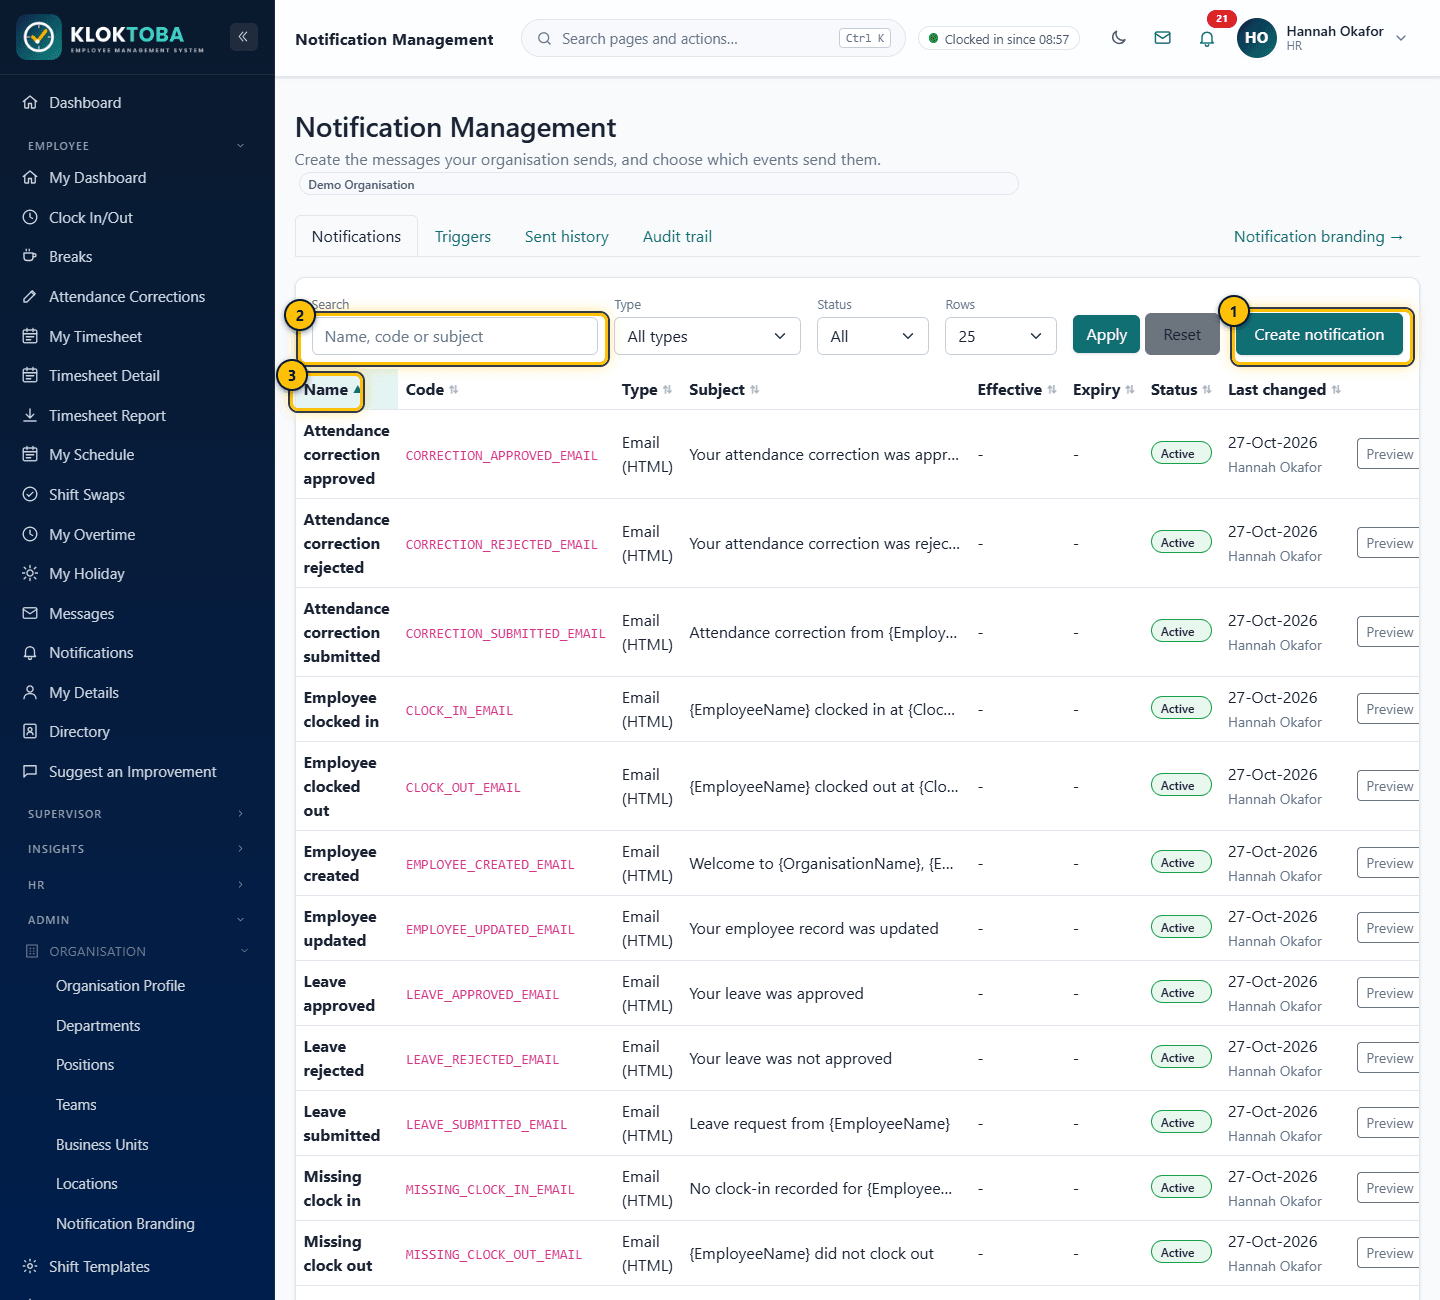
SS-067 – Notification Management: templates. Viewed as: HR. - Create a template
- Search templates
- Click a heading to sort; click again to reverse
- Select New notification (or Edit). Enter a name and a unique code, choose the type (Email, SMS, In-App or Push), then the subject and body. Insert placeholders such as
{EmployeeName},{LeaveType}or{OrganisationName}; tick HTML to use formatting. Set an effective date and, if wanted, an expiry date.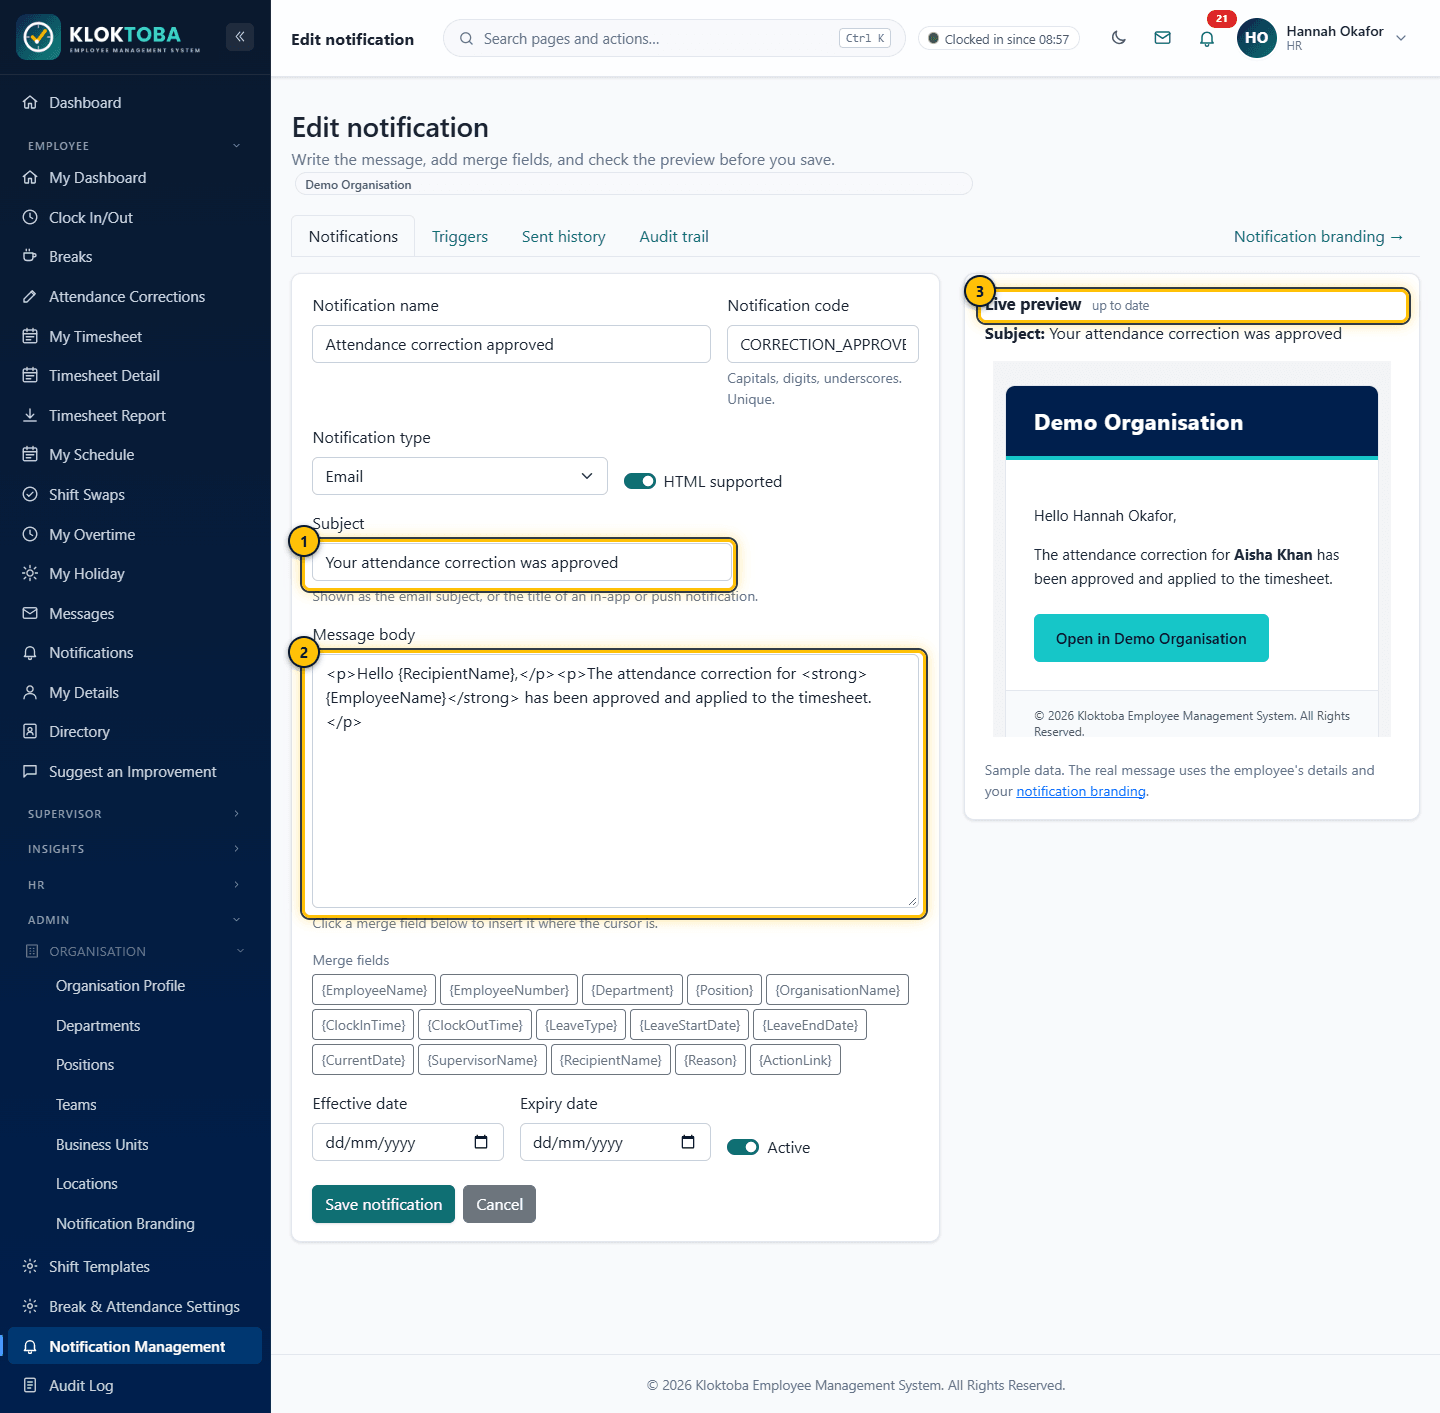
SS-068 – Edit a notification template. Viewed as: HR. - Subject (placeholders allowed)
- Body (plain text or HTML)
- Preview with sample values and your branding
- Select Preview to see the message with sample values and your branding before you save. Use Deactivate to pause a template without losing it; Delete asks you to confirm first.
- Open Triggers to choose which template is sent for each event: employee created or updated, clock in or out, missing clock in or out, leave, overtime and attendance correction submitted, approved or rejected, password reset and user created. Load recommended notifications creates a sensible starting set.
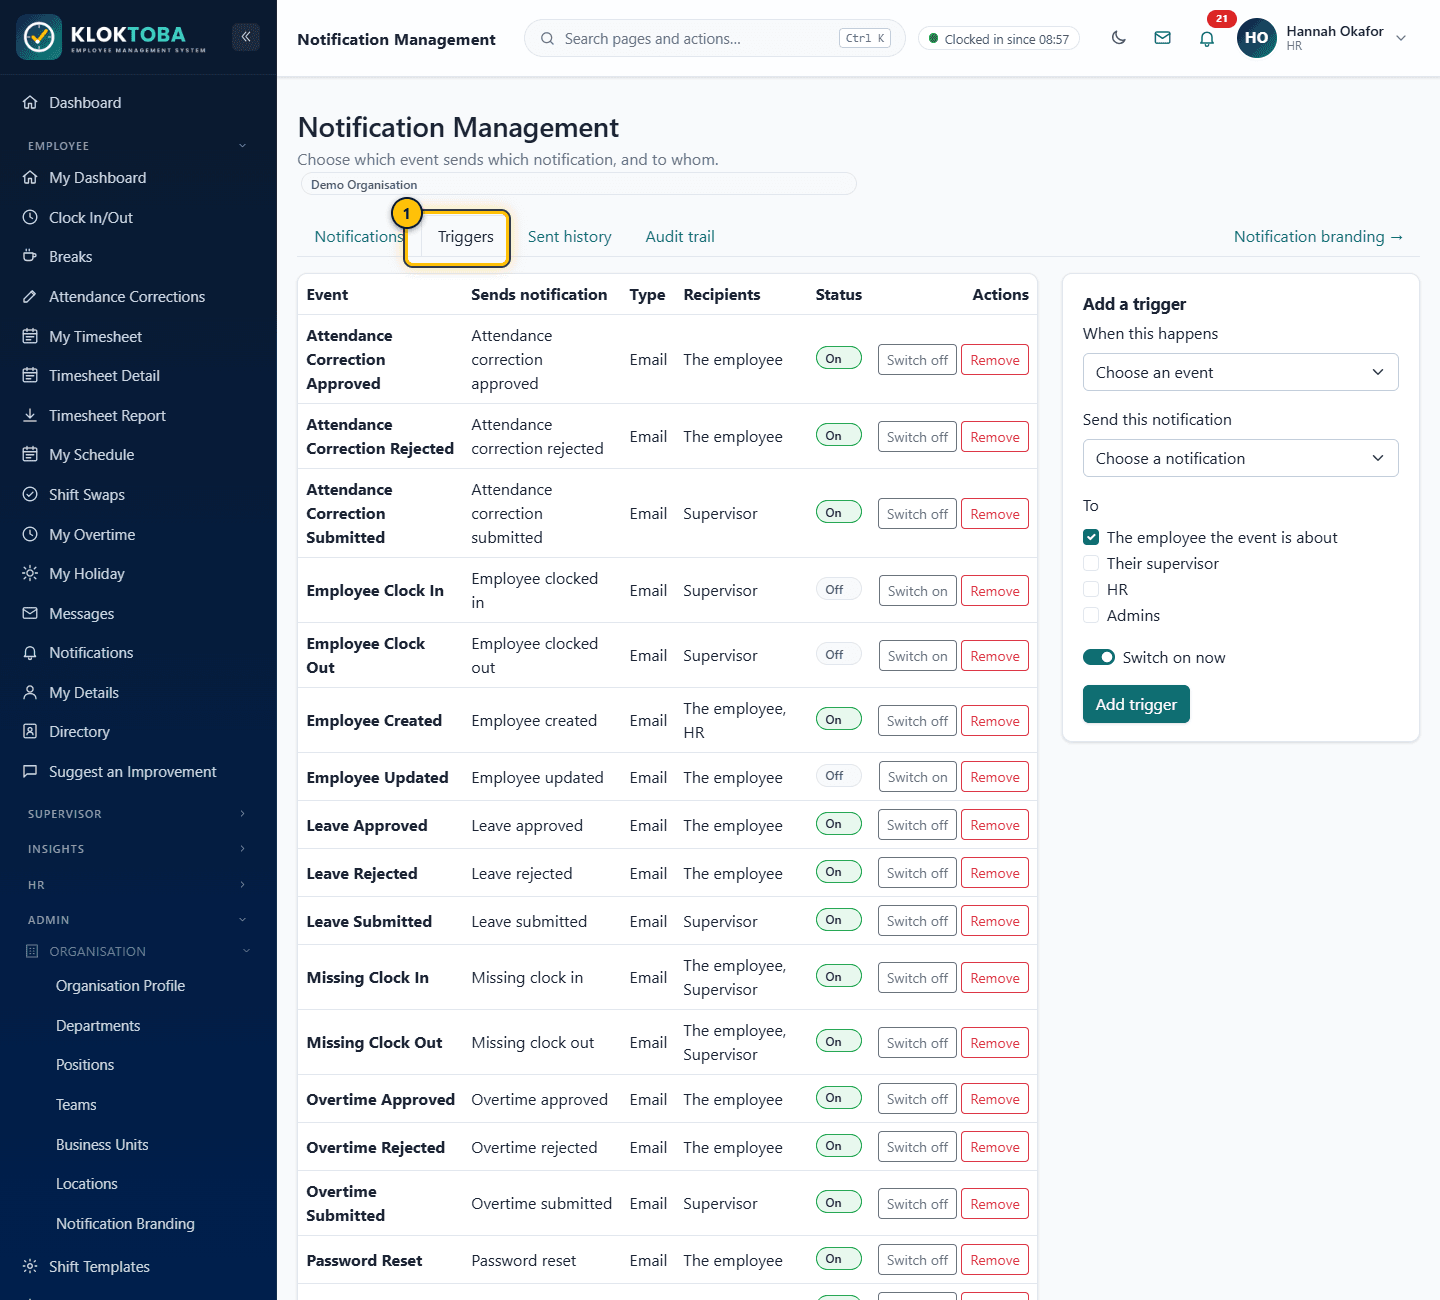
SS-069 – Notification triggers. Viewed as: HR. - Which template fires for which event
- Open History to see what was sent, to whom and whether it was delivered. Audit shows who changed a template and when.
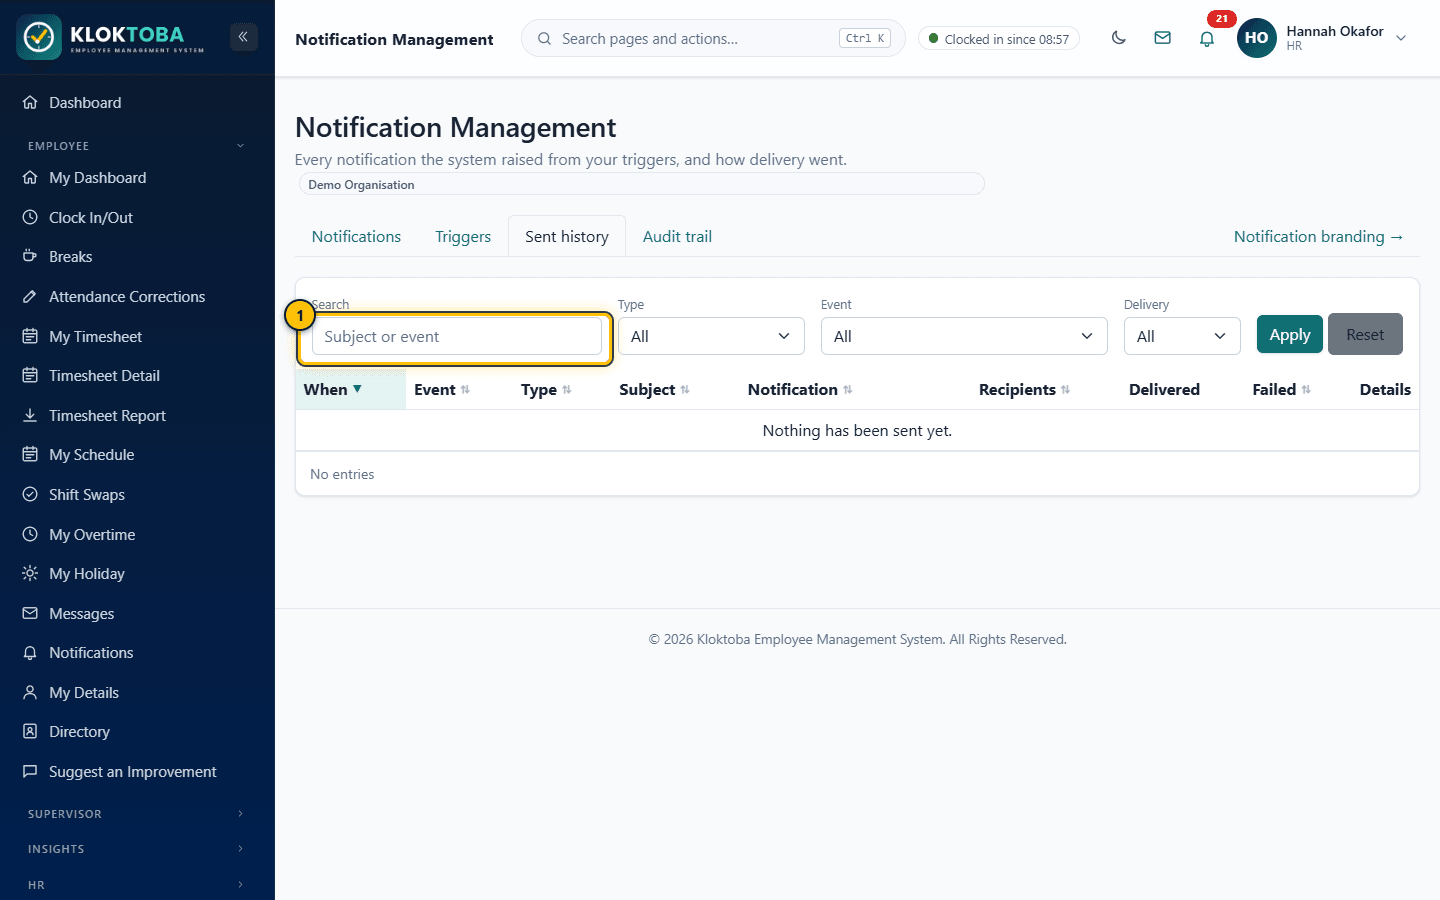
SS-070 – Notification history. Viewed as: HR. - Search the history
Expected result
When an event happens, the matching active template is sent to the right people in your organisation: the person concerned, their supervisor, HR and admins.
Common errors
| Error or mistake | What to do |
|---|---|
| Code already used | Each template code is unique within your organisation. |
| Unknown placeholder | Only the listed placeholders are replaced; check the spelling. |
Troubleshooting
| Problem | Solution |
|---|---|
| Nothing was sent | Check the template is active and inside its effective and expiry dates, that a trigger links it to the event, and that the recipient has an email address. |
| SMS or push shows Skipped | Your installation has no SMS or push gateway configured. Ask your administrator. |
Frequently asked questions
- Can a template contain scripts?
- No. Scripts, event handlers and unsafe links are removed from HTML before saving and sending.
- Do I see other organisations' templates?
- Never. Everything is limited to your own organisation.
9.6 Notification Branding
Step-by-step instructions
- Open Admin > Organisation > Notification Branding. On General, upload a logo (PNG, JPEG, GIF or WebP) and set the organisation name, brand and secondary colours, footer, support email and phone, and website.
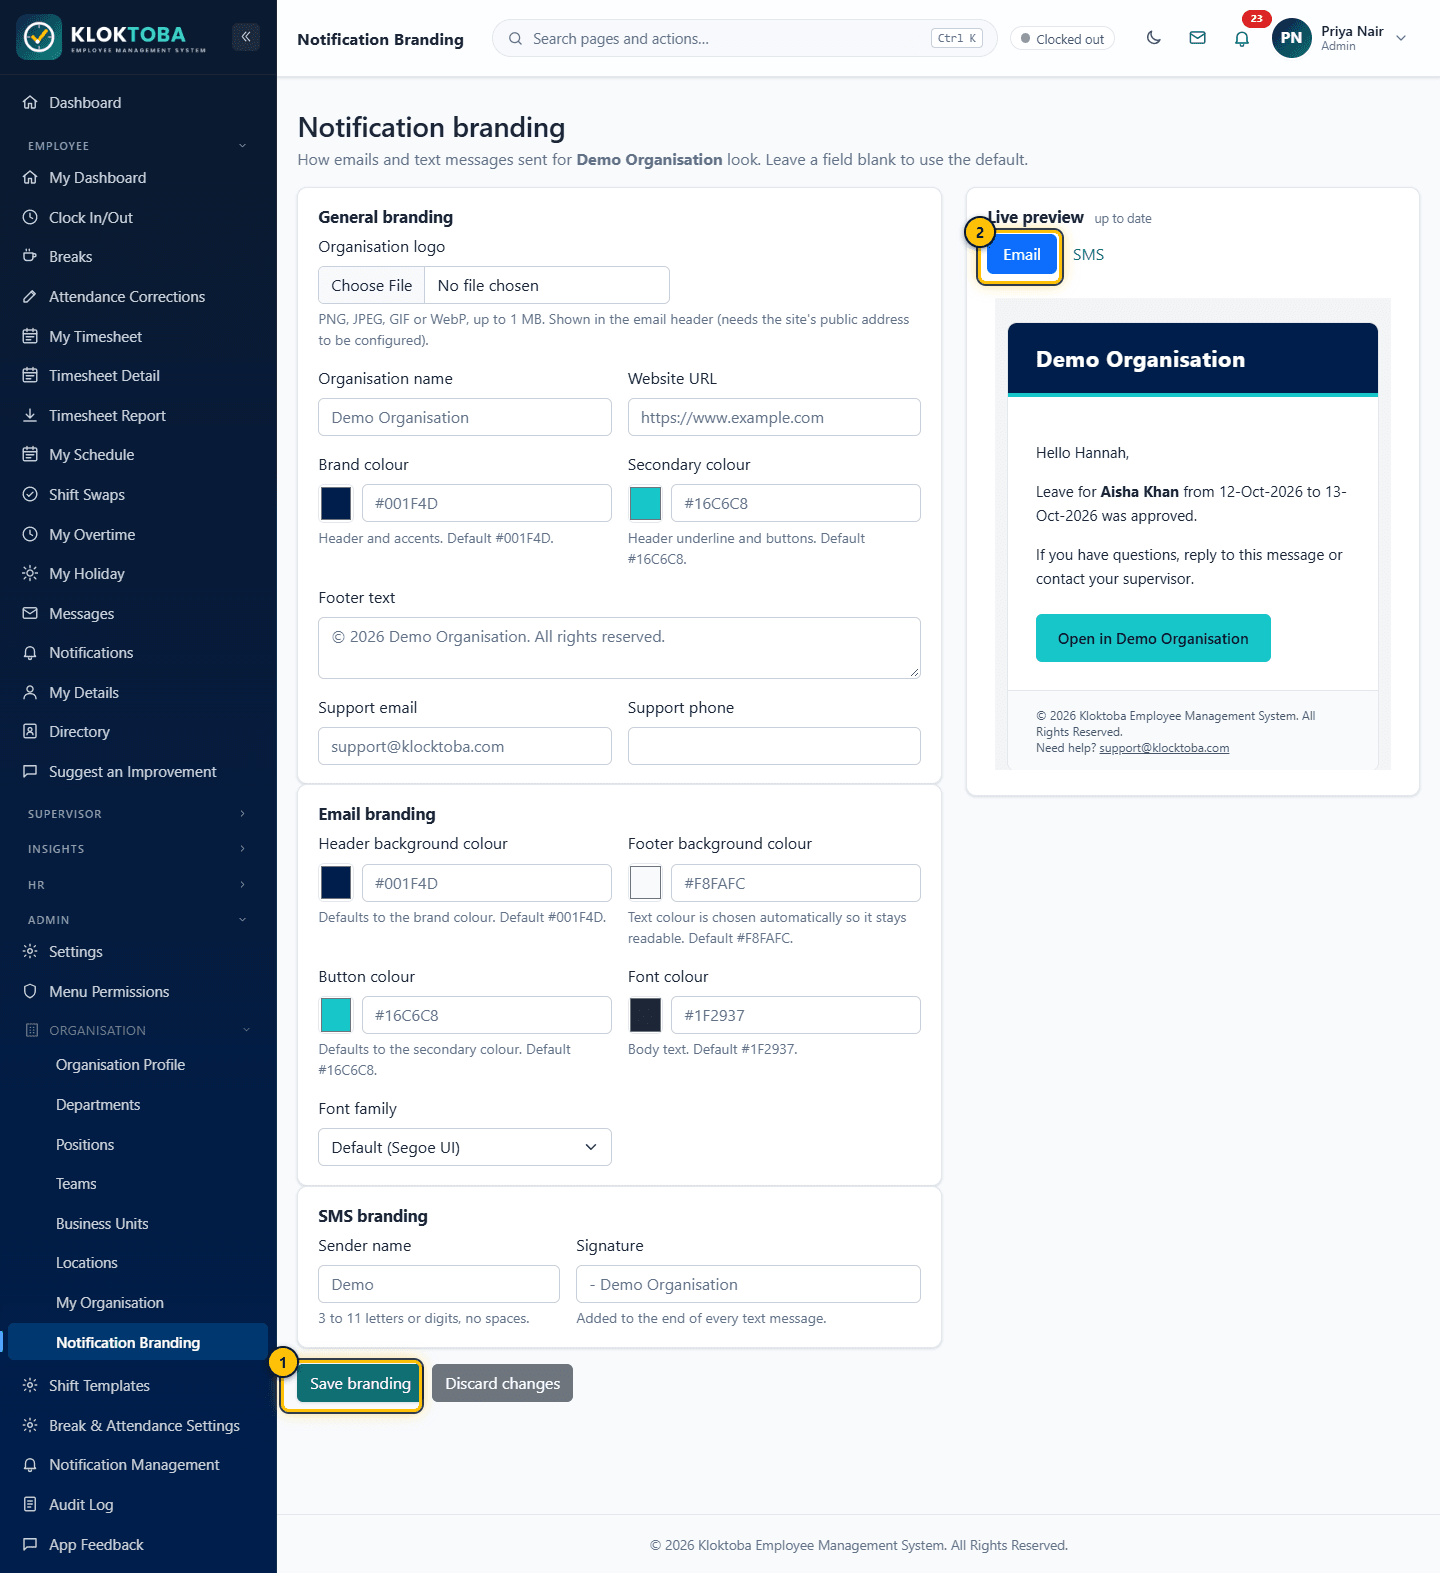
SS-071 – Notification Branding. Viewed as: Admin. - Save branding
- Email styling tab
- On Email, set the header and footer background, button colour, font family and font colour. On SMS, set the sender name and signature.
- The preview on the right updates as you change a setting. Select Save branding.
Expected result
Every notification, including password resets and leave emails, uses the saved branding automatically. Text colours are adjusted to stay readable.
Common errors
| Error or mistake | What to do |
|---|---|
| Colour rejected | Use a hex colour such as #1F6FEB. |
| Logo rejected | The file must be a real image up to the size limit; renaming another file type does not work. |
Troubleshooting
| Problem | Solution |
|---|---|
| The logo does not show in an email | Some mail programs block images until you allow them. |
Frequently asked questions
- What if I set nothing?
- Kloktoba's standard look is used.
9.7 Organisation Admins and platform administration
Step-by-step instructions
- Open Admin > Organisation > Organisation Admins and select Create organisation admin. Enter a username, first and last name, email and the organisation. The role is always Admin.
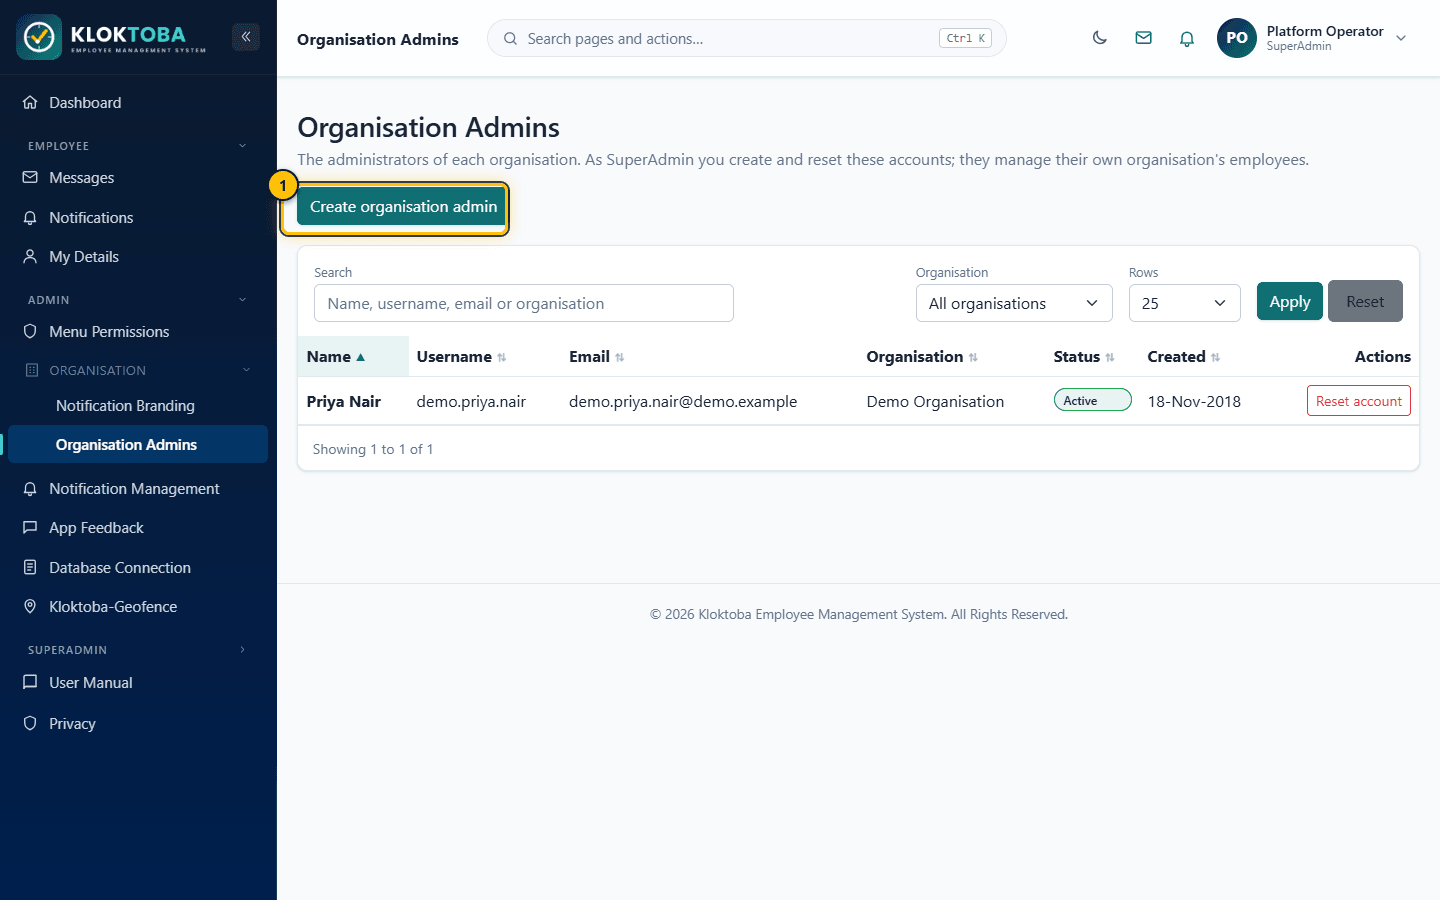
SS-072 – Organisation Admins. Viewed as: SuperAdmin. - Create an organisation admin
- Under How will they sign in for the first time? choose to email them a link to choose their own password (the default), or Set a temporary password now - type it twice and decide whether they must choose their own password at first sign-in (recommended). A temporary password is never emailed: give it to them yourself. Select Create organisation admin; the creation is recorded with the date and who created it.
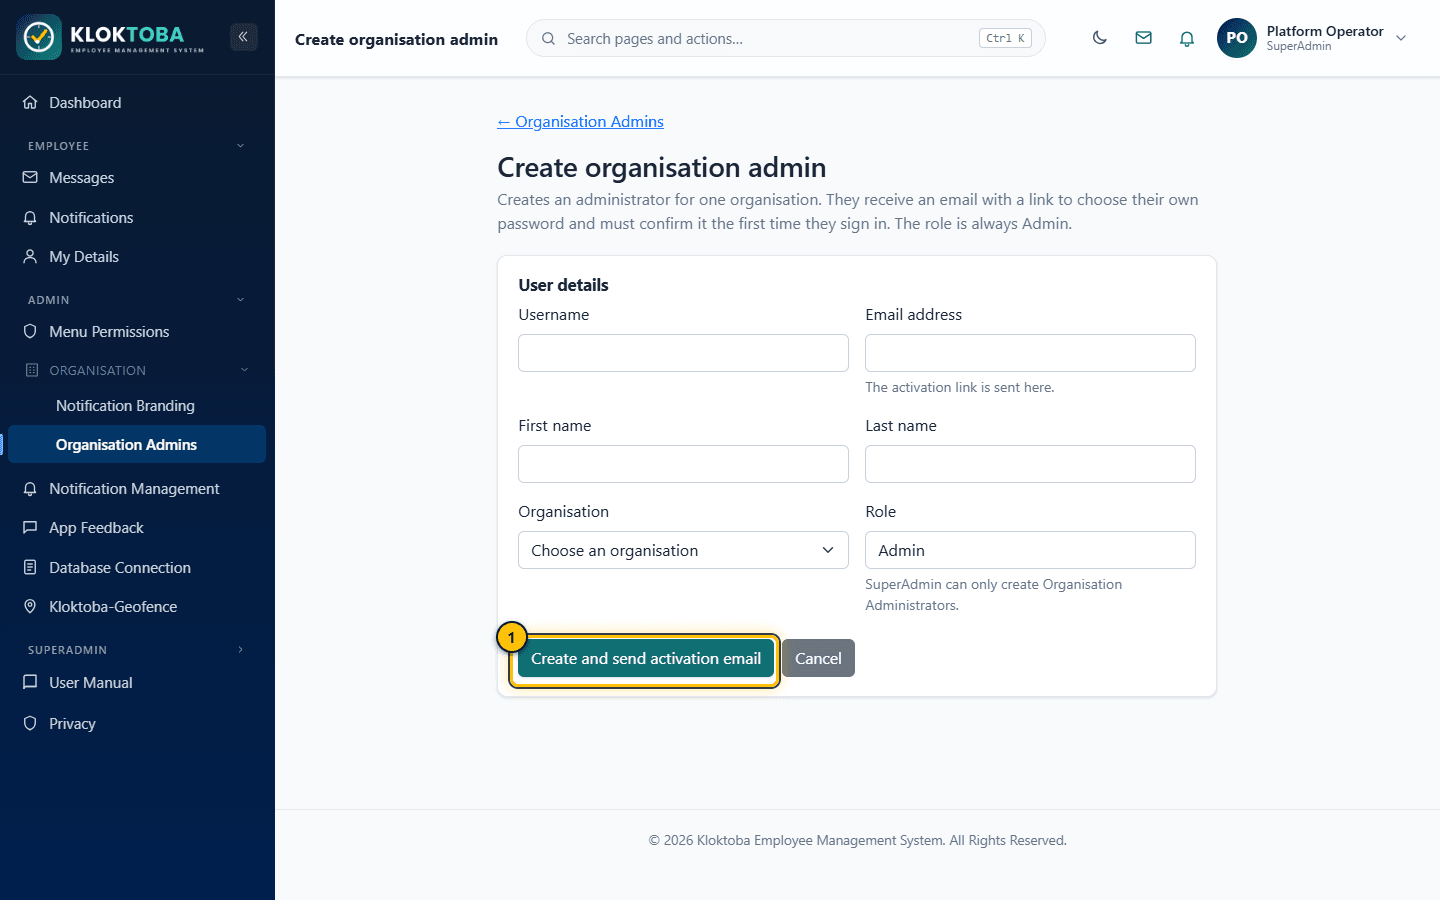
SS-073 – Create an organisation admin. Viewed as: SuperAdmin. - Sends an activation email; a password change is forced at first sign-in
- From the list, Deactivate stops an admin signing in (their account and history are kept) and Activate lets a deactivated admin sign in again. Reset account emails a new activation link, and Set password sets a temporary password instead (optionally to be changed at first sign-in). Every change is recorded in the audit log, never the password itself.
- System Statistics shows organisations, users and notification volumes. Organisations creates, edits, activates and deactivates organisations and assigns a Subscription Plan; Global Settings holds platform-wide settings.
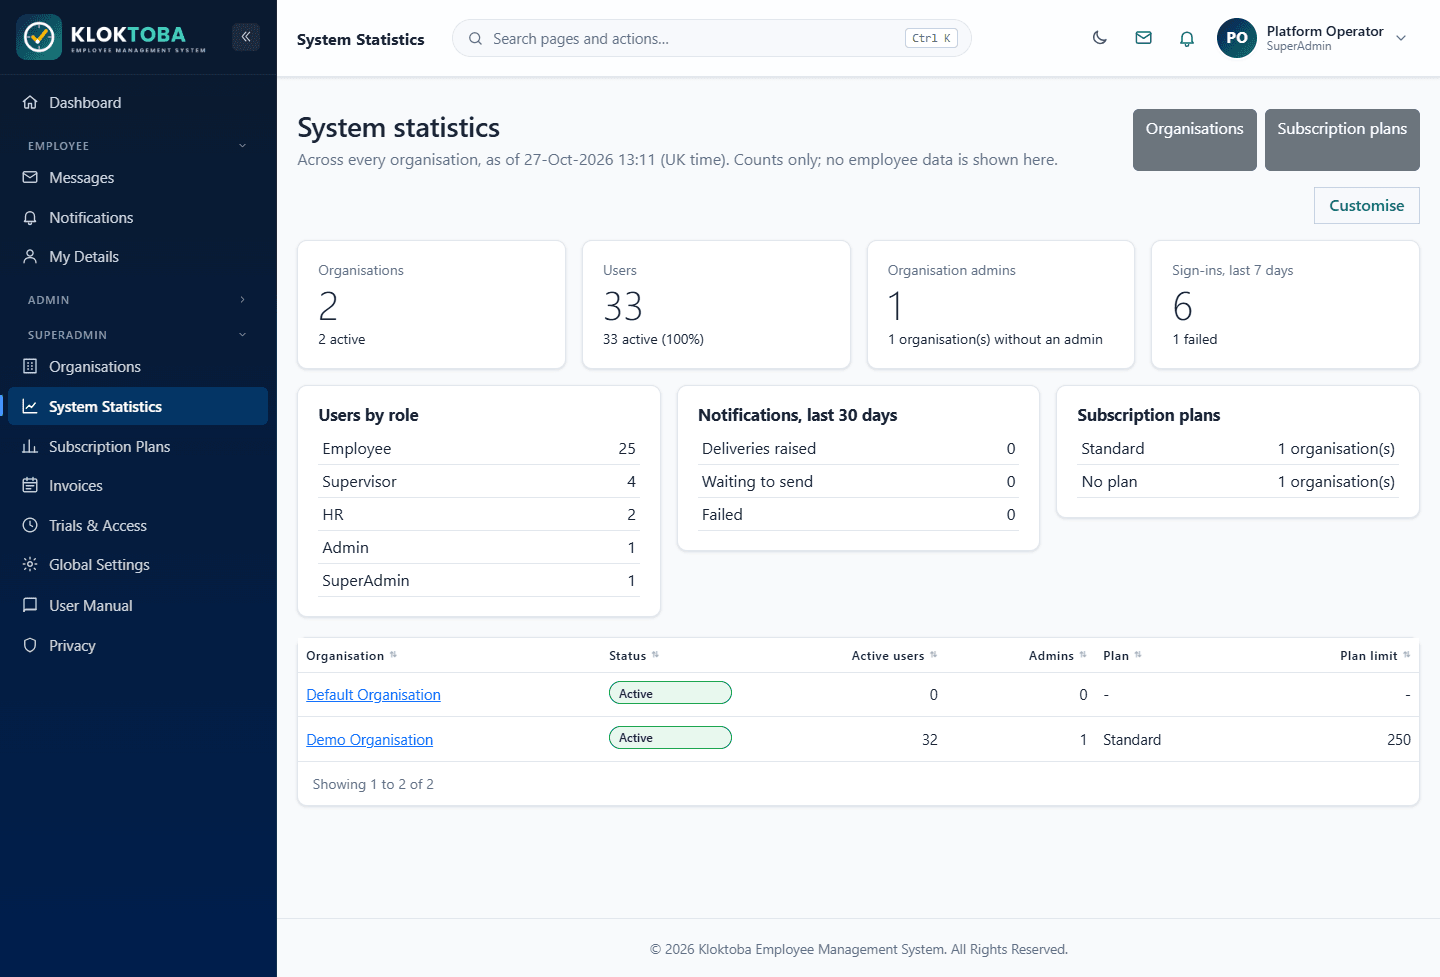
SS-074 – System statistics. Viewed as: SuperAdmin. - On Global Settings > Password policy set the rules every password must meet - a minimum length (6 to 64 characters) and whether it needs an uppercase letter, a lowercase letter, a number and a symbol - and after how many days passwords expire (0 = never). The rules apply from the next time anyone sets a password and are shown under every password box. When a password is older than the expiry, the next sign-in goes straight to Change Password. Changes are recorded in the audit log.
Expected result
The organisation has an administrator who then runs everything inside it.
Common errors
| Error or mistake | What to do |
|---|---|
| Username or email already used | Both must be unique. |
Troubleshooting
| Problem | Solution |
|---|---|
| The admin cannot sign in | Their organisation may be deactivated; reactivate it under Organisations. |
Frequently asked questions
- Can a SuperAdmin approve leave or edit employees?
- No. SuperAdmin cannot create or edit employees, approve leave, manage attendance or do HR work; that belongs to each organisation's Admin and HR.
9.8 Subscription plans, invoices and trials
Step-by-step instructions
- Open SuperAdmin > Subscription Plans and create or edit a plan. Choose the Currency (for example GBP, USD, EUR or NGN), the Price per active user (per month) and, if wanted, a Minimum monthly price. Each invoice is the larger of (active users × price per active user) and the minimum, so a small organisation never pays less than the minimum. Leave the per-user price blank for a flat monthly price. Invoices use the currency of the plan.
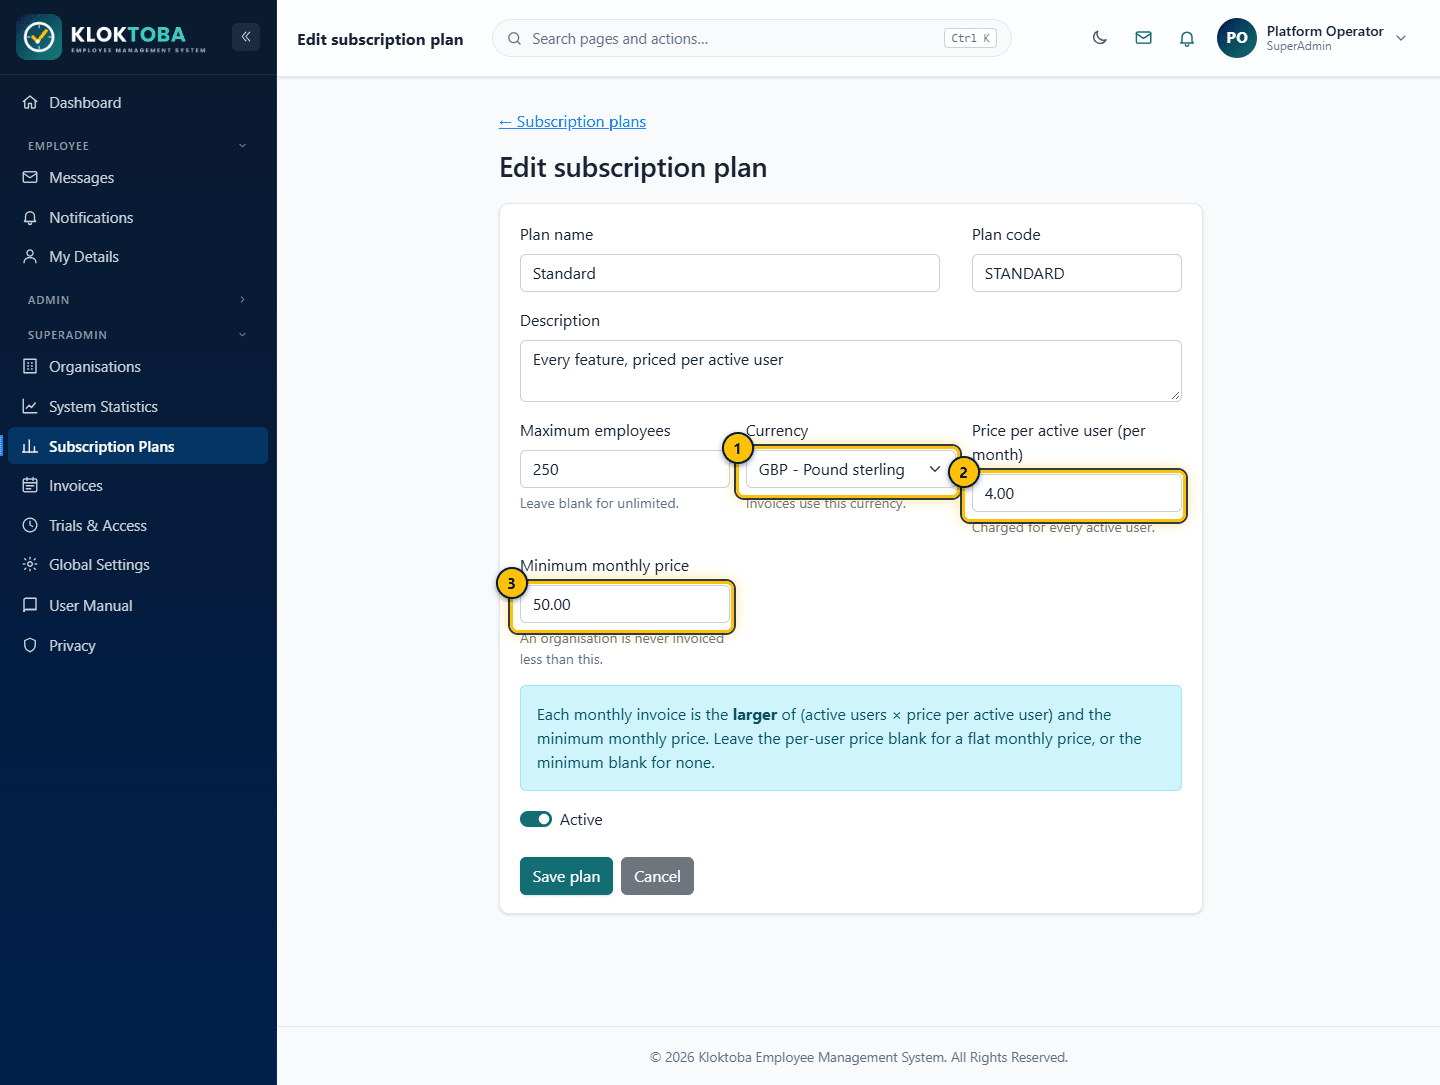
SS-079 – Subscription plan with currency. Viewed as: SuperAdmin. - Currency used for pricing and invoices
- Price per active user per month
- Minimum monthly price
- Assign a plan to an organisation on SuperAdmin > Organisations. An organisation with no plan is not invoiced.
- Set who each organisation is billed to: on SuperAdmin > Organisations select Bill to beside the organisation and enter the billing name, who to mark invoices for the attention of, the accounts email and phone, the billing address, the organisation's VAT / tax number and an optional purchase order number. The organisation's own Admin can keep these up to date at Admin > Organisation > Billing Details. Invoices show them under Billed to; until they are saved, the organisation's name and profile address are used.
- Open SuperAdmin > Platform Owner (also on Global Settings) and enter your business details - legal and trading name, company and VAT numbers, address and billing contact - and the bank account organisations pay into: account name, bank, account number and sort code and/or IBAN and SWIFT / BIC, plus optional payment instructions, and upload your logo (PNG or JPEG, up to 1 MB). Every invoice then shows your logo and business details in its footer and your bank account under How to pay, below the Kloktoba header, with the invoice number as the payment reference. Bank details are checked (for example the IBAN check digits) and the audit log never records the full account number or IBAN.
- To have invoices paid automatically by Direct Debit through GoCardless, the organisation's Admin (or SuperAdmin) opens Billing Details and selects Set up Direct Debit. GoCardless's secure page opens, already filled in with the bill-to details; the payer enters their bank details there (Kloktoba never sees or stores them) and is brought back to Billing Details, which then shows the Direct Debit as Being set up and later Active. Direct Debit is available for invoices in GBP, EUR, USD, CAD and AUD; it can be cancelled at any time with Cancel Direct Debit.
- When you Generate invoices, each new invoice for an organisation with Direct Debit is sent to GoCardless at once, to be collected on its due date (or the first day the bank allows, if later). The invoice list and the invoice show the Direct Debit status and collection date. When GoCardless confirms the payment the invoice is marked Paid automatically, with the GoCardless payment as its reference; a failed payment leaves it unpaid, and a charge-back makes it unpaid again. On an unpaid invoice, Collect by Direct Debit (or Try Direct Debit again after a failure) sends it to GoCardless, and Check Direct Debit status fetches the latest status. Voiding an invoice cancels its payment if it has not yet gone to the bank.
- Open SuperAdmin > Invoices. Choose a Month and an organisation (or all organisations) and select Generate invoices. Each organisation gets one invoice per month, due 14 days after issue unless you choose another Due date (any day from today up to a year ahead) before generating. The number of active users (active accounts in that organisation, never the SuperAdmin) is counted on the day you generate. Organisations that are deactivated, have no plan or price, are covered by a trial, or were already invoiced are skipped, so generating twice never creates duplicates.
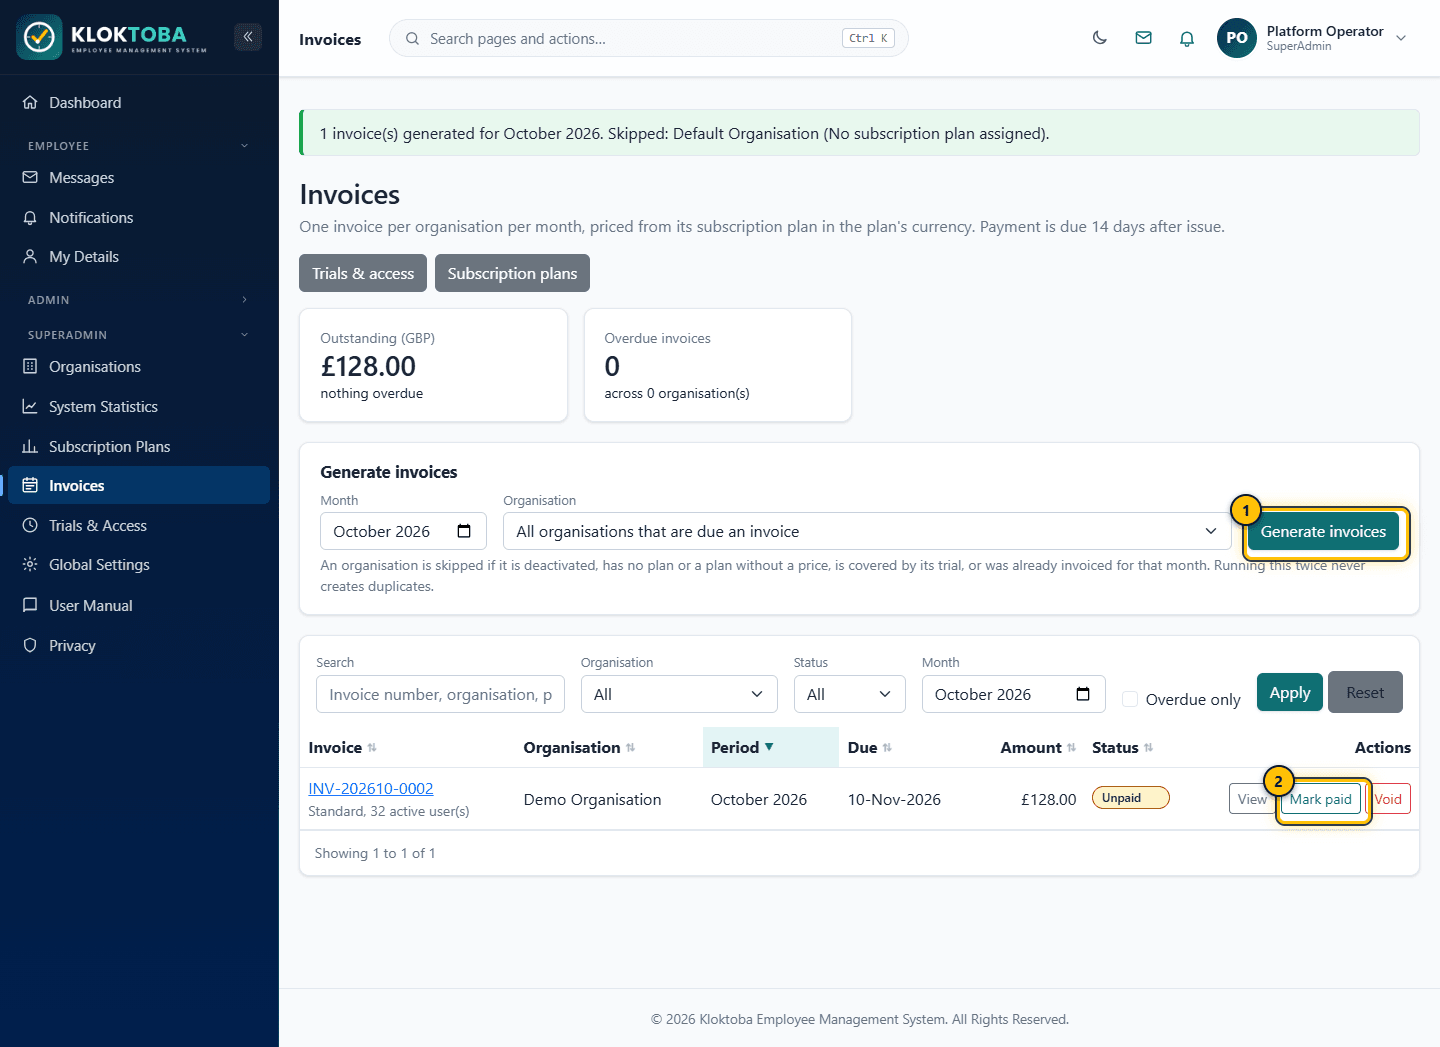
SS-076 – Invoices and overdue accounts. Viewed as: SuperAdmin. - Generate invoices for a month
- Record a payment
- Select an invoice number to open a printable invoice that shows how the amount was worked out (active users × price, or the minimum applied). Use Mark paid to record the date and a payment reference, or Void (with a reason) to cancel an unpaid invoice; a voided month can be invoiced again. To give an organisation more (or less) time, use Due date on the invoice list or Change due date on the invoice: an unpaid invoice can be due any day from its issue date up to a year after. A later due date takes it out of the overdue count, and a Direct Debit payment that is still only scheduled moves to the new date.
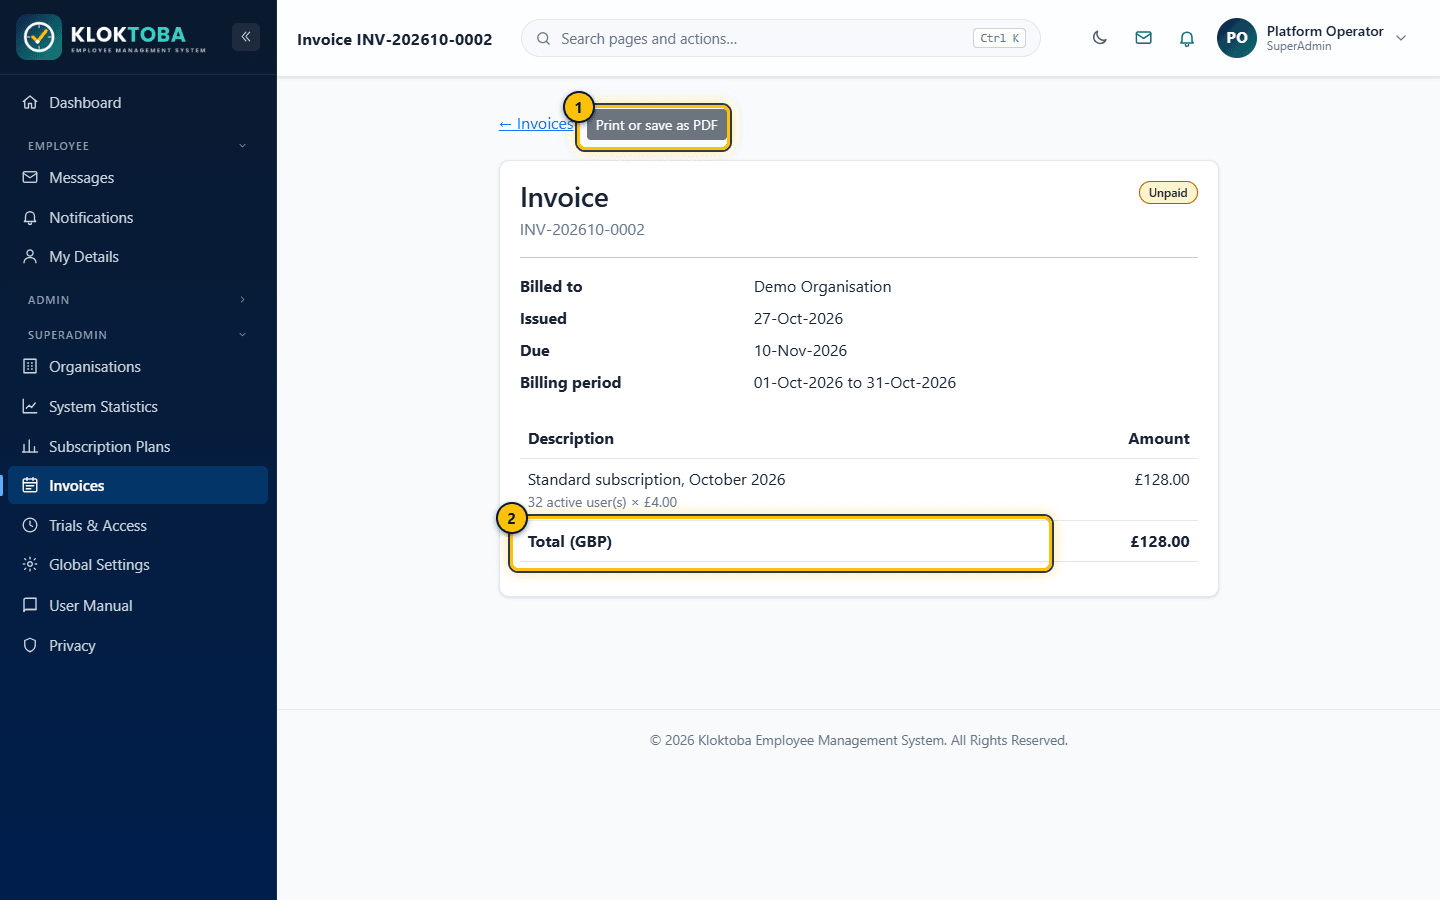
SS-077 – A printable invoice. Viewed as: SuperAdmin. - Print or save as PDF
- Total in the plan currency
- To send an invoice to the organisation, open it and select Email invoice. It goes to the billing email on the organisation's Billing Details, with the organisation's contact email (from its profile) copied in, and the invoice is attached as a PDF. The panel shows both addresses before you select Send email. If the organisation has no billing email yet, the panel says so and links to Billing Details. A paid invoice can be sent again for the organisation's records; a void invoice cannot be sent. Download PDF saves the same PDF that is attached. While an unpaid invoice's organisation has no Direct Debit (and GoCardless is set up), the invoice, the PDF and the email also explain how its Admin can set one up from Billing Details, so future invoices are collected automatically. Each email sent is recorded in the audit log.
- The Overdue accounts panel lists organisations with overdue unpaid invoices. When an organisation has three overdue unpaid invoices, select Deactivate (or Deactivate all at the limit) and confirm. Nobody in that organisation can then sign in until you activate it again on the Organisations screen. The reason and date are recorded.
- Open SuperAdmin > Trials & Access to issue a trial of 1 to 365 days to an organisation that has no plan, Extend it, End now or Remove it.
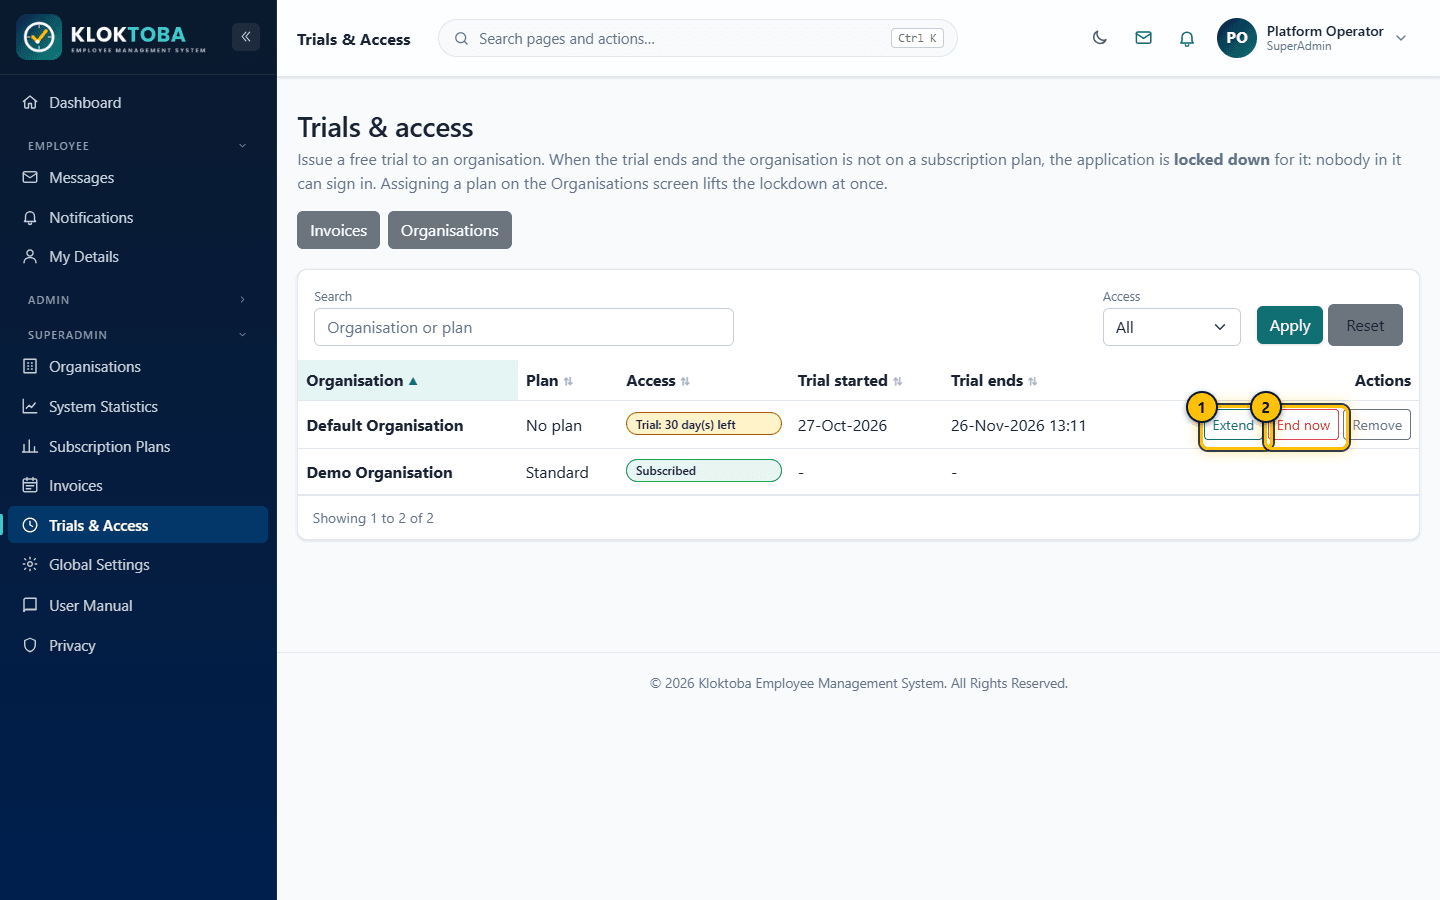
SS-078 – Trials and access. Viewed as: SuperAdmin. - Issue a trial of a number of days, or Extend one that is running
- End a trial now (locks the organisation unless it has a plan)
- When a trial ends and the organisation has no subscription plan, the application is locked down for that organisation: everyone in it is signed out and sees a message on the sign-in page. Assigning a plan lifts the lockdown at once.
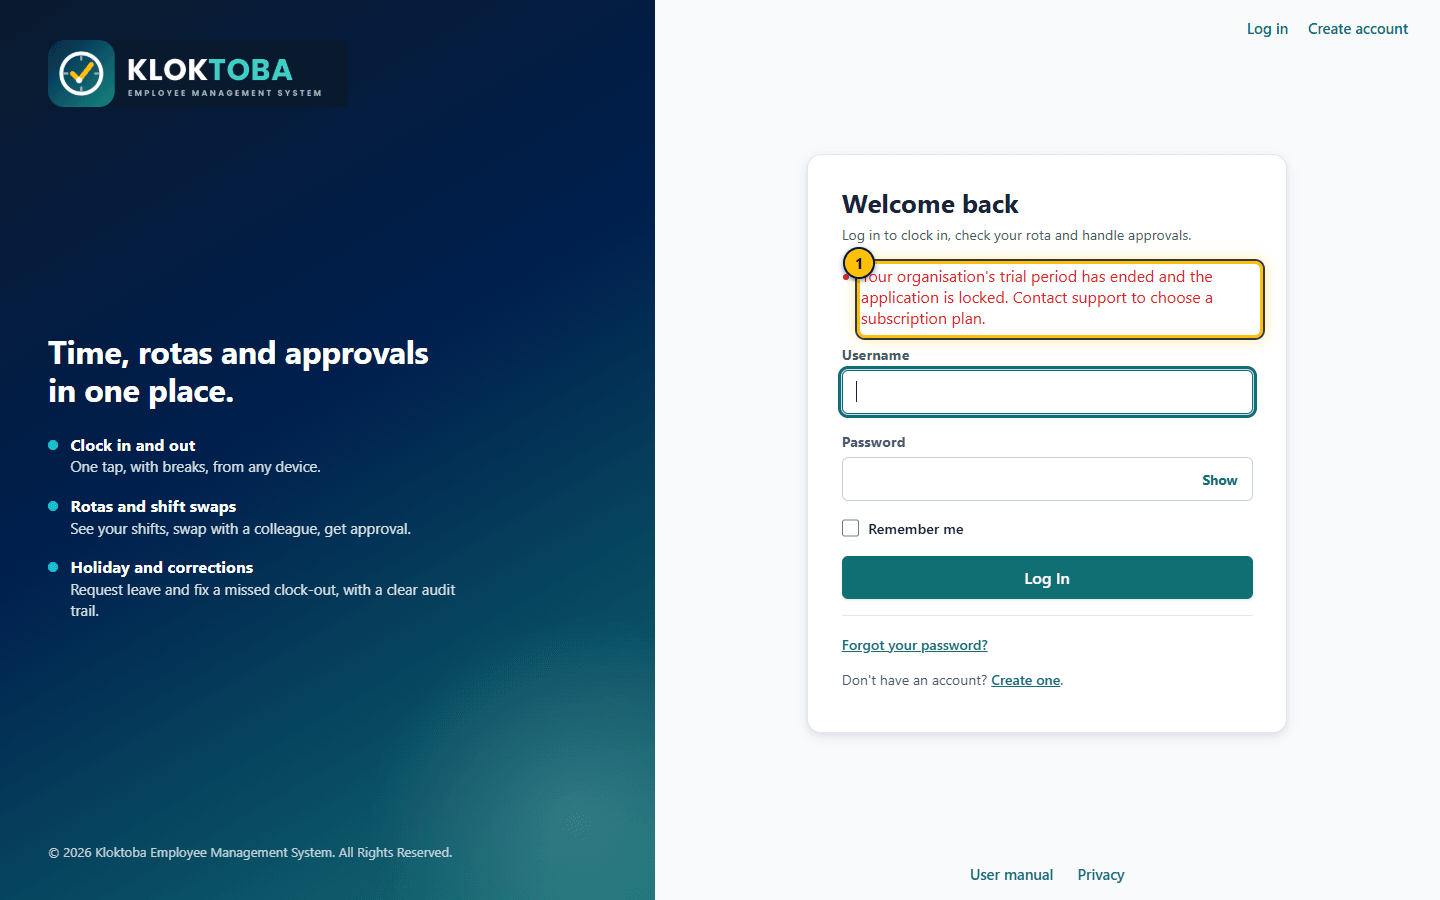
SS-080 – Sign-in blocked after a trial ends. Viewed as: Signed out. - The lockdown message everyone in the organisation sees
Expected result
Invoices, payments, deactivations and trial changes are all recorded in the audit log. Other organisations are never affected.
Common errors
| Error or mistake | What to do |
|---|---|
| Cannot invoice a future month | Choose the current month or an earlier one. |
| The due date cannot be before the issue date | Choose a due date on or after the day the invoice was issued, and no more than 365 days after it. |
| The due date can no longer be changed | The invoice is paid or void, or its Direct Debit payment has already gone to the bank. |
| Deactivate refused | The organisation needs three overdue unpaid invoices. Invoices that are paid, voided or not yet due do not count. |
| Cannot issue a trial | The organisation is already on a plan or is deactivated. |
| GoCardless cannot collect payments in this currency | Direct Debit works only for GBP, EUR, USD, CAD and AUD plans. Invoices in other currencies are paid by bank transfer. |
| Direct Debit is not available | GoCardless has not been configured on the server (GoCardless:AccessToken). Invoices are paid by bank transfer until it is. |
Troubleshooting
| Problem | Solution |
|---|---|
| An organisation was not invoiced | The Generate message lists why: no plan, no price, covered by a trial, deactivated or already invoiced. |
| Users still locked out after paying | Paying does not reactivate an organisation. Activate it on the Organisations screen. |
| Users locked out after a trial | Assign a subscription plan, or extend or remove the trial. |
| A Direct Debit invoice is still unpaid after its collection date | Open the invoice and select Check Direct Debit status. Bank payments take a few working days to be confirmed; if the payment failed, select Try Direct Debit again or ask the organisation to pay by bank transfer. |
Frequently asked questions
- Which currency is an invoice in?
- The currency of the plan when the invoice was generated. Changing the plan later does not change invoices already issued.
- Which users are charged for?
- Active accounts in the organisation on the day the invoice is generated. Deactivated, pending and rejected accounts are not counted.
- What if an organisation has hardly any users?
- It is charged the plan's minimum monthly price instead.
- Can an organisation admin see invoices?
- No. Billing is only for the SuperAdmin.
- Are existing organisations locked?
- No. Only an organisation that has been given a trial and has no plan is locked when the trial ends.
9.9 Suggestions and App Feedback
Step-by-step instructions
- Anyone: open Suggest an Improvement, describe what to improve (5 to 2,000 characters), optionally attach a picture, and select Submit suggestion.
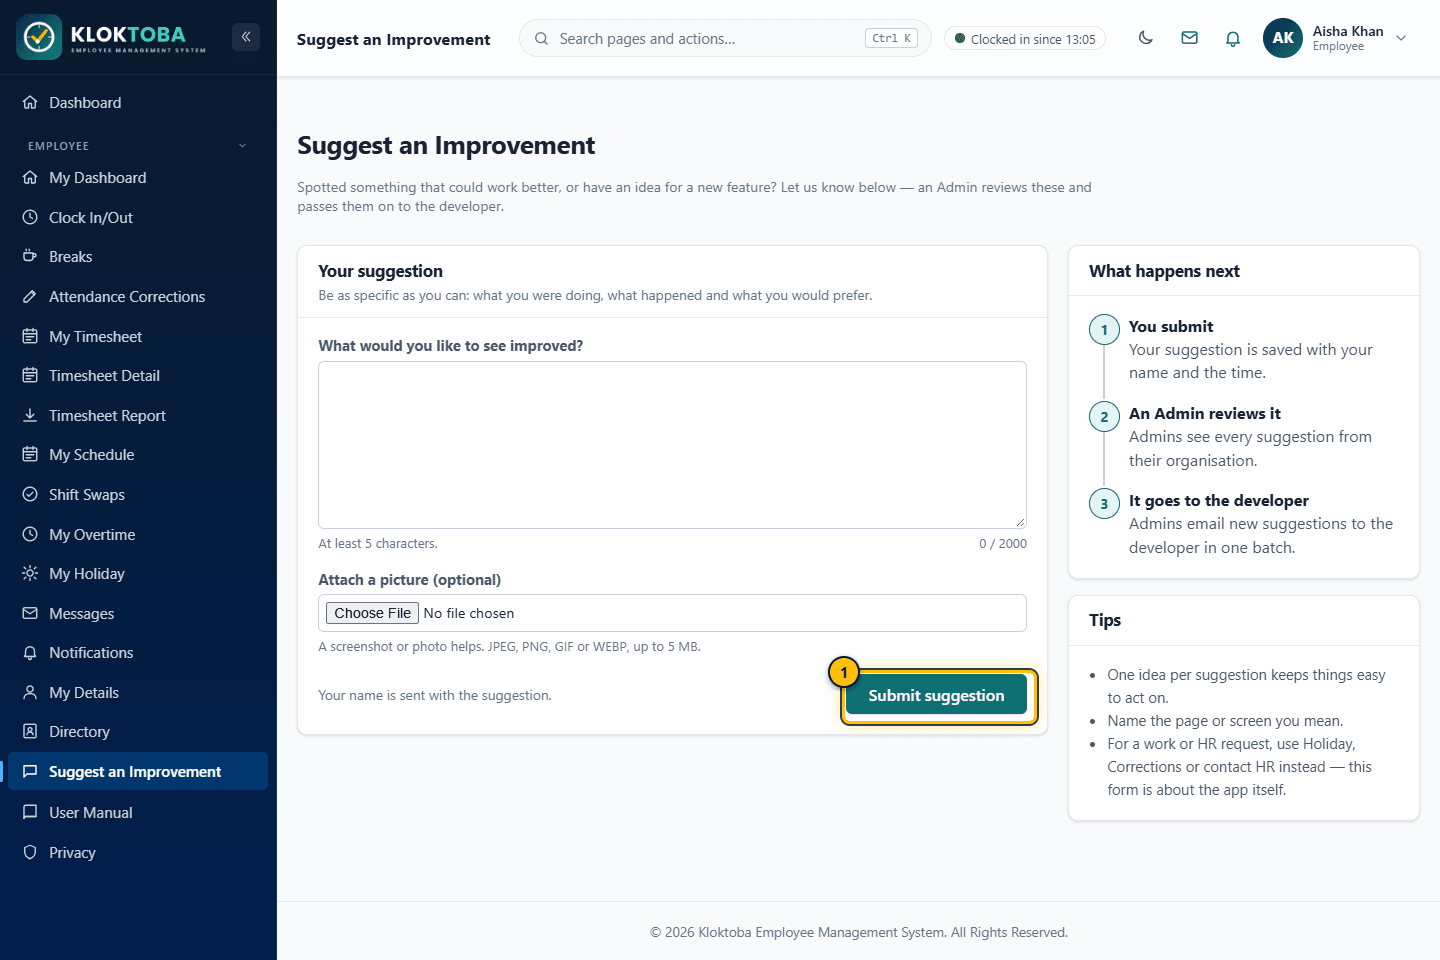
SS-066 – Suggest an improvement. Viewed as: Employee. - Submit suggestion
- Admin: open App Feedback to see suggestions and select the send button to email all new ones to the developer in one message. They are then marked as sent.
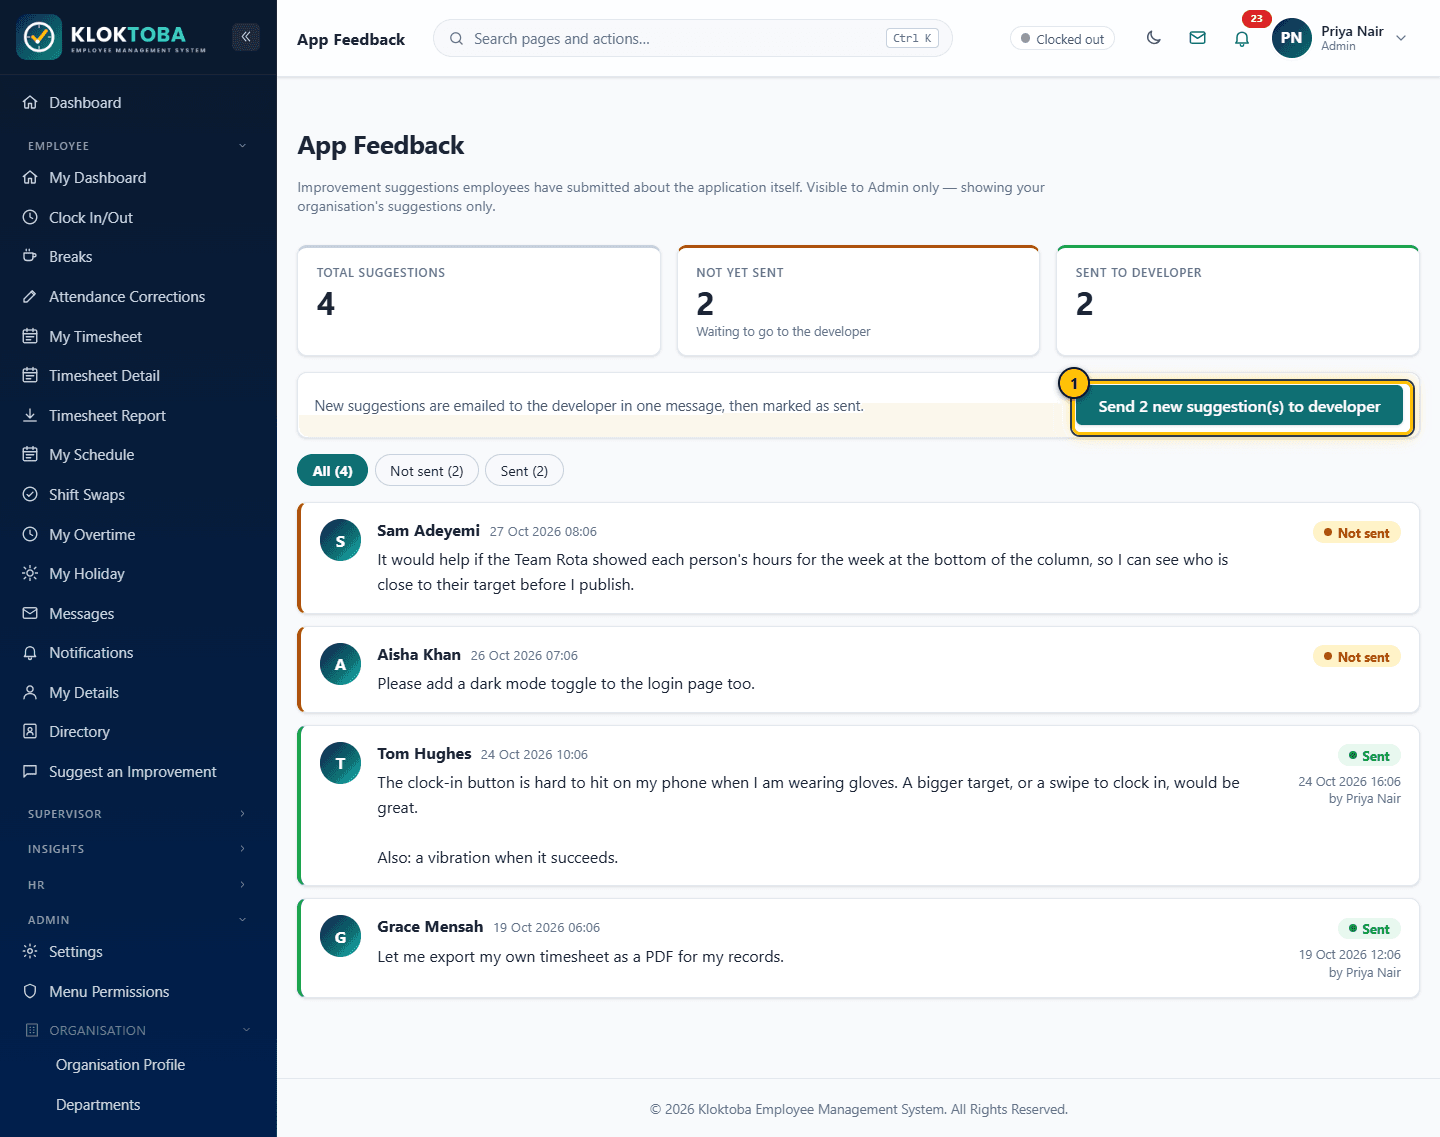
SS-057 – App feedback. Viewed as: Admin. - Send new suggestions to the developer
Expected result
Submitters see a confirmation. Sent suggestions are never emailed twice.
Common errors
| Error or mistake | What to do |
|---|---|
| Suggestion too short | Enter at least 5 characters. |
Troubleshooting
| Problem | Solution |
|---|---|
| Send button disabled | There are no new suggestions to send. |
Frequently asked questions
- Is this for HR requests?
- No. Use Corrections, Holiday or contact HR for work requests.
Chapter 10
User and Role Management
Accounts, roles, who can see which menu, and security controls.
10.1 User accounts
Accounts are created by self-registration with approval (Chapter 2) or by HR and Admin with Add Employee (Chapter 3). Account status can be Active, Deactivated, or awaiting approval or rejected for self-registrations.
- Reset a password: Employee List or Team Members, then Send password reset link.
- Set a temporary password: HR or Admin on the Employee List (Set password), for anyone in their organisation whose role is not above theirs, or when creating an employee choose Set a temporary password now instead of the emailed link. Tick whether they must change it at first sign-in. SuperAdmin does the same for Organisation Admins.
- Deactivate or activate: Admin on the Employee List, for anyone in their organisation (including registrations waiting for approval). SuperAdmin does the same for Organisation Admins on Organisation Admins. History is kept.
- Promote to Admin: Admin > Organisation > My Organisation, choose a person under Admins and select Promote.
- Organisation Admins: only a SuperAdmin creates these, on Admin > Organisation > Organisation Admins (Chapter 9).
10.2 Roles
Kloktoba has five roles: Employee, Supervisor, HR, Admin and SuperAdmin. Change a person's role on Edit Employee. HR can assign Employee, Supervisor or HR; Admin can also grant Admin. A SuperAdmin account is created only through the one-time setup page, and Organisation Admins only by a SuperAdmin. A role change takes effect the next time the person signs in. Role definitions are fixed; you cannot create custom roles.
10.3 Permissions: Menu Permissions
Step-by-step instructions
- Open Admin > Menu Permissions. Roles are columns and menu items are rows.
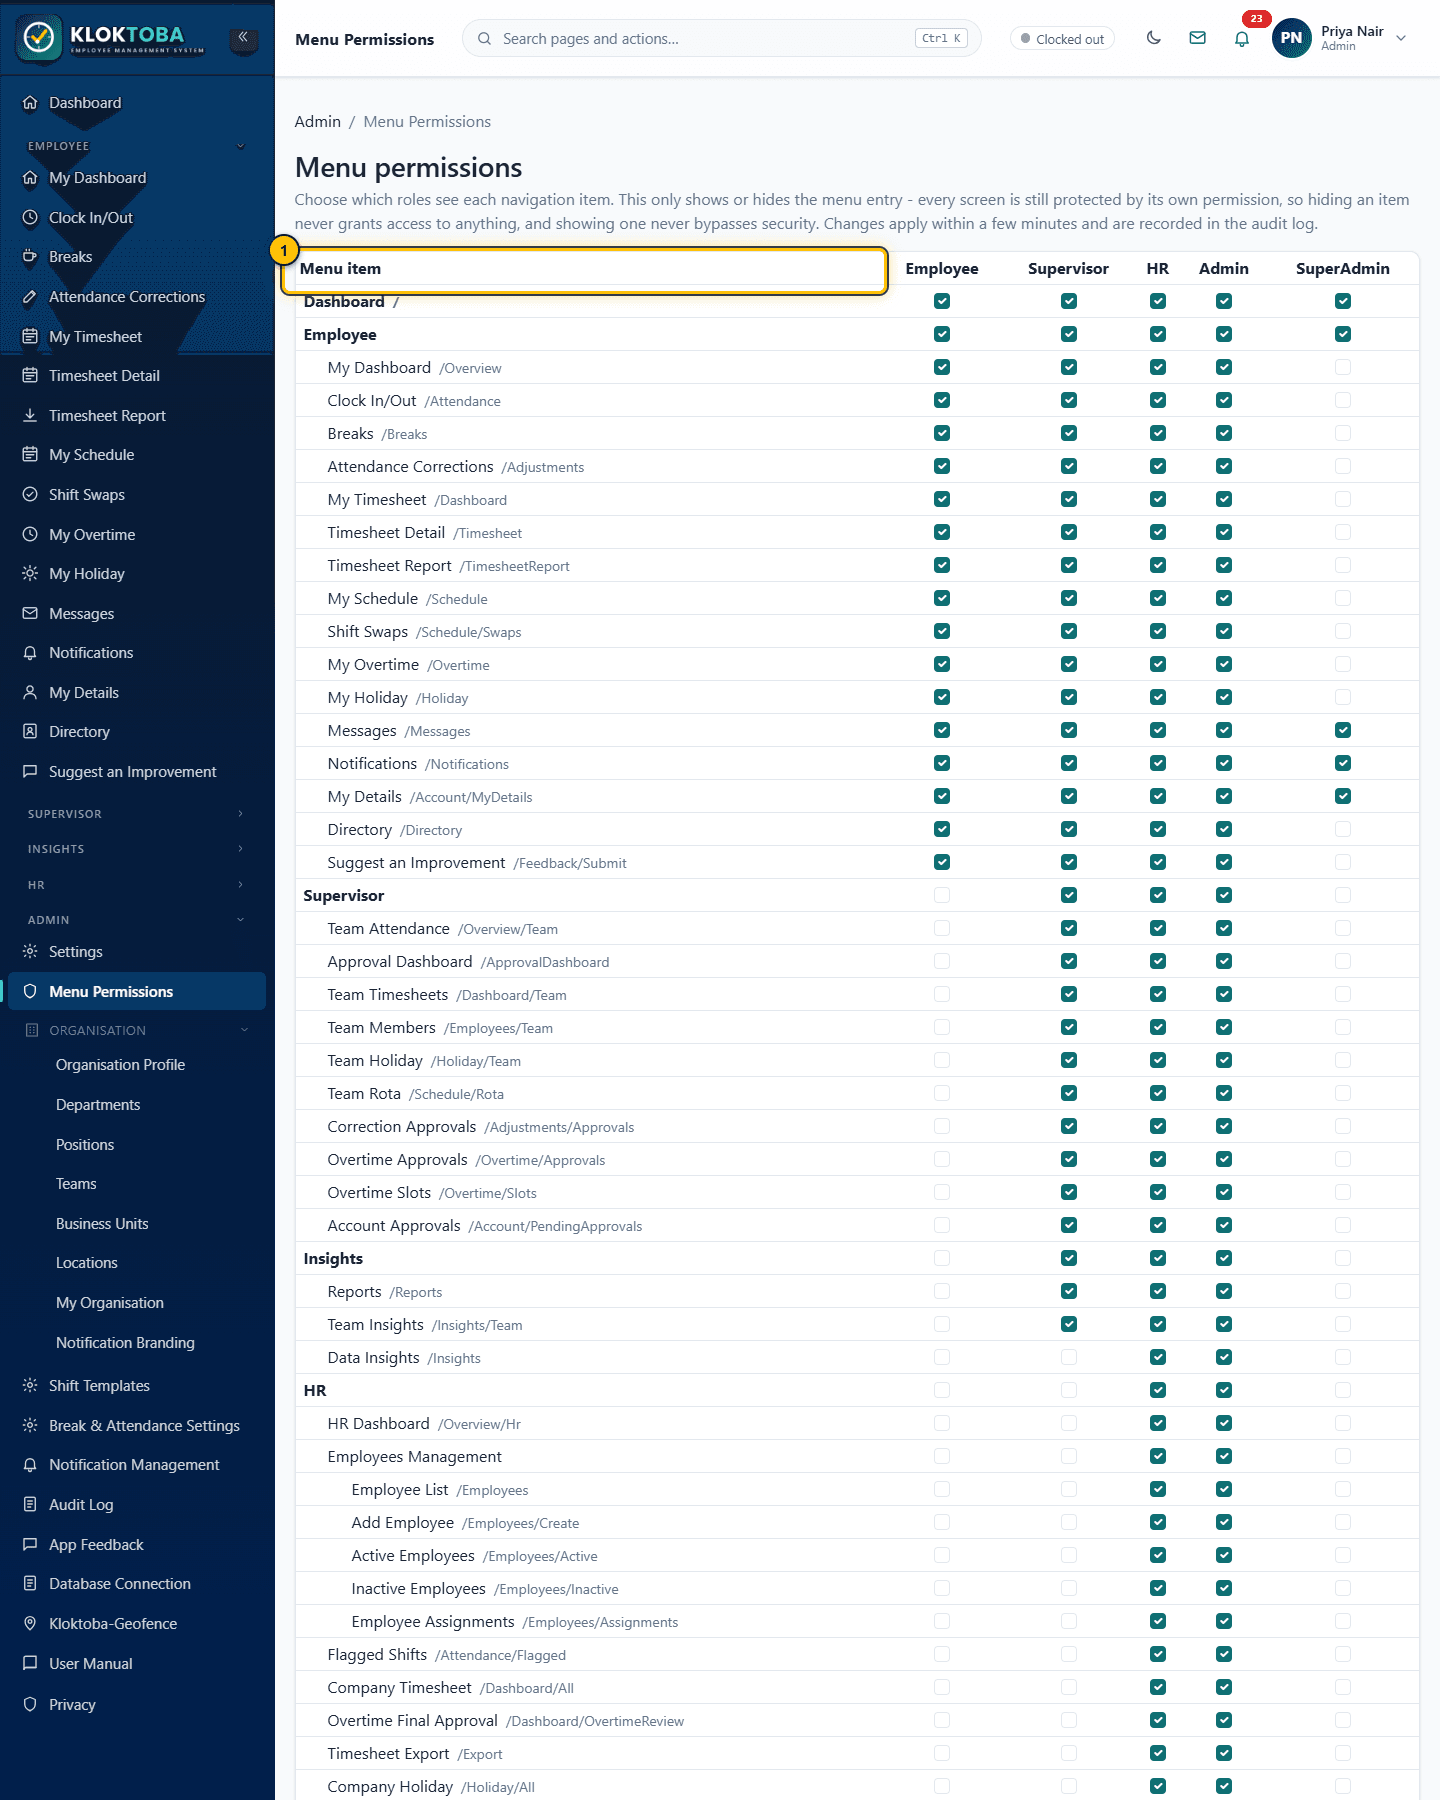
SS-054 – Menu permissions (role access). Viewed as: Admin. - Roles across the top, menu items down the side
- Tick or untick a box to show or hide an item for a role.
- Changes apply within a few minutes and are recorded in the audit log.
Expected result
The sidebar updates for that role. Admin and SuperAdmin can never be locked out of Menu Permissions.
Common errors
| Error or mistake | What to do |
|---|---|
| Cannot remove Menu Permissions for Admin | Admin and SuperAdmin must always see this page. |
Troubleshooting
| Problem | Solution |
|---|---|
| A user still sees the old menu | Wait a few minutes (menus are cached) and sign in again. |
Frequently asked questions
- Does hiding a menu item stop access?
- Showing or hiding is a convenience only. Every screen is separately protected, so hiding never grants access and showing never bypasses security.
10.4 Security controls
| Control | Detail |
|---|---|
| Passwords | Rules and expiry set by SuperAdmin on Global Settings > Password policy (default: at least 8 characters, no expiry); stored securely; reset links last 24 hours and work once; temporary passwords are never emailed. |
| Generic sign-in errors | The same message for a wrong username or password, to avoid revealing which accounts exist. |
| Sessions | Sign-in lasts up to 8 hours with activity, or 30 days if Remember me is chosen. |
| Role-protected screens | Every screen checks permission regardless of menu visibility. |
| Organisation scoping | HR, Admin and Supervisor see only their own organisation. SuperAdmin manages organisations but not their employees or records. |
| Approvals | Self-registrations need manager and HR/Admin approval. |
| Multi-factor authentication | Not currently available. |
10.5 Audit log
Step-by-step instructions
- Open Admin > Audit Log.
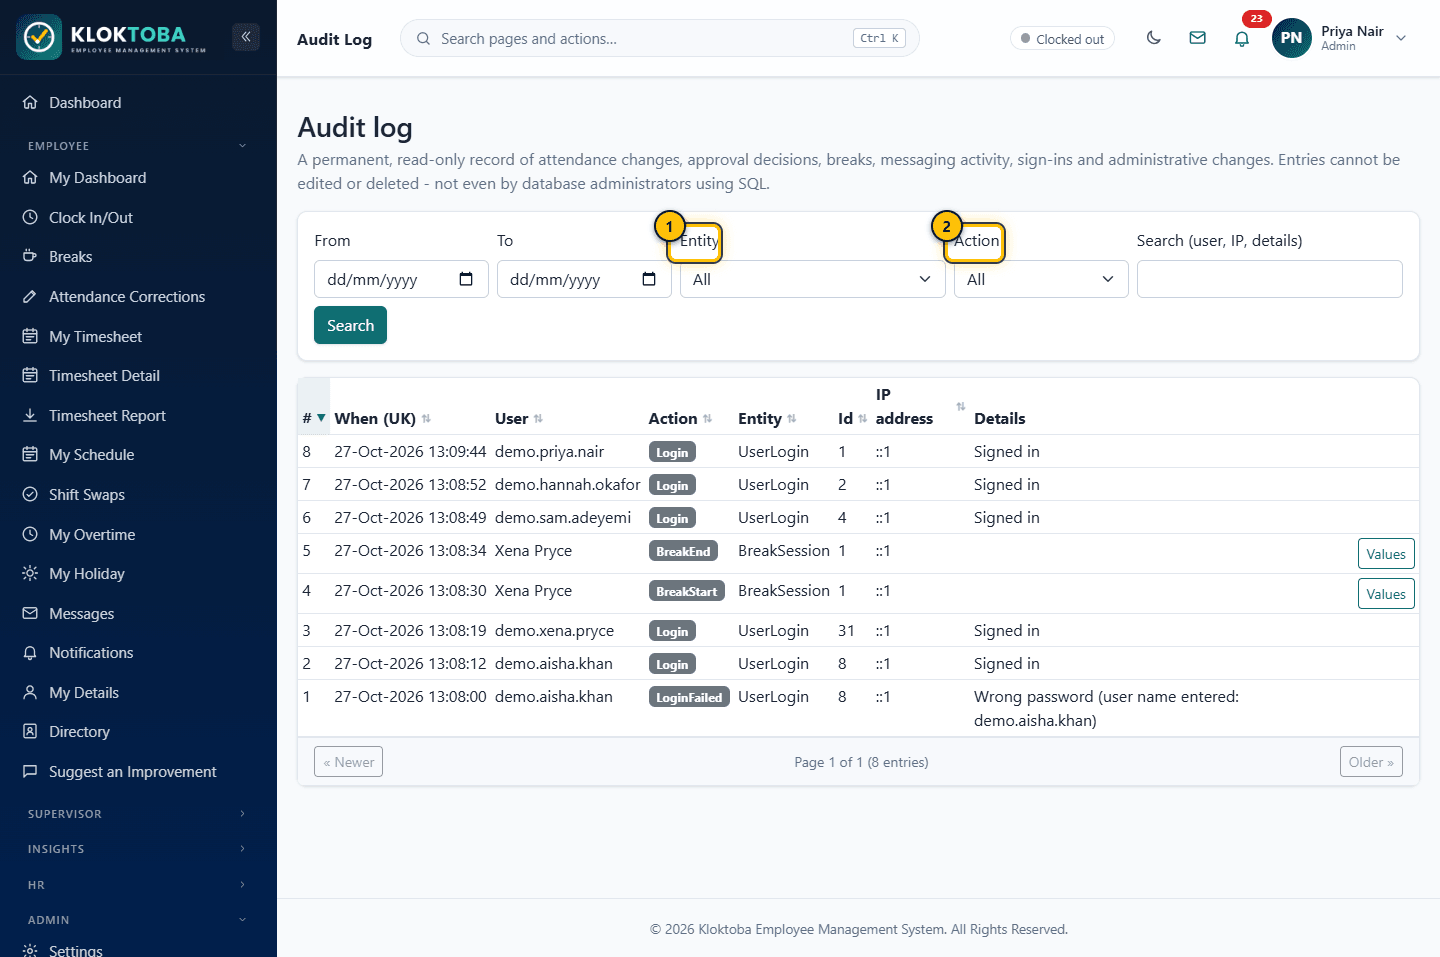
SS-056 – Audit log. Viewed as: Admin. - Filter by entity
- Filter by action
- Filter by date range, Entity and Action, or search by user, IP address or details.
- Page through results with Newer and Older.
Expected result
Entries cannot be edited or deleted, even by database administrators using SQL.
Common errors
| Error or mistake | What to do |
|---|---|
| No results | Widen the date range or clear filters. |
Troubleshooting
| Problem | Solution |
|---|---|
| I cannot find an action | Use the Entity filter first, then Action. |
Frequently asked questions
- Are exports logged?
- Yes. Every export is recorded.
Chapter 11
Reports and Analytics
Built-in reports, live analytics and exports.
11.1 Running a report
Step-by-step instructions
- Open Insights > Reports. Supervisors see their direct reports; HR and Admin see their whole organisation. People whose clocking is switched off are left out of attendance reports.
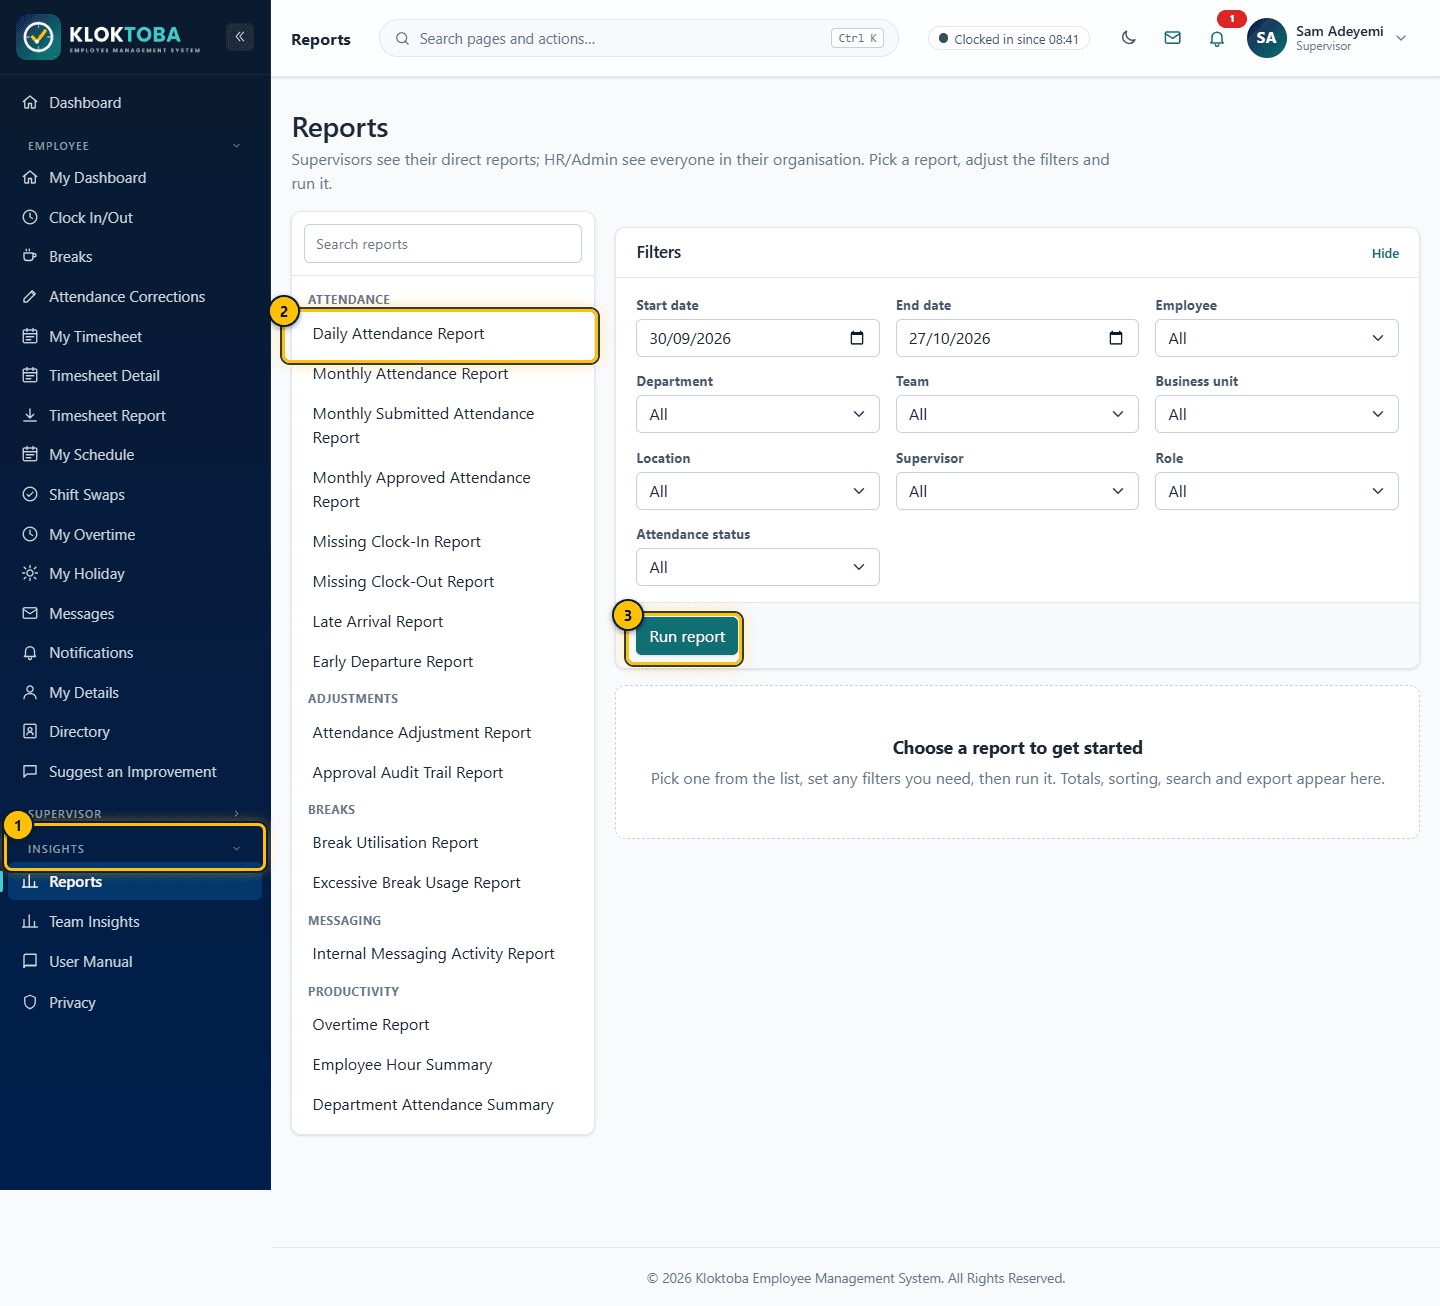
SS-058 – Reports - choose a report. Viewed as: Supervisor. - Insights group: Reports and Team Insights
- Pick a report
- Run report
- Choose a report from the list: Daily and Monthly Attendance, Monthly Submitted Attendance, Monthly Approved Attendance, Missing Clock-In, Missing Clock-Out, Late Arrival, Early Departure, Attendance Adjustment, Approval Audit Trail, Break Utilisation, Excessive Break Usage, Internal Messaging Activity, Broadcast Message (HR and Admin), Overtime, Employee Hour Summary, Department Attendance Summary and Standard Salary Bill (HR and Admin).
- Set filters: dates, employee, department, team, business unit, location, supervisor, role and attendance status.
- Select Run report. Use the search box and column sorting on the results, which also show totals.
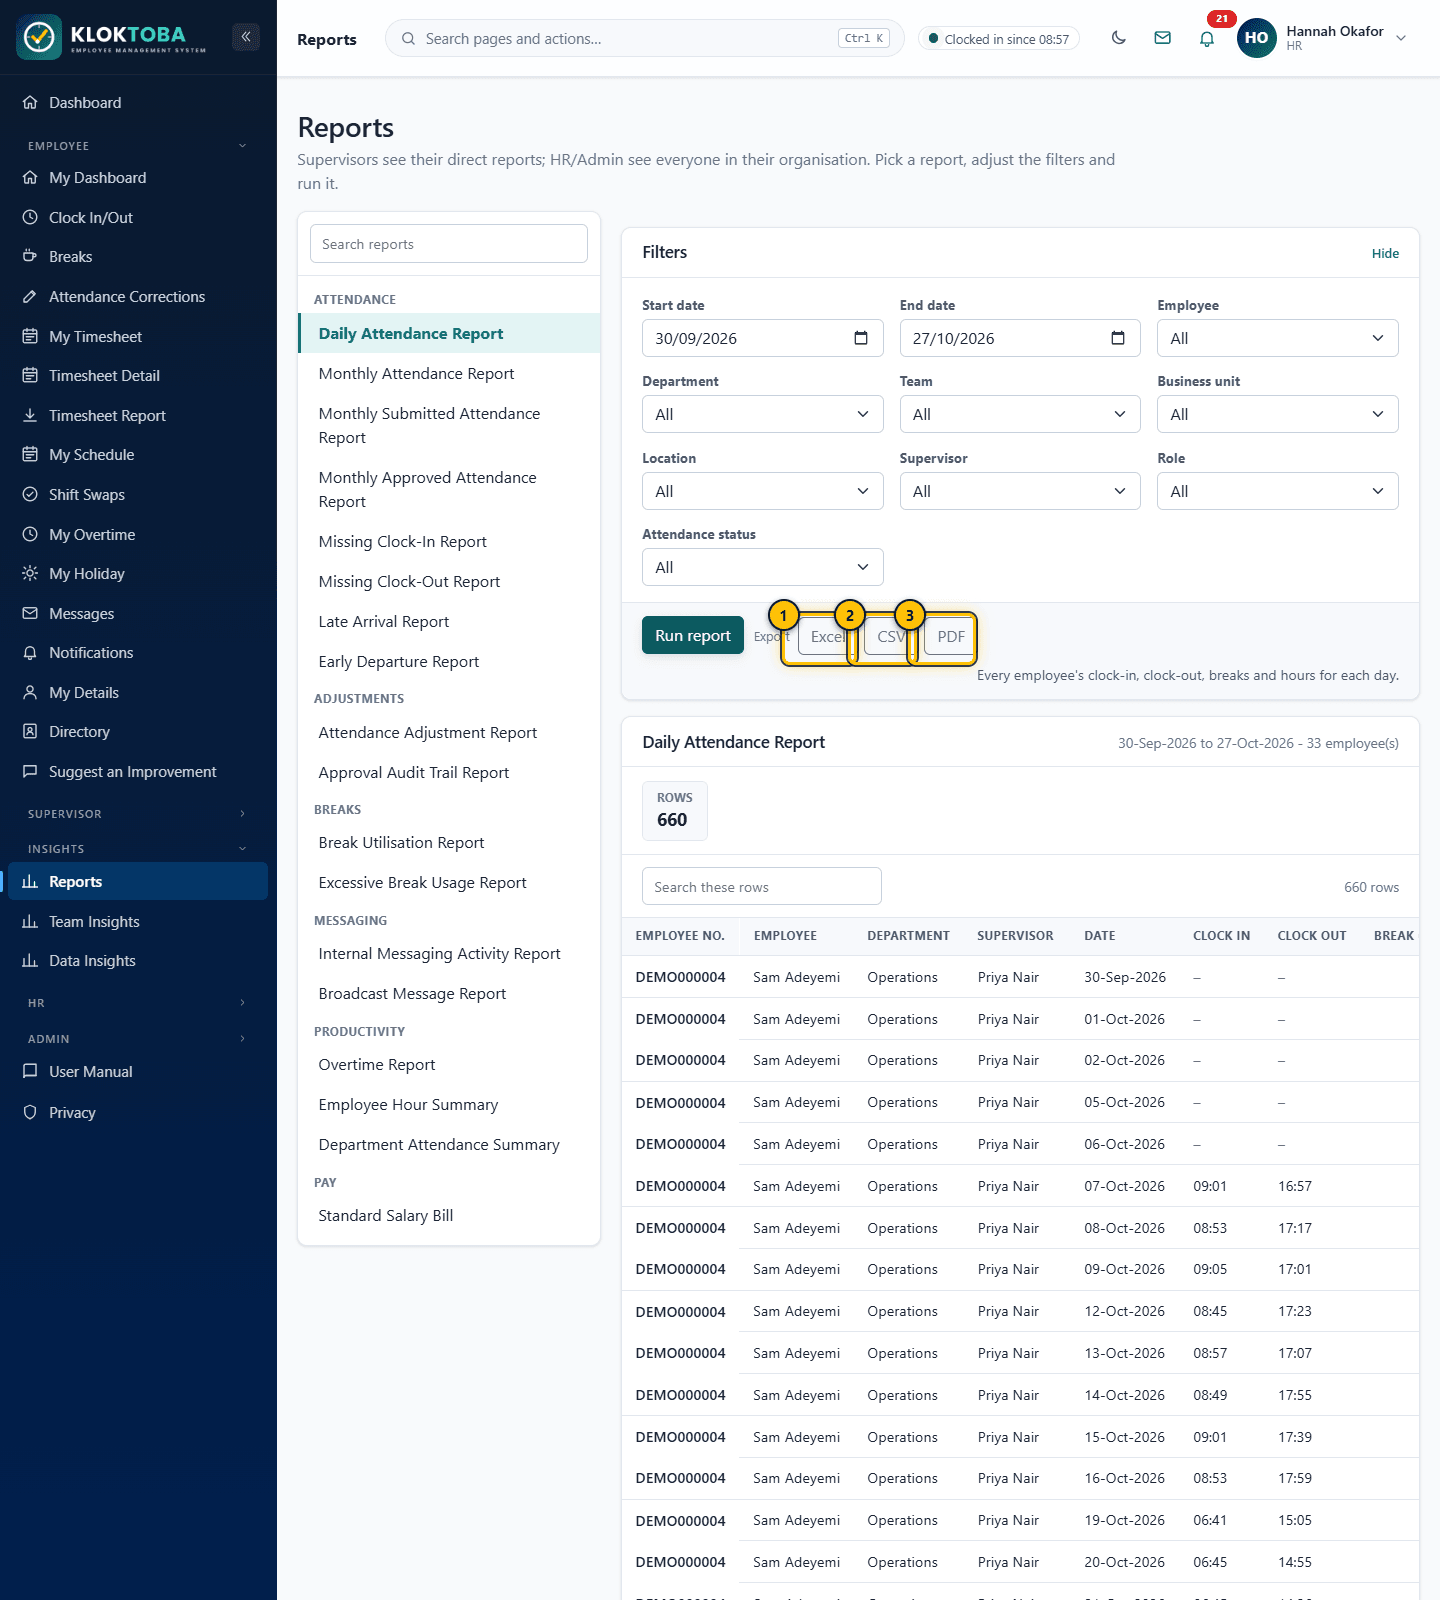
SS-059 – Attendance report results and export. Viewed as: HR. - Export to Excel
- Export to CSV
- Export to PDF
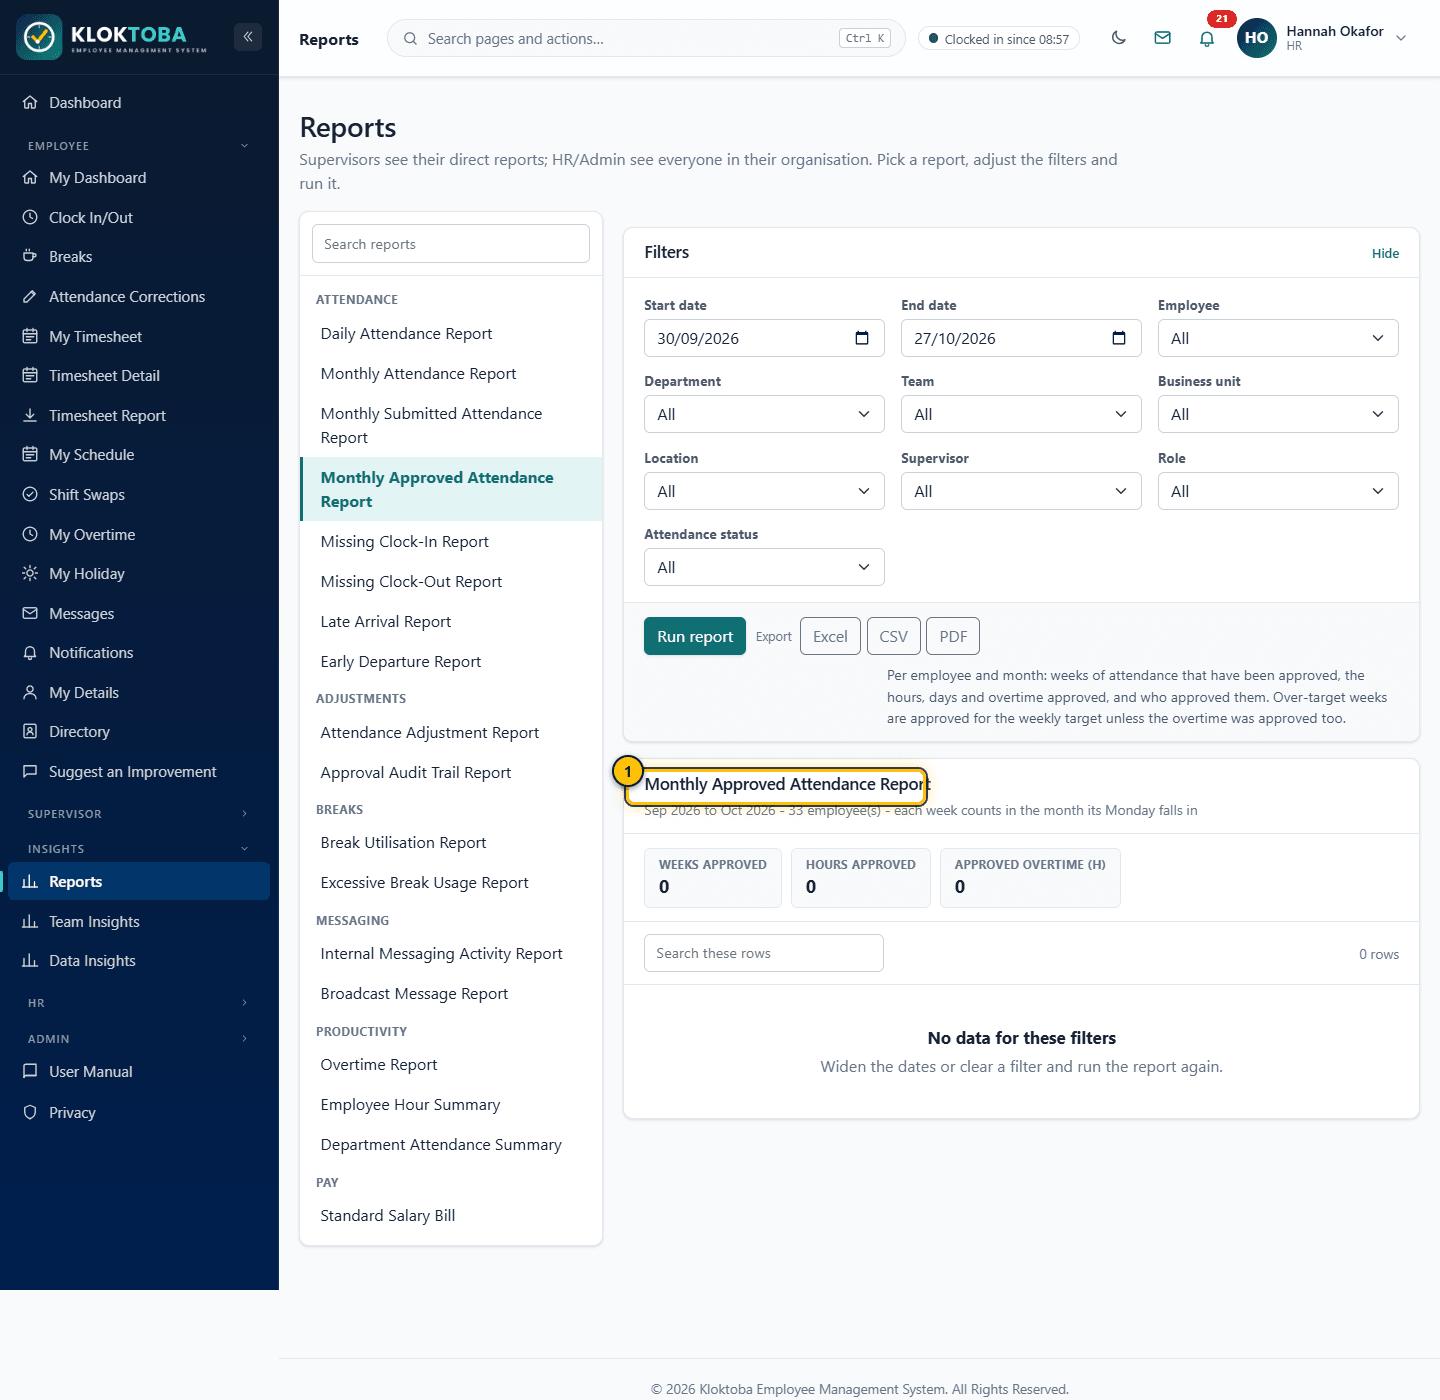
- Monthly approved (and submitted) attendance reports
Expected result
Results appear below the filters. Export controls are enabled after a run.
Common errors
| Error or mistake | What to do |
|---|---|
| No rows | Widen the date range or relax filters. |
Troubleshooting
| Problem | Solution |
|---|---|
| Export buttons are disabled | Run a report first. Export is available to HR and Admin. |
Frequently asked questions
- Which formats can I export?
- Excel, CSV and PDF.
- How do the monthly submitted and approved reports work?
- Each week belongs to the month its Monday falls in. Monthly Submitted Attendance counts, per employee and month, the weeks worked, submitted, pending, approved, rejected and not submitted, and the hours submitted. Monthly Approved Attendance shows the approved weeks, the hours worked in them, the Hours Approved (over-target weeks count at the weekly target unless the overtime was finally approved), approved overtime and who approved them.
11.2 Standard Salary Bill
Step-by-step instructions
- Open Insights > Reports and choose Standard Salary Bill under Pay.
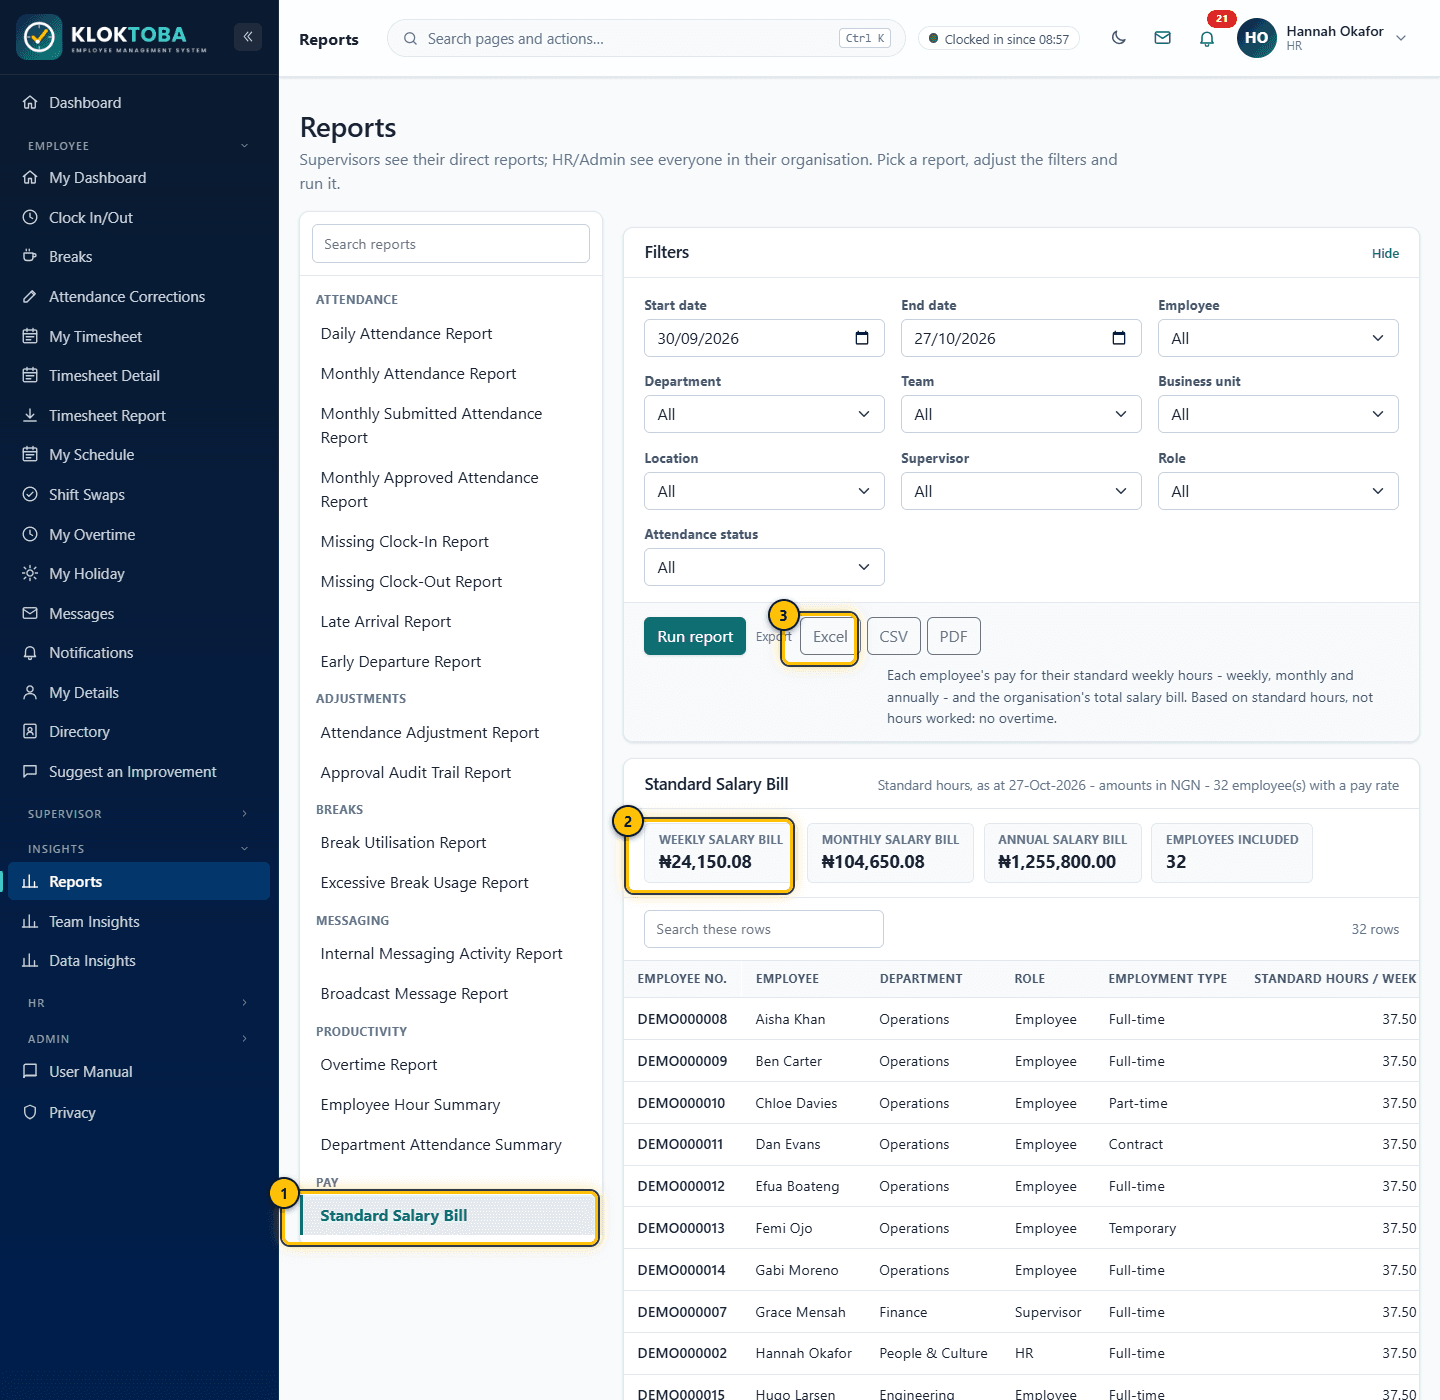
SS-087 – Standard Salary Bill. Viewed as: HR. - In the Pay group (HR and Admin only)
- Weekly, monthly and annual totals
- Export to Excel, CSV or PDF
- Optionally filter by department, team, business unit, location or role, then select Run report. Dates do not change the figures; the report shows pay as it stands today.
- Read the totals: Weekly salary bill, Monthly salary bill, Annual salary bill and Employees included. Export to Excel, CSV or PDF if needed.
Expected result
One row per employee with a pay rate: Standard Hours / Week, Hourly Rate, Weekly, Monthly, Annual and Pay Basis (hourly rate or annual salary). Amounts are in the company currency.
Common errors
| Error or mistake | What to do |
|---|---|
| The report is not in my list | It shows pay, so only HR and Admin can see and run it. |
Troubleshooting
| Problem | Solution |
|---|---|
| Someone is missing | Employees with no pay rate, or a rate of zero, are not shown. Set a pay rate on their employee record. |
| An annual figure differs slightly from the stored salary | When an hourly rate is stored it is used (hourly rate x hours x 52), the same rule as Salary due on the Company Timesheet; the stored annual salary may have been rounded differently. |
Frequently asked questions
- How is it calculated?
- Standard hours are the person's weekly hours override, or the company standard. Weekly = hourly rate x standard hours; Annual = weekly x 52; Monthly = annual / 12. If only an annual salary is stored, it is spread over the standard hours.
- Does it include overtime?
- No. It is based on standard hours, not hours worked.
- Are people who cannot clock in included?
- Yes, if they have a pay rate. They are still on the payroll.
11.3 Analytics: Data Insights and Team Insights
Data Insights (HR and Admin) and Team Insights (Supervisor, for direct reports) are under Insights. They are live, read-only views recalculated each time you open them: headcount by role, the attendance trend, attendance analytics, hours against target this week and holiday use.
| Section | What it shows and how to change it |
|---|---|
| Attendance trend | How many active employees clocked in on each day (or week). Choose a Period (This week, Last 7, 14 or 30 days, This month, Last 90 days, or a Custom range of up to a year); a preset applies straight away, a custom range when you select Show trend. Up to 35 days shows a bar per day; longer periods a bar per Monday-start week. Tiles show the average, the busiest day or week and who is clocked in now. |
| Attendance analytics | Choose a Period (Last 8, 12, 26 or 52 weeks, or a Custom range of up to a year) and what to Compare (Week on week and month on month, Week on week or Month on month). Tiles show scheduled days, the attendance rate, the unplanned absence rate, approved leave days and missing clock-ins to review. The comparison shows each week (or month) against the one before, with the change. |
| Weekly attendance rate | Line chart: attended days divided by attended days plus unplanned absences, for each Monday to Sunday week. |
| Monthly absence rate | Line chart: unplanned absences divided by attended days plus unplanned absences, for each month. Approved leave is not included. |
| Lateness by department | Bars: late arrivals divided by days attended, per department. Late means after the start time plus the grace period. |
| Absence by weekday and week | Heat map of unplanned absences for each weekday in each week; darker cells are a larger share of that day's expected attendance. A dash means nobody was expected. |
| Missing clock-ins to review | Scheduled days with no clock-in and no approved leave, with a link to the Missing Clock-In report. |
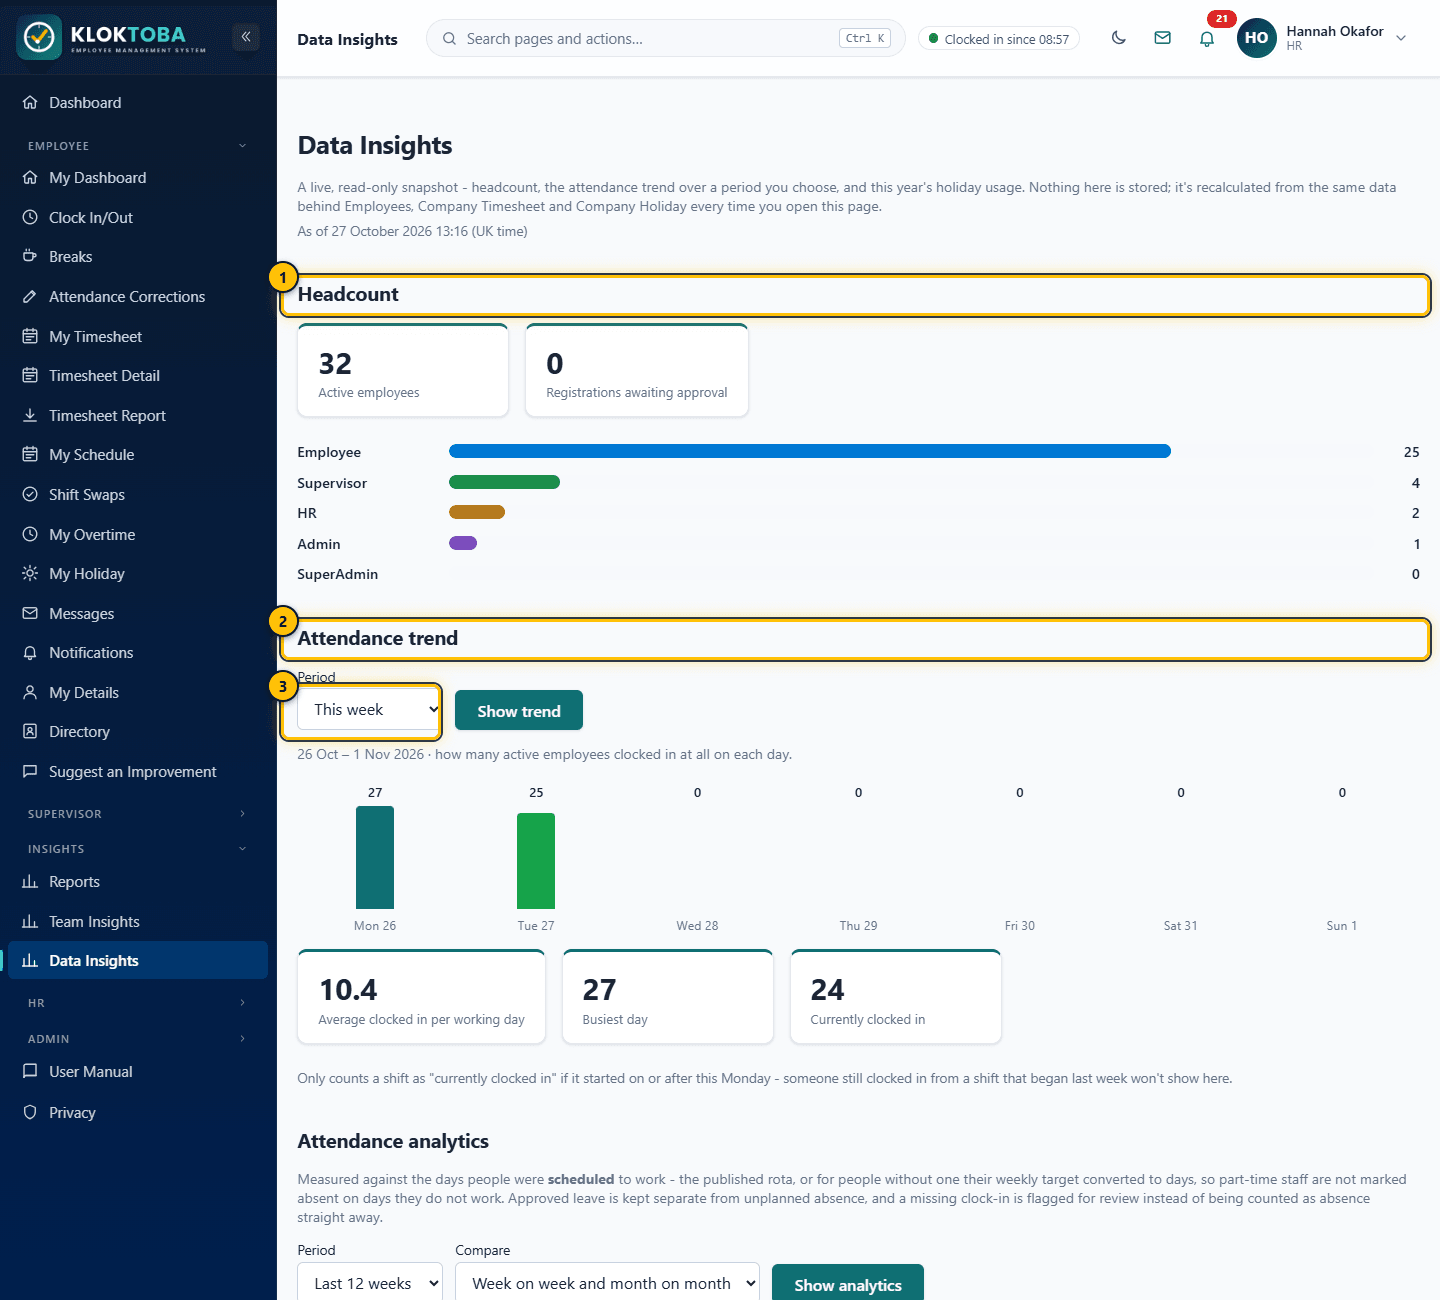
- Headcount by role
- Attendance trend
- Choose the period (or a custom range)
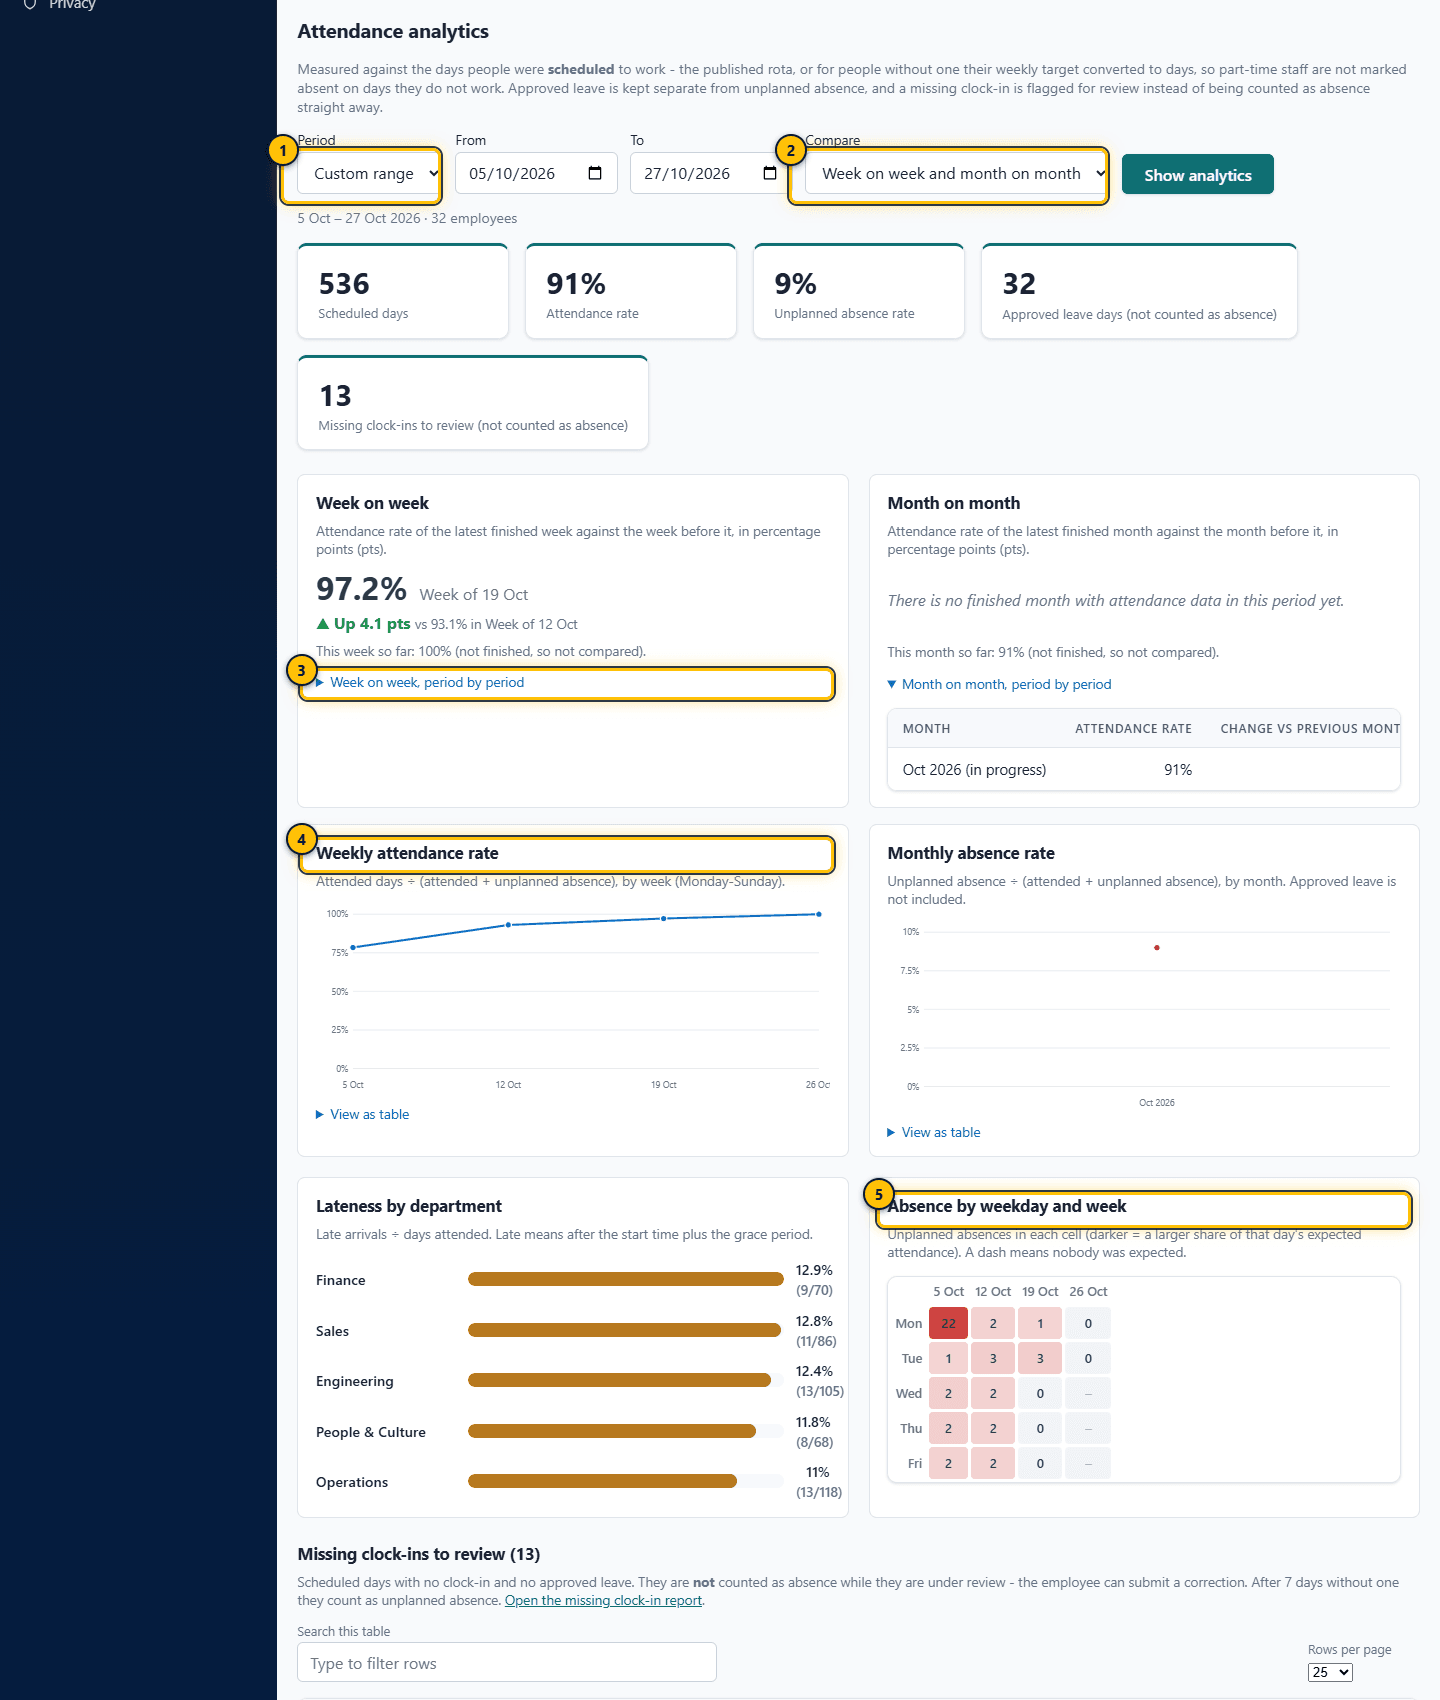
- Analytics period
- Compare week on week, month on month, or both
- Comparison with the previous week
- Weekly attendance rate
- Absence heat map
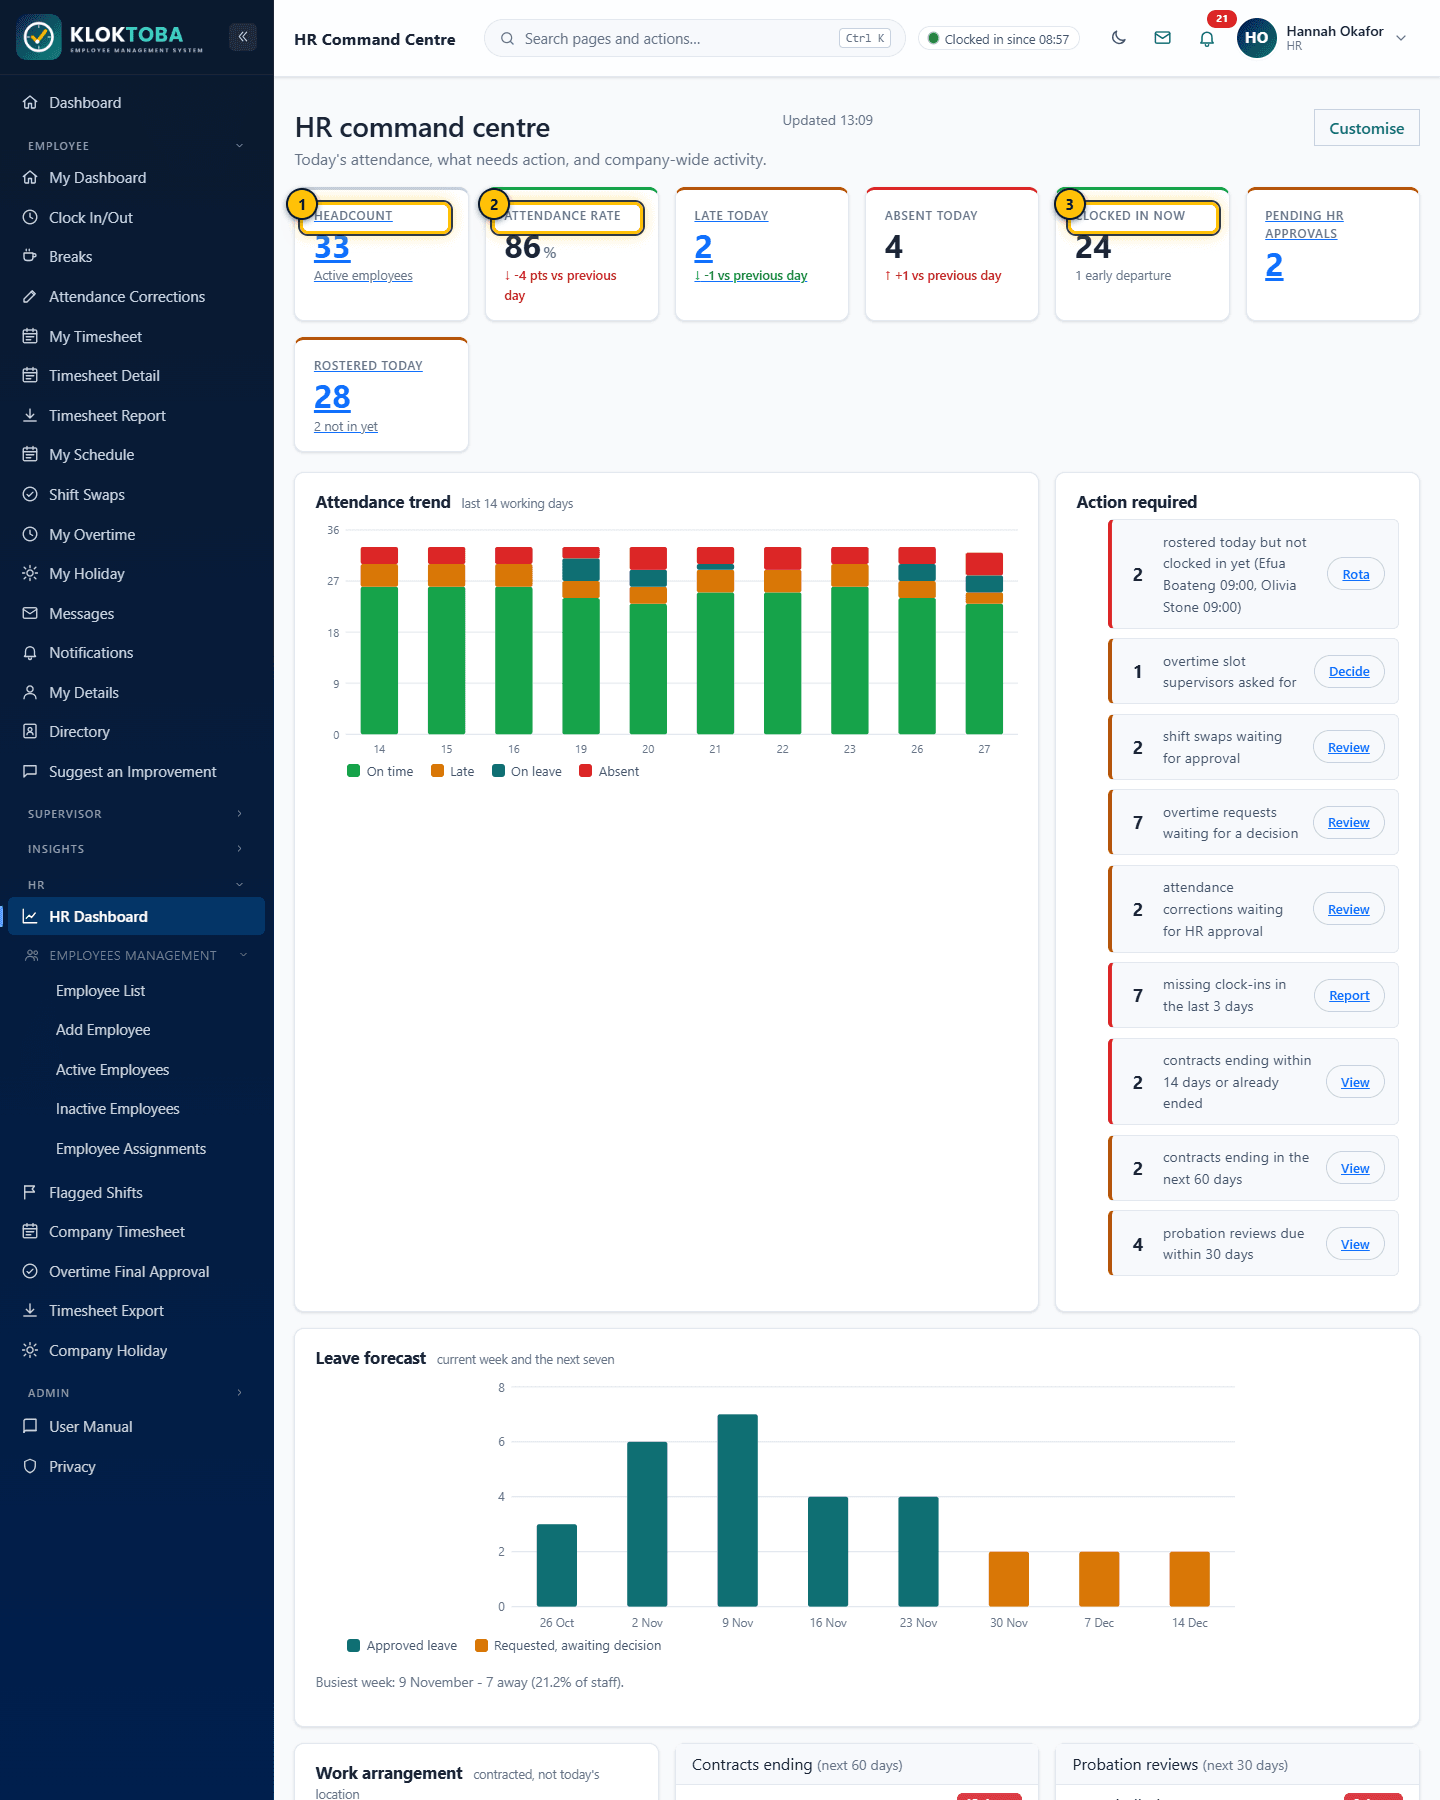
- Headcount
- Attendance rate
- Clocked in now
11.4 Timesheet exports
Step-by-step instructions
- On HR > Company Timesheet choose a week and select Export CSV or Export Excel. Files include over-target and auto clocked-out flags, the overtime status, Counted hours (after the overtime rule), Approved hours and salary due where a pay rate exists.
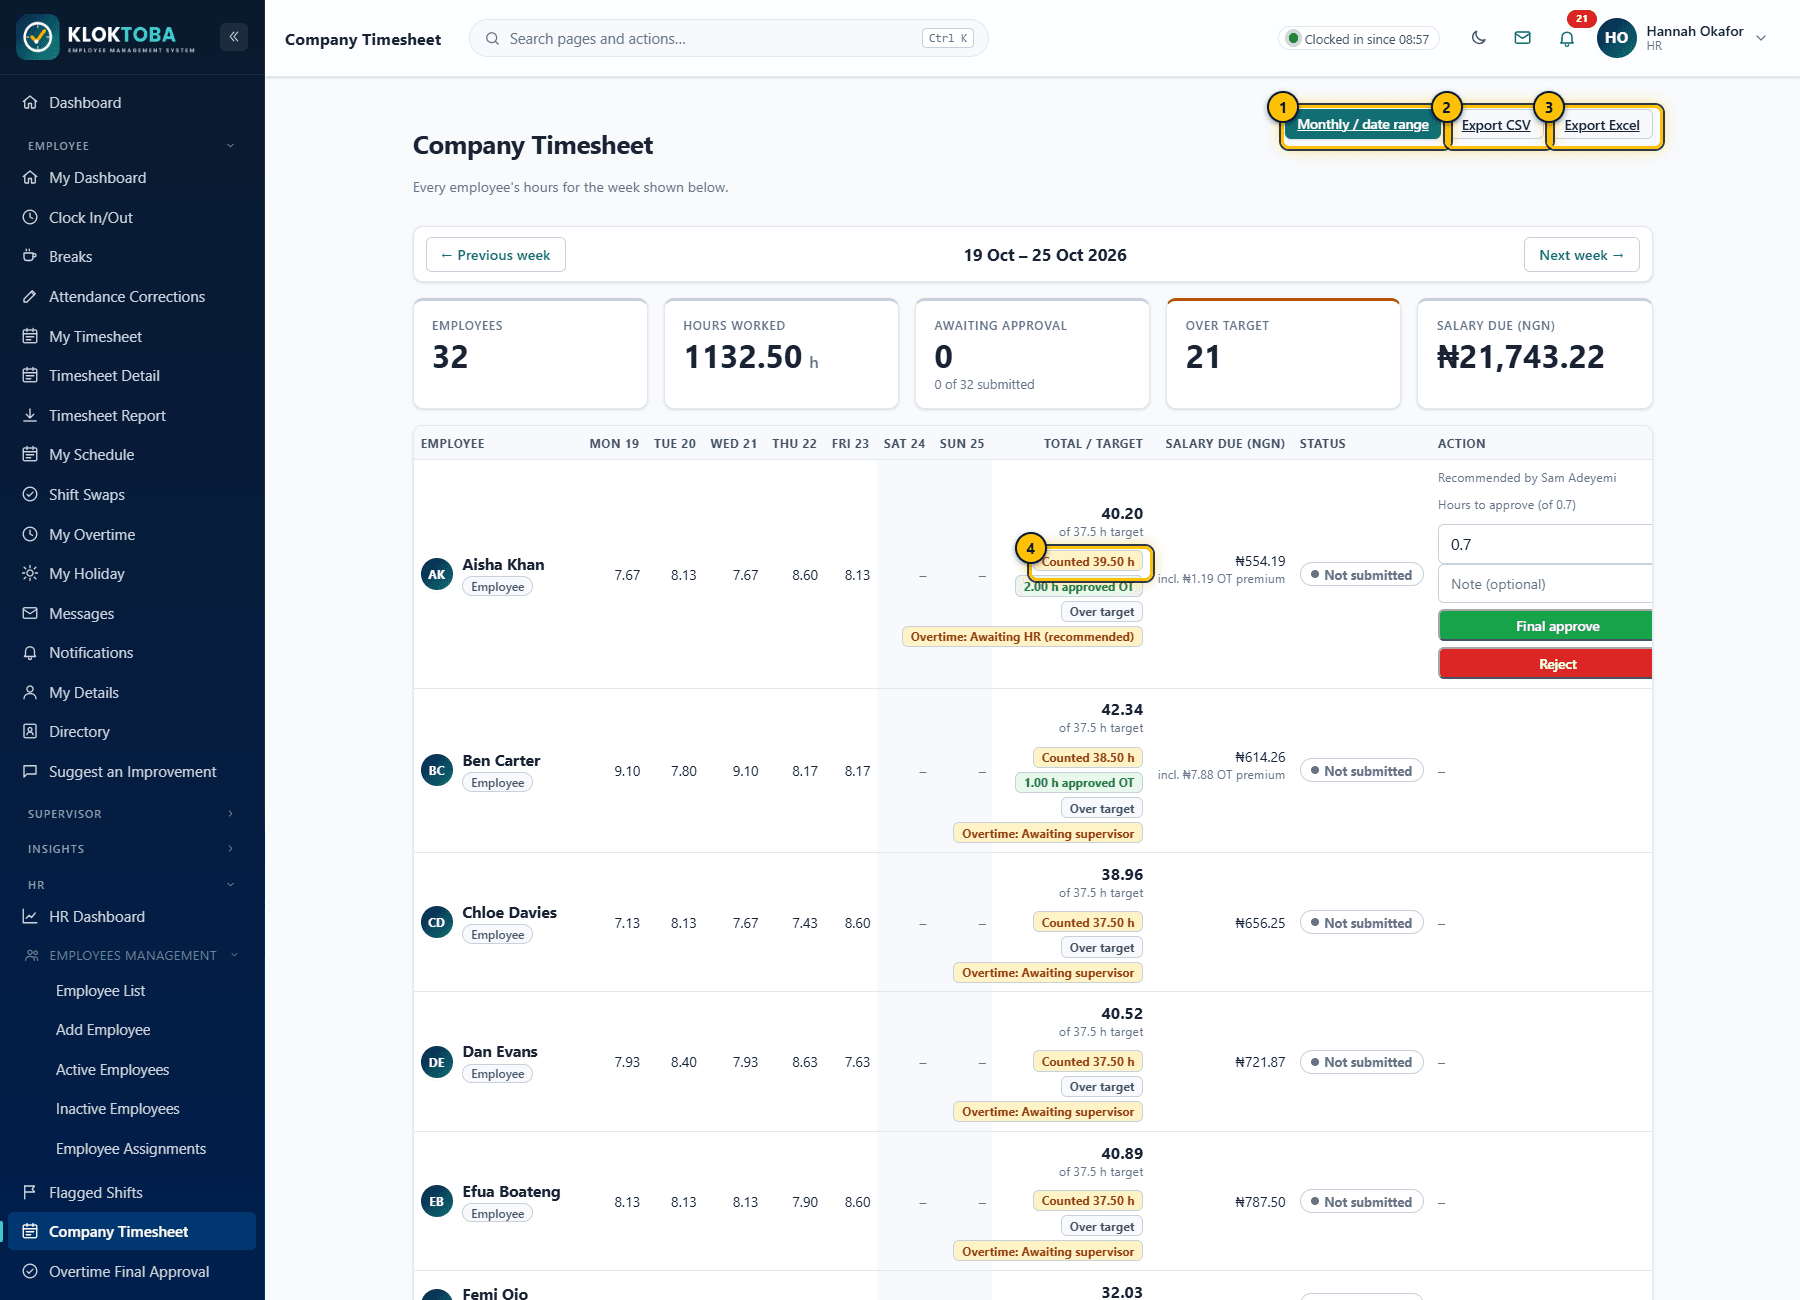
SS-061 – Company timesheet and exports. Viewed as: HR. - Month or date-range view
- Export CSV
- Export Excel
- Hours that count until overtime is approved
- For a month or any date range, select Monthly / date range on the Company Timesheet. Choose a Month and Show month, or From and To dates (up to 93 days) and Show range. The page shows each person's hours day by day and week by week, the counted and approved hours and salary due; Export CSV and Export Excel download the same period. Weekly view returns to the week.
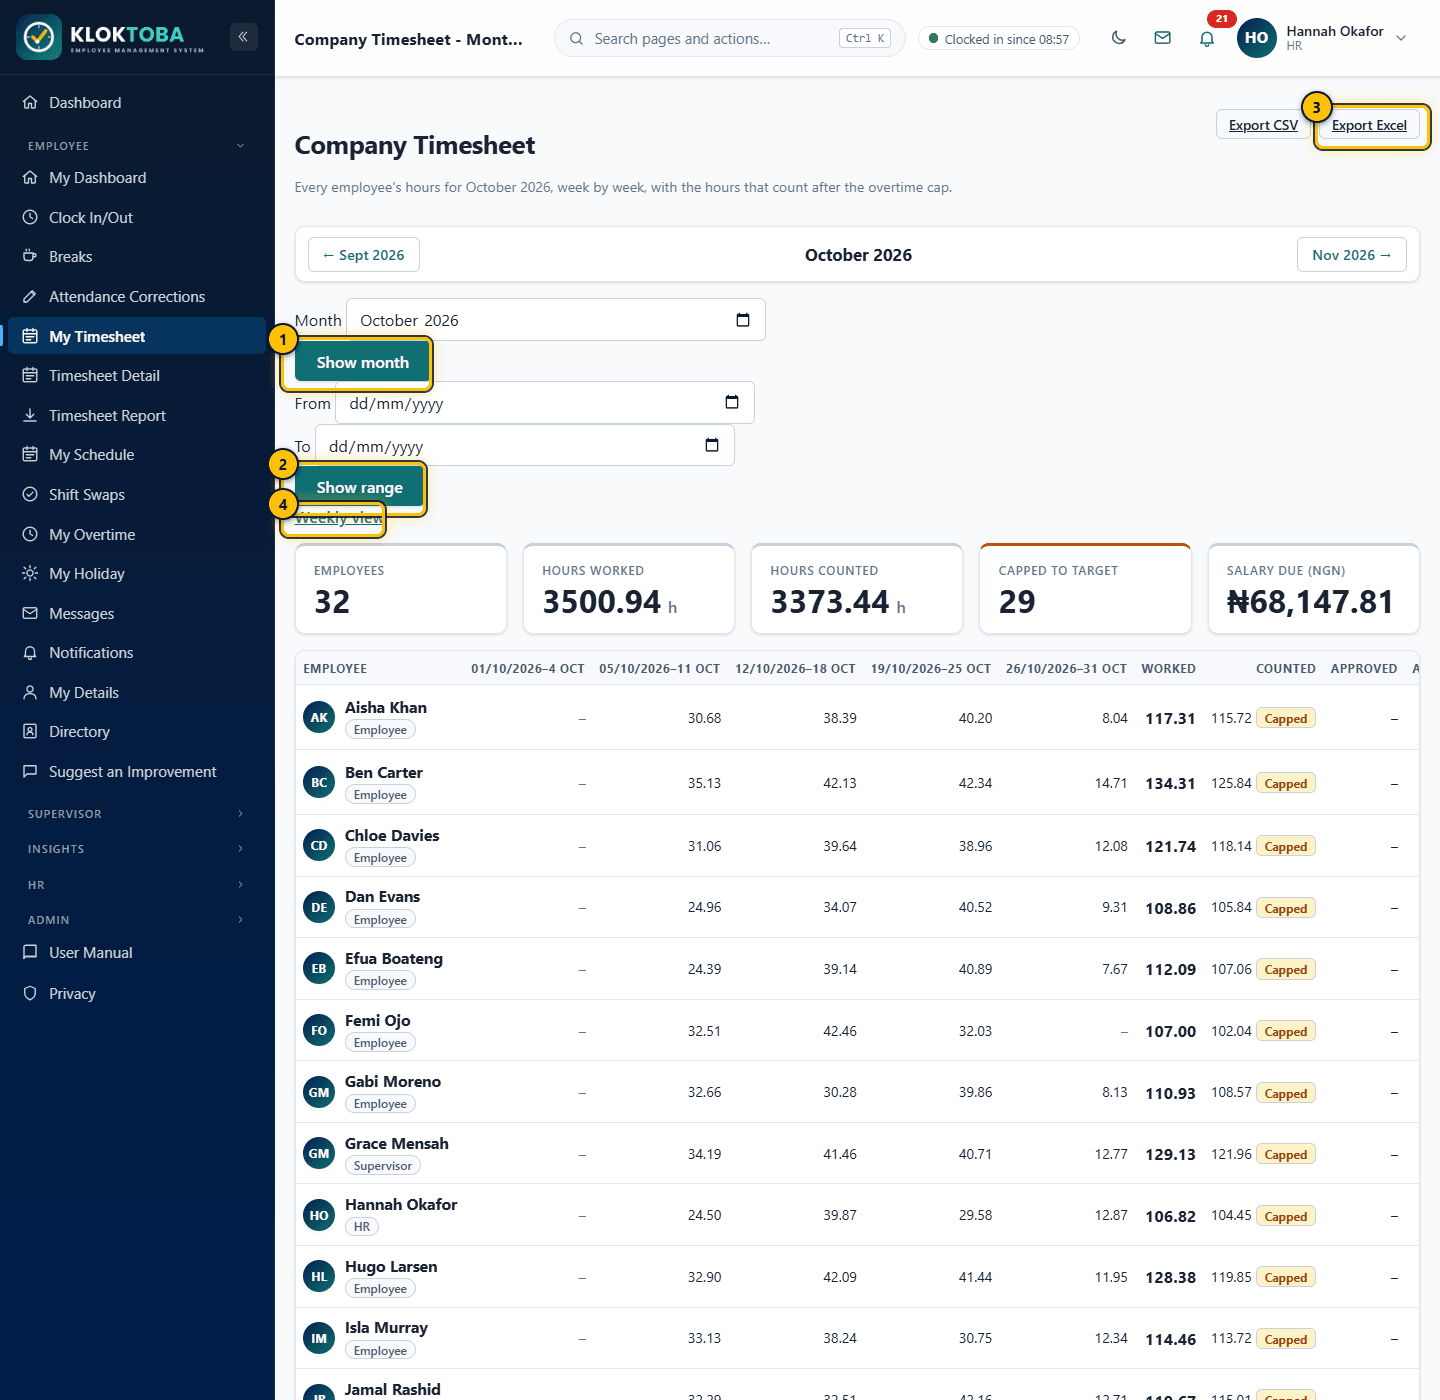
SS-085 – Company timesheet: month or date range. Viewed as: HR. - Choose a month
- Or any date range (up to 93 days)
- Export the same period
- Back to the week
- For any period open Timesheet Export, choose a Quick period or dates, filter by employee, and export. Each file has employee details, one row per day and a summary.
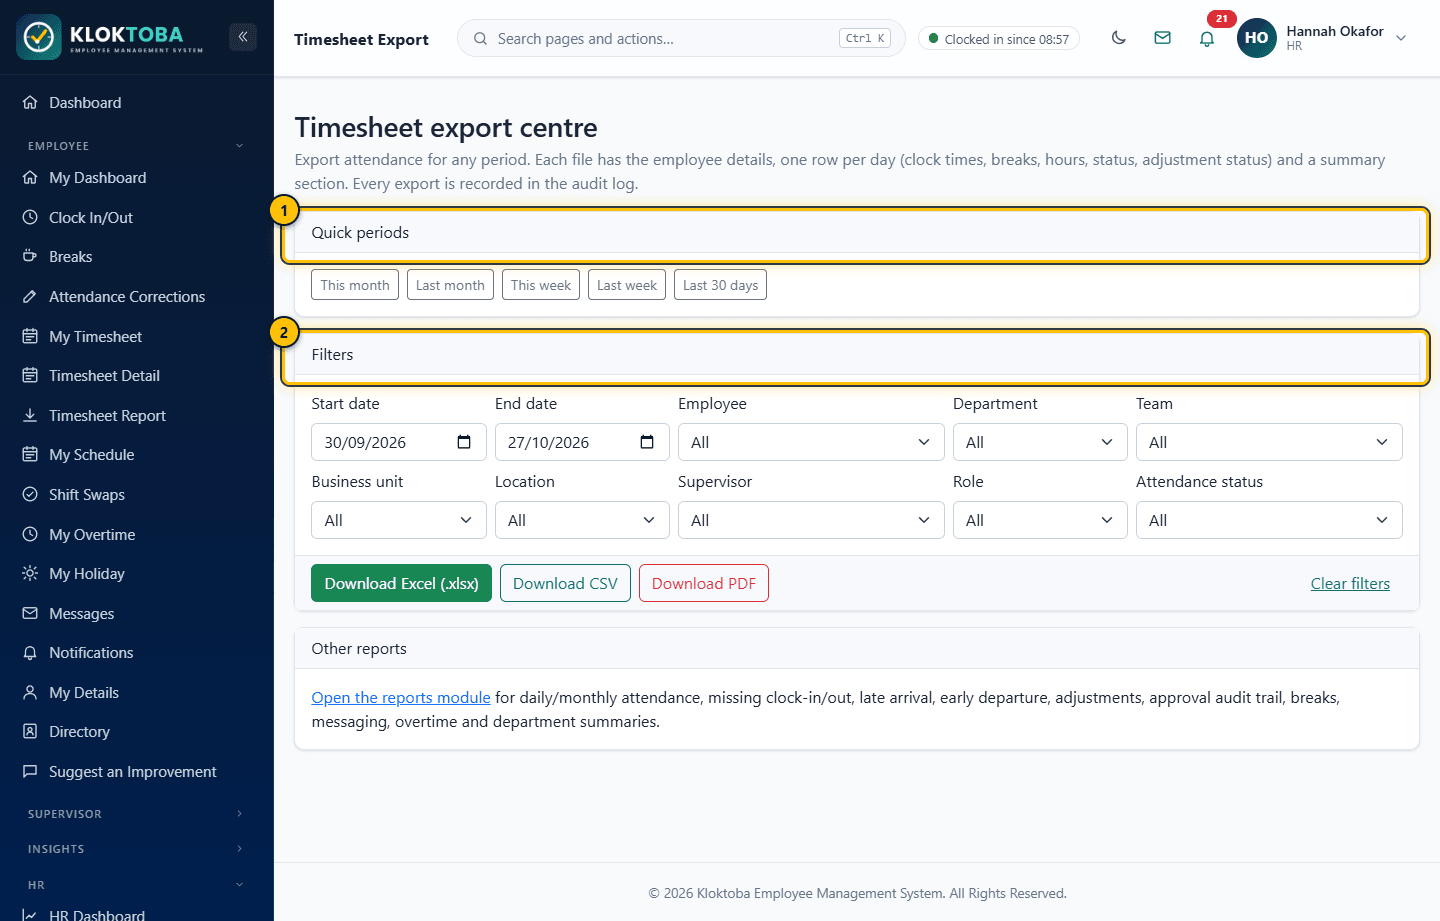
SS-062 – Timesheet export centre. Viewed as: HR. - Quick periods
- Filters
Expected result
A file downloads; the export is recorded in the audit log.
Common errors
| Error or mistake | What to do |
|---|---|
| Salary due shows a dash | No pay rate is set for that person; they are excluded from the total. |
| Salary due is lower than hours x rate | Hours over the weekly target without approved overtime are not paid until the overtime is approved (Overtime). |
Troubleshooting
| Problem | Solution |
|---|---|
| Excel opens with strange characters | Import the CSV as UTF-8. |
Frequently asked questions
- Does CSV include a title row?
- No. CSV is pure data so it imports cleanly.
Chapter 12
Notifications and Messages
Alerts, announcements and how to control them.
12.1 Notification centre
Step-by-step instructions
- Select the bell in the top bar or open Notifications. Tabs show Unread, History and Preferences.
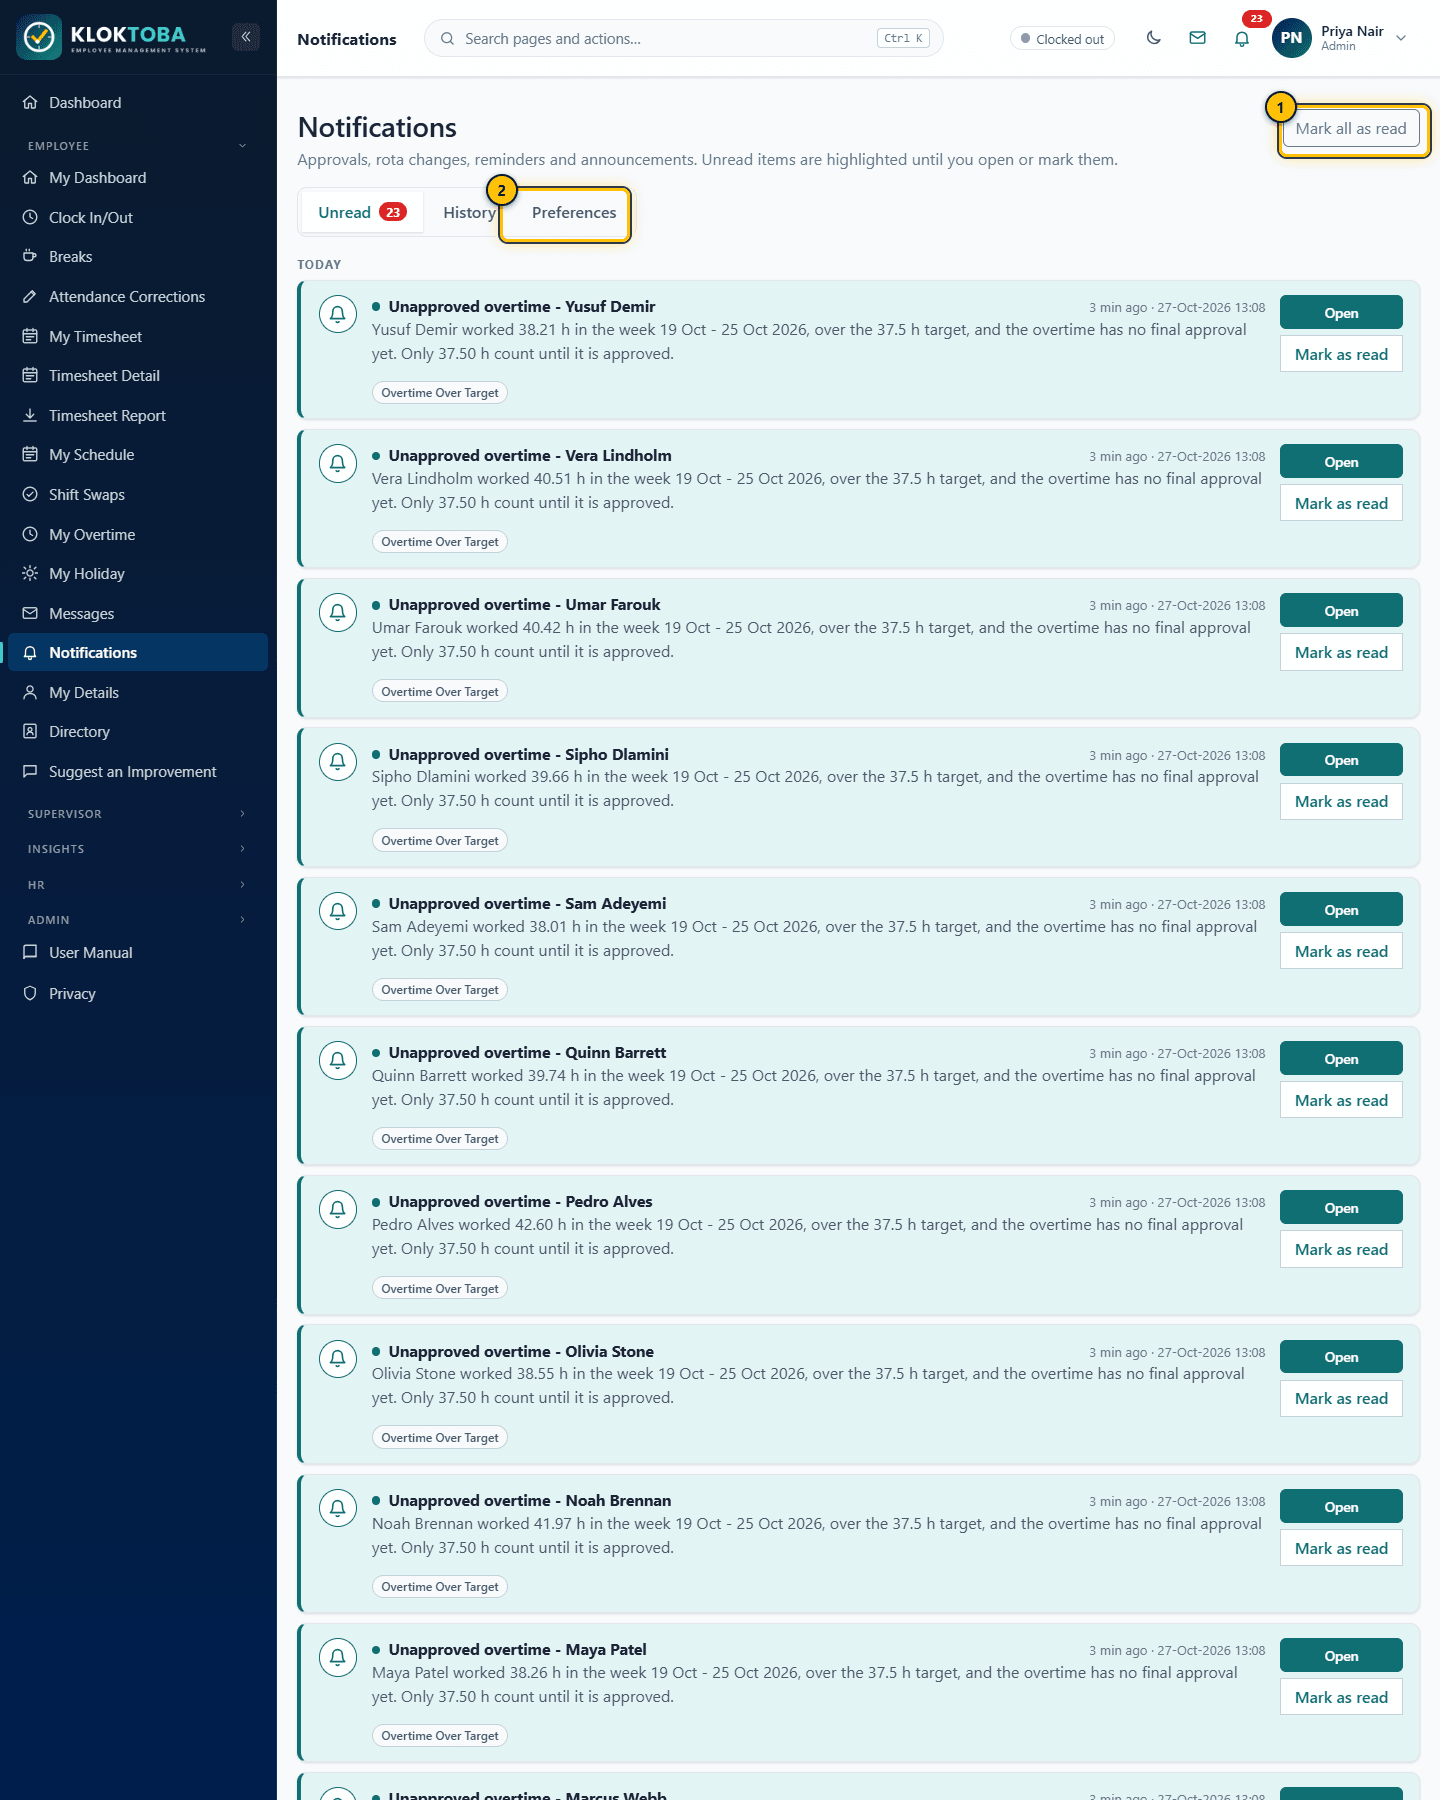
SS-063 – Notification centre. Viewed as: Admin. - Mark all as read
- Notification preferences
- A system alert
- Select Open to go to the item, Mark as read for one, or Mark all as read.
- Open Preferences to choose, for each notification type, whether you receive it in the app and by email.
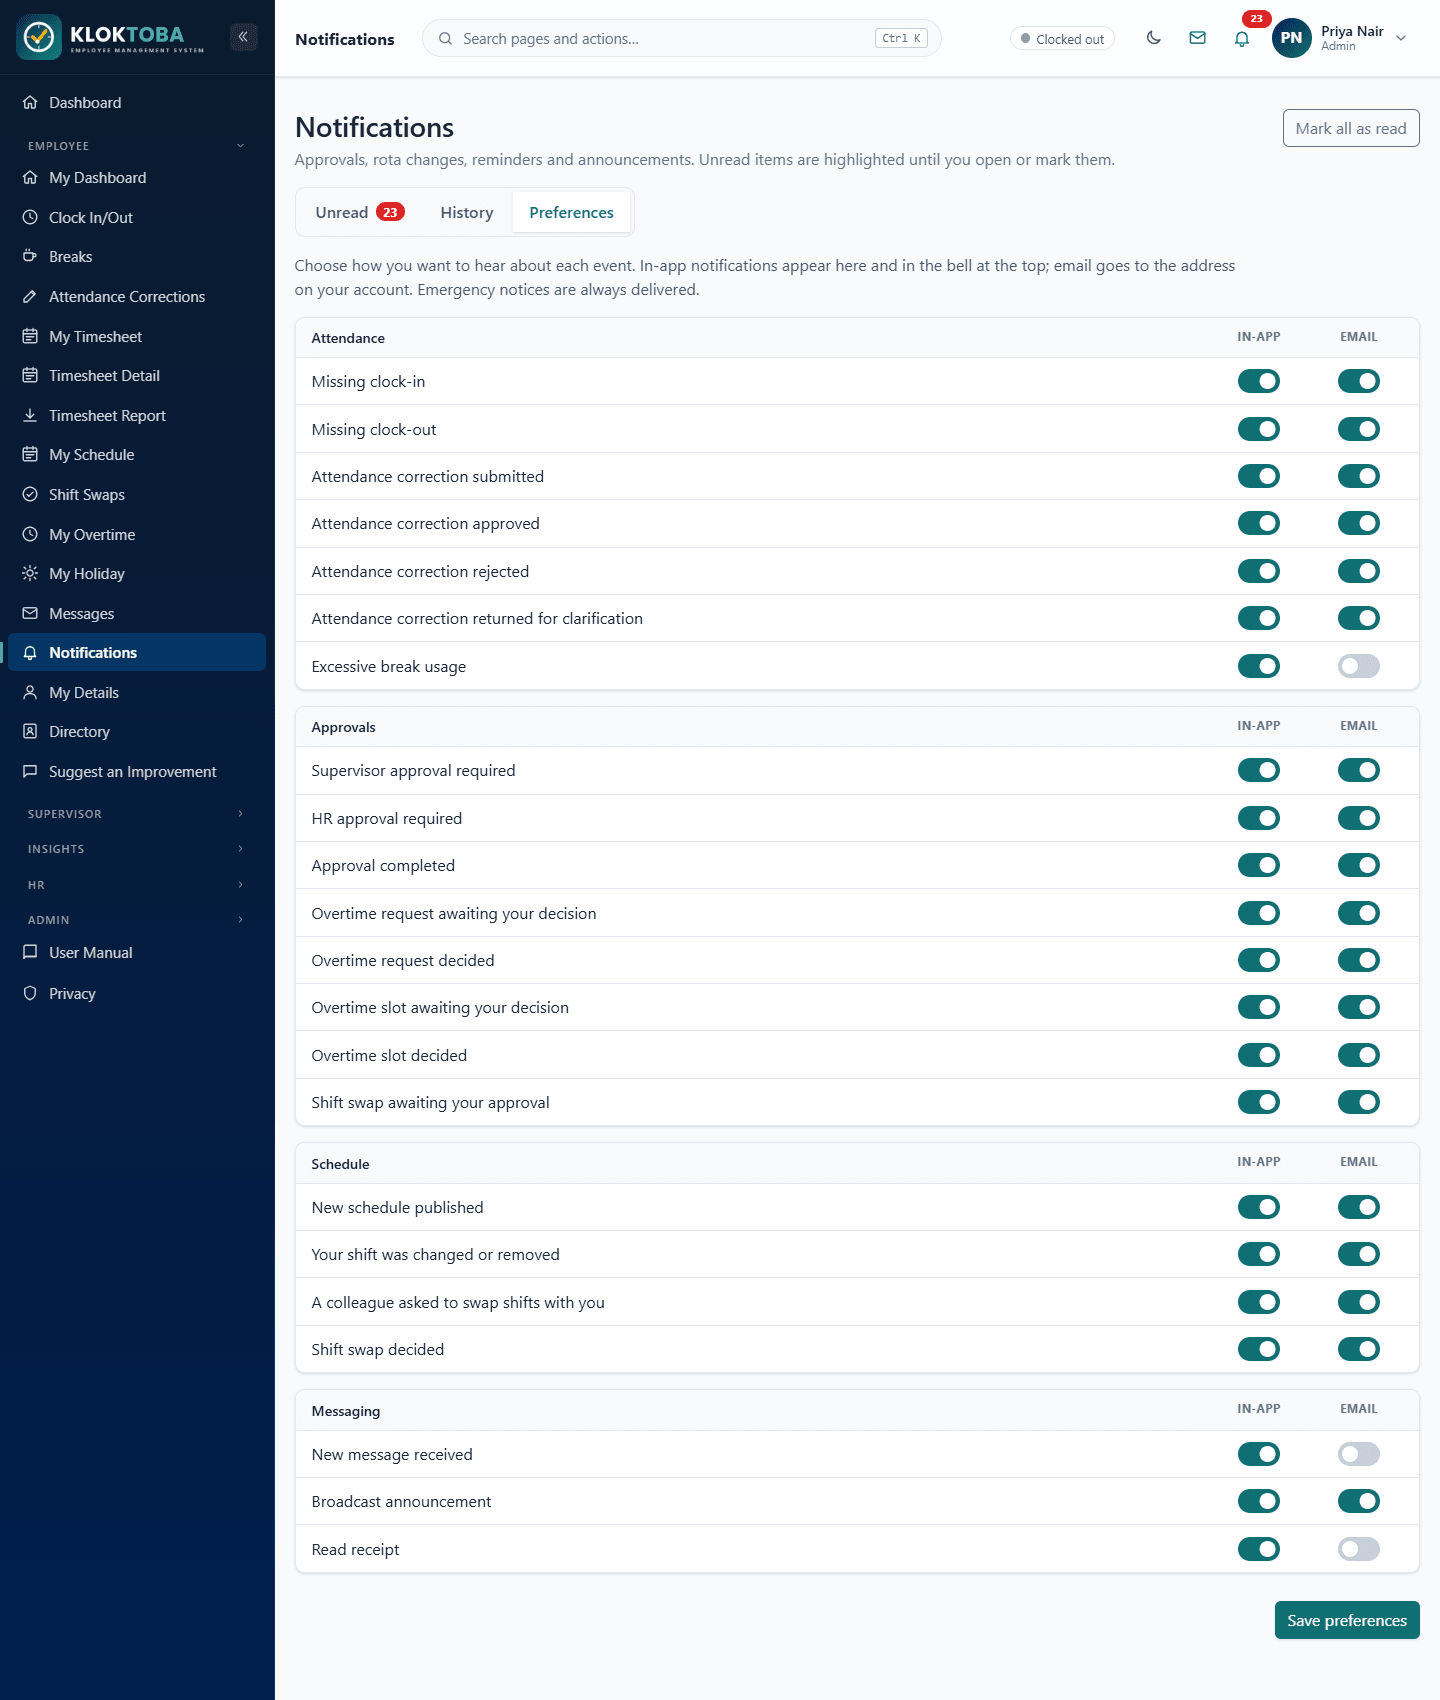
SS-064 – Notification preferences. Viewed as: Admin.
undefined Approval notifications
When a correction, overtime request, slot or swap needs your decision, you receive a Supervisor approval required or HR approval required notification. When it is decided, the requester is told. Email notifications use the Kloktoba email template with your organisation's support address.
Expected result
Unread items stay highlighted until opened or marked read. The bell shows the unread count.
Common errors
| Error or mistake | What to do |
|---|---|
| Not receiving emails | Check your Preferences and that your account has an email address. |
Troubleshooting
| Problem | Solution |
|---|---|
| A notification disappeared | Check History. |
Frequently asked questions
- Which events notify me?
- Missing clock-in or clock-out, attendance correction submitted, approved, rejected or returned, approvals required, overtime requested or decided, schedule published, shift changes, swap requests and decisions, new messages, announcements and read receipts, excessive breaks, and (for HR and Admin) unapproved overtime: a week over target with no final overtime decision.
12.2 Messages and announcements
Step-by-step instructions
- Open Messages. Folders are Inbox, Sent, Drafts and Archive.
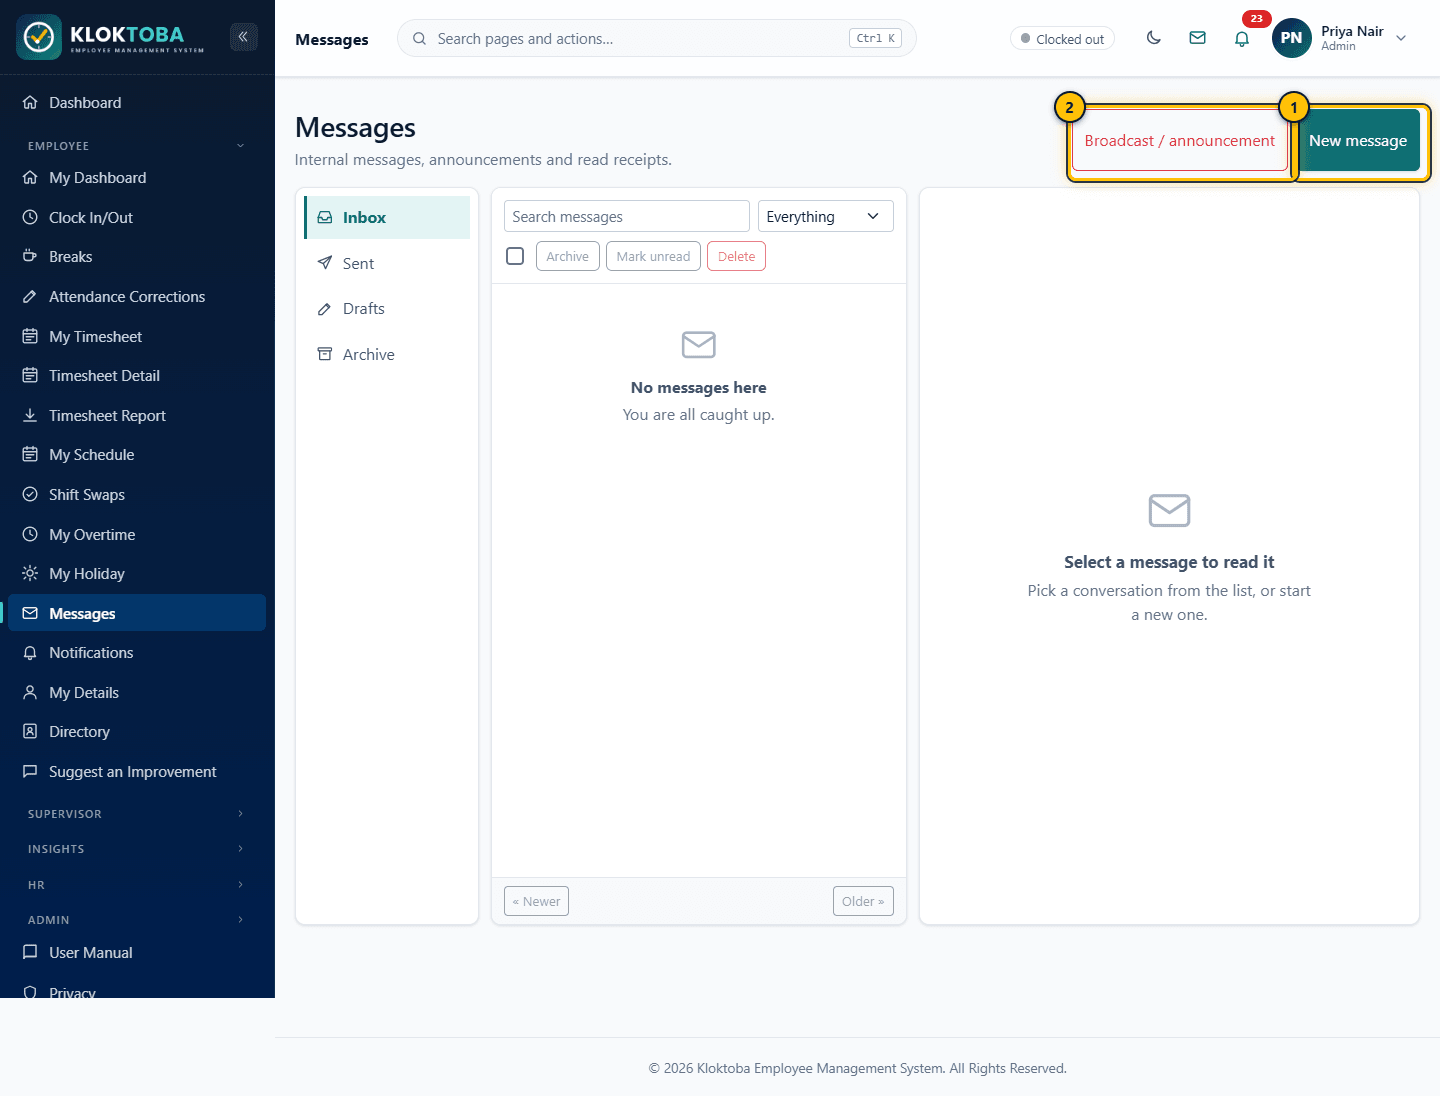
SS-065 – Messages. Viewed as: Admin. - New message
- Announcements and emergency broadcasts
- Select New message to write to a colleague. Select a message to read it; use Archive, Mark unread or Delete.
- Authorised users can use Broadcast / announcement to send a company or department announcement or an emergency message.
Expected result
Messages show in the recipient's Inbox with an unread count in the top bar.
Common errors
| Error or mistake | What to do |
|---|---|
| Cannot broadcast | Broadcasts are limited to authorised roles. |
Troubleshooting
| Problem | Solution |
|---|---|
| Message not found | Check Archive or the Everything view. |
Frequently asked questions
- Do broadcasts notify people?
- Yes, as a broadcast announcement notification.
Chapter 13
Troubleshooting
Common issues, messages and where to get help.
13.1 Common issues
| Symptom | Likely cause | What to do |
|---|---|---|
| "Permission to access location was denied." | Browser blocked location for the Kloktoba site. | Open site settings, set Location to Allow, reload, retry. |
| GPS chip never turns ready | Device location services are off. | Turn on location services; try Wi-Fi or mobile data; reload. |
| "You're already clocked in." | Open shift from earlier or another device. | Clock out of that shift first. |
| Clock buttons are disabled with a notice | Clocking switched off for your account. | Contact HR or Admin. |
| Cannot sign in after registering | Awaiting manager and HR/Admin approval. | Ask your manager or HR. |
| Reset link does not work | Expired (24 h) or already used. | Request a new one. |
| Cannot start a break | Not clocked in, limit reached or already on break. | Check status on Breaks; see break rules. |
| Timesheet hours look short | Unpaid breaks and lunch are deducted; missing clock-out. | Check Timesheet Detail; request a correction. |
| Cannot cancel holiday | Only Pending requests can be cancelled. | Contact your supervisor or HR. |
| Page not in my sidebar | Role or Menu Permissions do not include it. | Ask your Admin. |
| No overtime slot to book | Team has no approved slot. | Ask your supervisor to request one. |
| Cannot see Settings | It is in the Admin group. | Ask an Admin. |
| Cannot find Reports, Team Insights or Data Insights | They moved to the Insights group. | Open Insights in the sidebar. |
| Cannot find Shift Templates, Audit Log or the organisation settings | They moved to the Admin group (organisation settings are under Admin > Organisation). | Open Admin in the sidebar. |
| Week shows fewer hours than worked ("Counted") | Hours over the weekly target have no final overtime approval yet. | Supervisor recommends, then HR or Admin approve on Overtime Final Approval. |
| Someone is missing from the Company Timesheet | Their clocking is switched off. | Turn on Allow clocking in/out on their employee record if they should clock. |
13.2 Error messages
| Message | Meaning |
|---|---|
| Invalid username or password. | Credentials did not match. Same message for both cases. |
| Permission to access location was denied. | The browser did not allow location access. |
| You're already clocked in. Please clock out first. | An open clock-in exists. |
| The password must be at least ... characters long / must contain ... | Choose a password that meets every rule listed under the password box (SuperAdmin > Global Settings > Password policy). |
| Your password has expired | Enter your current password and choose a new one; the policy sets how many days a password lasts. |
| Admin and SuperAdmin must always be able to see Menu Permissions. | You tried to hide the screen that controls menus from Admin or SuperAdmin. |
| Only Admin can manage menu permissions. | Your role cannot change menu permissions. |
13.3 Frequently asked questions
- Who can see my location? Supervisors and HR can see the address recorded for each clock event on timesheets and reports. It is not tracked at any other time.
- Why is a time different from my phone? Kloktoba stamps events with server time, shown in UK time.
- Can I use Kloktoba on my phone? Yes. Use a current mobile browser and allow location.
- What if I do not have a supervisor? HR can set one on your employee record. HR and Admin can decide their own holiday where no one is above them.
13.4 Support contacts
First contact your Supervisor or HR. For application problems, email support@klocktoba.com (the address configured for this installation) and include your username, the page, what you expected and what happened. Use Suggest an Improvement for ideas.
Chapter 14
Best Practices
Recommended habits for compliance and security.
14.1 Attendance compliance
- Submit corrections as soon as you notice a problem, with a clear reason and attachment where helpful.
- Review My Timesheet every week and submit it for approval before the deadline your organisation sets.
- Take breaks using the Breaks page so unpaid time is deducted correctly.
14.2 Leave governance
- Add a reason so approvers have context.
- Supervisors should check the rota and Team Attendance before approving.
- Use the decision note to explain rejections.
14.3 Supervisor responsibilities
- Clear Action required daily.
- Publish the rota in advance and use shift templates for consistency.
- Use Return on corrections rather than rejecting when you need clarification.
- Recommend or decline overtime promptly: hours over target are not paid until HR gives the final approval.
- Start each day on the Approval Dashboard.
14.4 Administrative guidelines
- Keep departments, positions, teams and locations tidy; deactivate rather than delete.
- Review Menu Permissions after changing responsibilities.
- Use the Audit Log for investigations.
- Set sensible break and attendance rules and review them yearly.
- Assign managers to everyone so approvals have an owner.
14.5 Security best practices
- Use a long, unique password.
- Sign out on shared devices and do not use Remember me on them.
- Report lost devices to HR so the account can be reviewed.
- Admins: keep the number of Admin and SuperAdmin accounts small.
Appendix A Screenshot Index
All 90 screenshots were captured from the current build against a demonstration database with fictitious data. Yellow numbered markers identify the items described in each figure's key.
| ID | Screenshot | Viewed as | Page | Used in |
|---|---|---|---|---|
| SS-001 | Sign-in page | Signed out | /Account/Login | Chapter 2 |
| SS-002 | Sign-in error message | Signed out | /Account/Login | Chapter 2 |
| SS-003 | Forgot your password | Signed out | /Account/ForgotPassword | Chapter 2 |
| SS-004 | Create account (self-registration) | Signed out | /Account/Register | Chapter 2 |
| SS-005 | First-time SuperAdmin setup | Signed out | /Setup/SuperAdmin | Chapter 2 |
| SS-006 | Employee home dashboard | Employee | / | Chapter 2 |
| SS-007 | My attendance dashboard | Employee | /Overview | Chapter 2 |
| SS-008 | Clock In screen (before clocking in) | Employee2 | /Attendance | Chapter 4 |
| SS-009 | After clocking in - confirmation banner | Employee2 | /Attendance | Chapter 4 |
| SS-010 | Clock Out screen (while clocked in) | Employee2 | /Attendance | Chapter 4 |
| SS-011 | Break Management - start a break | Employee2 | /Breaks | Chapter 6 |
| SS-012 | Break in progress | Employee2 | /Breaks | Chapter 6 |
| SS-013 | Break ended - today's breaks | Employee2 | /Breaks | Chapter 6 |
| SS-014 | After clocking out - confirmation banner | Employee2 | /Attendance | Chapter 4 |
| SS-015 | Attendance history - My Timesheet | Employee | /Dashboard | Chapter 5 |
| SS-016 | Daily timesheet detail | Employee | /Timesheet | Chapter 5 |
| SS-017 | My attendance corrections | Employee | /Adjustments | Chapter 4 |
| SS-018 | Attendance correction form | Employee | /Adjustments/Create | Chapter 4 |
| SS-019 | Correction approvals (Supervisor) | Supervisor | /Adjustments/Approvals | Chapter 8 |
| SS-020 | Correction approvals (HR final approval) | HR | /Adjustments/Approvals | Chapter 8 |
| SS-021 | Leave - allowance and request form | Employee | /Holiday | Chapter 7 |
| SS-022 | Leave request submitted - history | Employee2 | /Holiday | Chapter 7 |
| SS-023 | Team Holiday - pending approval | Supervisor | /Holiday/Team | Chapter 7 |
| SS-024 | Company Holiday (HR/Admin) | HR | /Holiday/All | Chapter 7 |
| SS-025 | My schedule | Employee | /Schedule | Chapter 7 |
| SS-026 | Shift swaps | Supervisor | /Schedule/Swaps | Chapter 8 |
| SS-027 | My overtime | Employee | /Overtime | Chapter 7 |
| SS-028 | Overtime approvals | Supervisor | /Overtime/Approvals | Chapter 8 |
| SS-029 | Overtime slots (HR/Admin) | HR | /Overtime/Slots | Chapter 9 |
| SS-030 | Supervisor home dashboard | Supervisor | / | Chapter 8 |
| SS-031 | Team dashboard (Supervisor) | Supervisor | /Overview/Team | Chapter 8 |
| SS-032 | Team timesheets | Supervisor | /Dashboard/Team?week=2026-10-19 | Chapter 8 |
| SS-081 | Overtime recommended by the supervisor | Supervisor | /Dashboard/Team?week=2026-10-19 | Chapter 8 |
| SS-082 | Approval dashboard | Supervisor | /ApprovalDashboard | Chapter 8 |
| SS-083 | Employee timesheet report | Supervisor | /TimesheetReport?employeeId=8 | Chapter 5 |
| SS-033 | Team members | Supervisor | /Employees/Team | Chapter 8 |
| SS-034 | Team rota | Supervisor | /Schedule/Rota | Chapter 8 |
| SS-035 | Team insights | Supervisor | /Insights/Team | Chapter 8 |
| SS-036 | HR command centre | HR | /Overview/Hr | Chapter 11 |
| SS-037 | Administrator home dashboard | Admin | / | Chapter 2 |
| SS-038 | Employee list | Admin | /Employees | Chapter 3 |
| SS-039 | Add Employee | Admin | /Employees/Create | Chapter 3 |
| SS-040 | Edit Employee | Admin | /Employees | Chapter 3 |
| SS-041 | Employee assignments | Admin | /Employees/Assignments | Chapter 3 |
| SS-042 | Directory | Employee | /Directory | Chapter 3 |
| SS-043 | My Details | Employee | /Account/MyDetails | Chapter 3 |
| SS-044 | Account approvals | HR | /Account/PendingApprovals | Chapter 2 |
| SS-045 | Flagged shifts | HR | /Attendance/Flagged | Chapter 5 |
| SS-046 | Organisation profile | Admin | /OrganisationSettings/Profile | Chapter 9 |
| SS-047 | Departments | Admin | /OrganisationSettings/Departments | Chapter 9 |
| SS-048 | Positions | Admin | /OrganisationSettings/Positions | Chapter 9 |
| SS-049 | Teams and business units | Admin | /OrganisationSettings/Teams | Chapter 9 |
| SS-050 | Locations (work locations) | Admin | /OrganisationSettings/Locations | Chapter 9 |
| SS-051 | Shift templates | Admin | /Schedule/Templates | Chapter 9 |
| SS-052 | Break and attendance settings | Admin | /Breaks/Settings | Chapter 6 |
| SS-053 | Settings hub | Admin | /Settings | Chapter 9 |
| SS-054 | Menu permissions (role access) | Admin | /AdminMenus | Chapter 10 |
| SS-055 | My Organisation and Admins | Admin | /Organisation/MyOrganisation | Chapter 9 |
| SS-056 | Audit log | Admin | /Audit | Chapter 10 |
| SS-057 | App feedback | Admin | /Feedback | Chapter 9 |
| SS-058 | Reports - choose a report | Supervisor | /Reports | Chapter 11 |
| SS-059 | Attendance report results and export | HR | /Reports | Chapter 11 |
| SS-060 | Data Insights: headcount and attendance trend | HR | /Insights | Chapter 11 |
| SS-084 | Data Insights: attendance analytics | HR | /Insights?arange=custom&compare=both&afrom=2026-10-05&ato=2026-11-01 | Chapter 11 |
| SS-061 | Company timesheet and exports | HR | /Dashboard/All?week=2026-10-19 | Chapter 11 |
| SS-085 | Company timesheet: month or date range | HR | /Dashboard/Period | Chapter 11 |
| SS-086 | Overtime final approval | HR | /Dashboard/OvertimeReview | Chapter 5 |
| SS-087 | Standard Salary Bill | HR | /Reports?report=salary-bill | Chapter 11 |
| SS-088 | Monthly Approved Attendance report | HR | /Reports?report=monthly-approved-attendance | Chapter 11 |
| SS-062 | Timesheet export centre | HR | /Export | Chapter 11 |
| SS-063 | Notification centre | Admin | /Notifications | Chapter 12 |
| SS-064 | Notification preferences | Admin | /Notifications | Chapter 12 |
| SS-065 | Messages | Admin | /Messages | Chapter 12 |
| SS-066 | Suggest an improvement | Employee | /Feedback/Submit | Chapter 9 |
| SS-067 | Notification Management: templates | HR | /NotificationManagement | Chapter 9 |
| SS-068 | Edit a notification template | HR | /NotificationManagement | Chapter 9 |
| SS-069 | Notification triggers | HR | /NotificationManagement/Triggers | Chapter 9 |
| SS-070 | Notification history | HR | /NotificationManagement/History | Chapter 9 |
| SS-071 | Notification Branding | Admin | /NotificationBranding | Chapter 9 |
| SS-072 | Organisation Admins | SuperAdmin | /OrganisationAdmins | Chapter 9 |
| SS-073 | Create an organisation admin | SuperAdmin | /OrganisationAdmins/Create | Chapter 9 |
| SS-074 | System statistics | SuperAdmin | /Platform | Chapter 9 |
| SS-075 | Sorting the employee list | HR | /Employees?sort=role&dir=desc | Chapter 2 |
| SS-076 | Invoices and overdue accounts | SuperAdmin | /Billing | Chapter 9 |
| SS-077 | A printable invoice | SuperAdmin | /Billing | Chapter 9 |
| SS-078 | Trials and access | SuperAdmin | /Billing/Trials | Chapter 9 |
| SS-079 | Subscription plan with currency | SuperAdmin | /SubscriptionPlans/Edit/1 | Chapter 9 |
| SS-080 | Sign-in blocked after a trial ends | Signed out | /Account/Login?reason=trial-expired | Chapter 9 |
| SS-089 | Sidebar: Insights and Admin groups | Admin | /OrganisationSettings/Profile | Chapter 2 |
| SS-090 | Kloktoba-Geofence map | Admin | /Geofence?date=2026-10-19 | Chapter 4 |
Appendix B Change Log
| Section updated | Description of change | Author | Date | Version |
|---|---|---|---|---|
| All | Complete rewrite. Replaced single in-app page with a 14-chapter manual. | Documentation (AI-assisted draft, pending human review) | 27 October 2026 | 2.0 |
| Cover, Contents, Version control | New cover page, clickable contents, version control page and executive summary. | Documentation (AI-assisted draft, pending human review) | 27 October 2026 | 2.0 |
| Chapter 2 Getting Started | Rewrote sign-in, password reset, registration and approvals; added system requirements, dashboards and a note that multi-factor authentication is not available. | Documentation (AI-assisted draft, pending human review) | 27 October 2026 | 2.0 |
| Chapter 3 Employee Management | Added employee numbers, organisation assignment (department, position, team, business unit, location), employment fields and the onboarding workflow. | Documentation (AI-assisted draft, pending human review) | 27 October 2026 | 2.0 |
| Chapters 4 to 6 | Rewrote clock in/out; new coverage of lunch, flagged shifts, corrections, breaks and break rules. | Documentation (AI-assisted draft, pending human review) | 27 October 2026 | 2.0 |
| Chapter 7 Leave Management | Rewrote leave; new coverage of rota, shift swaps and overtime requests. | Documentation (AI-assisted draft, pending human review) | 27 October 2026 | 2.0 |
| Chapter 8 Supervisor Functions | New: team dashboard, approval queues, rota, team reporting. | Documentation (AI-assisted draft, pending human review) | 27 October 2026 | 2.0 |
| Chapters 9 and 10 | New: organisation setup and structure, shift templates, overtime allowances, company settings, menu permissions, security controls, audit log. | Documentation (AI-assisted draft, pending human review) | 27 October 2026 | 2.0 |
| Chapters 11 and 12 | New: reports, analytics, exports, notifications, messages. | Documentation (AI-assisted draft, pending human review) | 27 October 2026 | 2.0 |
| Chapters 13 and 14 | Expanded troubleshooting and new best practices chapter. | Documentation (AI-assisted draft, pending human review) | 27 October 2026 | 2.0 |
| Appendices | Added screenshot index, change log, workflow index, role access summary, coverage notes, accessibility review and audit summary. | Documentation (AI-assisted draft, pending human review) | 27 October 2026 | 2.0 |
| Notification Management and Branding | New: templates, triggers, history and audit for the 17 notification events; organisation branding applied to every email and SMS. | Documentation (AI-assisted draft, pending human review) | 27 October 2026 | 2.1 |
| Organisation Admins and SuperAdmin | New: SuperAdmin creates Organisation Admins only, with activation email and forced password change; SuperAdmin no longer performs employee, leave or attendance functions. | Documentation (AI-assisted draft, pending human review) | 27 October 2026 | 2.1 |
| Sorting | Every list sorts by clicking a heading (ascending, then descending) with filters and paging kept. | Documentation (AI-assisted draft, pending human review) | 27 October 2026 | 2.1 |
| Per-user pricing | Subscription plans are priced per active user per month with an optional minimum monthly price; invoices show the calculation. | Documentation (AI-assisted draft, pending human review) | 27 October 2026 | 2.3 |
| Subscription plans, invoices and trials | New: plan currency, monthly invoices, deactivation of organisations with three overdue unpaid invoices, trial periods and the lockdown when a trial ends. | Documentation (AI-assisted draft, pending human review) | 27 October 2026 | 2.2 |
| Navigation | New Insights group (Reports, Team Insights, Data Insights); Admin and Administration merged into Admin with an Organisation sub-group; Shift Templates, Break & Attendance Settings and Audit Log moved to Admin; collapsible sub-groups. | Documentation (AI-assisted draft, pending human review) | 27 October 2026 | 2.4 |
| Chapter 5 Overtime | Hours over target count only once approved; two-step approval (supervisor recommends, HR or Admin give final approval for all or some hours); new Overtime final approval and Employee timesheet report sections; break and clock-change rules for hours worked. | Documentation (AI-assisted draft, pending human review) | 27 October 2026 | 2.4 |
| Chapter 8 Supervisor Functions | New Approval dashboard; team timesheets now recommend overtime. | Documentation (AI-assisted draft, pending human review) | 27 October 2026 | 2.4 |
| Chapter 11 Reports and Analytics | New Monthly Submitted and Monthly Approved Attendance reports, Standard Salary Bill, attendance trend and analytics charts with week-on-week and month-on-month comparison, and the monthly and date-range Company Timesheet with exports. | Documentation (AI-assisted draft, pending human review) | 27 October 2026 | 2.4 |
| Subscription plans, invoices and trials | New: Platform Owner - the business details and bank account printed on every invoice as From and How to pay; invoices also show the organisation's address. | Documentation (AI-assisted draft, pending human review) | 27 October 2026 | 2.4 |
| Subscription plans, invoices and trials | New: Bill to - who each organisation's invoices are billed to, set by SuperAdmin (Organisations > Bill to) or the organisation's Admin (Admin > Organisation > Billing Details). | Documentation (AI-assisted draft, pending human review) | 27 October 2026 | 2.4 |
| Subscription plans, invoices and trials | New: SuperAdmin sets the due date when generating invoices and can change it on any unpaid invoice. | Documentation (AI-assisted draft, pending human review) | 27 October 2026 | 2.4 |
| Subscription plans, invoices and trials | New: Direct Debit through GoCardless - organisations set it up from Billing Details; invoices are collected on their due date and marked paid automatically when GoCardless confirms payment. | Documentation (AI-assisted draft, pending human review) | 27 October 2026 | 2.4 |
| Subscription plans, invoices and trials | New: SuperAdmin emails an invoice as a PDF to the billing email, copying the organisation contact email, and can download the PDF. | Documentation (AI-assisted draft, pending human review) | 27 October 2026 | 2.4 |
| Subscription plans, invoices and trials | New: invoices show the platform owner's logo (uploaded on Platform Owner) and the Kloktoba logo, and explain how to set up Direct Debit when the organisation has not. | Documentation (AI-assisted draft, pending human review) | 27 October 2026 | 2.4 |
| Subscription plans, invoices and trials | Changed: invoices have a new design - a navy Kloktoba header, the status beside the dates, the amount due in a navy block, payment options side by side, and the platform owner in the footer. | Documentation (AI-assisted draft, pending human review) | 27 October 2026 | 2.4 |
| Employees and roles | New: Admin activates any account that cannot sign in (deactivated, waiting for approval or rejected) with one Activate button; SuperAdmin activates and deactivates Organisation Admins. | Documentation (AI-assisted draft, pending human review) | 27 October 2026 | 2.4 |
| Employees and roles | New: temporary passwords - SuperAdmin for Organisation Admins, HR and Admin for their organisation - with a choice to force a change at first sign-in; a SuperAdmin password policy (length, character types, expiry). | Documentation (AI-assisted draft, pending human review) | 27 October 2026 | 2.4 |
| Screenshots | All screenshots recaptured from the current build with the new sidebar; 10 new (SS-081 to SS-090): overtime recommendation, approval dashboard, timesheet report, attendance analytics, monthly company timesheet, overtime final approval, salary bill, monthly approved report, sidebar groups and the geofence map. | Documentation (AI-assisted draft, pending human review) | 27 October 2026 | 2.4 |
| Chapters 3, 4, 12 and 13 | Clock-in-disabled employees left out of timesheets and attendance reports; Kloktoba-Geofence map; unapproved overtime notification; new troubleshooting rows. | Documentation (AI-assisted draft, pending human review) | 27 October 2026 | 2.4 |
| Previous manual (in-app page) | Superseded. Sections for removed or renamed screens (for example "Pending Approvals" naming, "Company Timesheet" locations) were replaced by current screen names. | Documentation (AI-assisted draft, pending human review) | 27 October 2026 | 1.x |
Appendix C Workflow Diagram Index
| ID | Workflow | Where it appears |
|---|---|---|
| FL-001 | Employee attendance | Clocking in and out |
| FL-002 | Leave approval | Approving leave |
| FL-003 | Missed attendance (correction) | Manual attendance |
| FL-004 | New employee onboarding | Adding an employee |
Role access summary (default menu)
| Menu items | Employee | Supervisor | HR | Admin |
|---|---|---|---|---|
| Dashboard, My Dashboard, Clock In/Out, Breaks, Attendance Corrections, My Timesheet, Timesheet Detail, My Schedule, Shift Swaps, My Overtime, My Holiday, Messages, Notifications, My Details, Directory, Suggest an Improvement | Yes | Yes | Yes | Yes |
| Team Attendance, Team Timesheets, Team Members, Team Holiday, Team Rota, Correction Approvals, Overtime Approvals, Overtime Slots, Account Approvals, Team Insights, Reports | No | Yes | Yes | Yes |
| HR Dashboard, Employee List, Add Employee, Active and Inactive Employees, Employee Assignments, Organisation Settings (Profile, Departments, Positions, Teams, Business Units, Locations), Flagged Shifts, Company Timesheet, Timesheet Export, Company Holiday, Shift Templates, Break & Attendance Settings, Data Insights, Audit Log | No | No | Yes | Yes |
| Settings, Menu Permissions, My Organisation, App Feedback | No | No | No | Yes |
Defaults observed in the current build. Admins can change visibility under Menu Permissions. SuperAdmin sees everything Admin sees across all organisations.
Appendix D Coverage Notes: Brief versus Product
Where the documentation brief listed a capability that Kloktoba does not currently provide, this manual says so rather than describing something that does not exist.
| Item in brief | What the product does | How the manual handles it |
|---|---|---|
| Multi-factor authentication screens | Not available in the application | Documented as not available (Chapter 2, Chapter 10). |
| GPS attendance verification (blocking by location) | Location is captured and stored with each clock event; there is no geofence or location check that blocks a clock-in | Documented as location capture, with a note. |
| Holiday calendar | No public-holiday calendar; "who is off in the next 14 days" is on the Dashboard and My Timesheet | Documented as such. |
| Role management and permission management screens | Five fixed roles; Menu Permissions controls menu visibility only; screens are protected separately | Documented as Menu Permissions. |
| User management as a separate module | Accounts are managed through Employees (create, edit, reset, deactivate) and Account Approvals | Documented under Employee Management and Chapter 10. |
| Email notification screenshots | Emails are sent only when a mail sender is configured; none in the demo environment | Described in text; screenshot to be added. |
| Registration pending, password reset form and logout confirmation screens | Reached only through a live registration or emailed link | Described in text; screenshots to be added. |
| Rejected or approved request screenshots as separate captures | Shown as statuses within the approval and history screens | Covered by SS-019 to SS-028. |
| Product spelling | User-facing text now reads "Kloktoba"; code identifiers, file names and the klocktoba.com addresses still use the older spelling | Rename identifiers and confirm the domain separately if wanted. |
Appendix E Documentation Audit Summary
Findings from the audit of the previous manual (the single in-app User Manual page).
| Area | Finding | Risk |
|---|---|---|
| Missing features | Breaks, corrections, rota, shift swaps, overtime slots and requests, reports, exports, messages, notifications, audit log, menu permissions, departments, positions, teams, business units, locations, employee numbers, directory details were not documented. | High |
| Outdated content | Described Settings as HR/Admin hub with an organisation-wide screens list that no longer matches the sidebar; used old screen names such as My Team, Pending Approvals, Data Insights, Company Holiday groupings. | High |
| Incomplete workflows | No workflow for corrections, onboarding or approvals beyond registration; no overtime or swap process. | High |
| Inconsistent terminology | Mixed "Team Timesheet" and "Team Timesheets", "My Team" and "Team Members", "Insights" naming. | Medium |
| Missing screenshots | The previous manual contained no screenshots at all. | High |
| Missing business process explanations | No benefits, roles per feature, errors or FAQs per feature. | Medium |
| Grammar and formatting | Long paragraphs, inconsistent muted notes, no consistent callouts or step numbering. | Medium |
| Navigation | One long page with a single contents list; no previous or next links, no cross references between chapters. | Medium |
| Branding | Product name came from configuration (Klocktoba); no cover, logo, tagline, version or copyright; no consistent look. | Medium |
| Troubleshooting | Six entries only; no error message list or support contacts. | Medium |
| Risks | Staff could not discover features; support load; inconsistent approvals; compliance gaps in how corrections and overtime are handled. | High |
Accessibility review summary
| Check | Result | Status |
|---|---|---|
| Font sizes | Body text 11 pt (print) / 16 px (web); headings scale up; tables 10 to 10.5 pt. | Pass |
| Colour contrast | Text colours on backgrounds checked to at least 4.5:1: navy #001F4D on white (16:1), dark teal #0F6F73 on white (5.9:1), callout text colours on their tints (all above 4.5:1). Teal #16C6C8 is used only decoratively, never for text on white. | Pass |
| Screen reader support | Landmarks (header, nav, main), skip link, table captions and header scopes, figures with captions, diagrams with titles. | Pass |
| Alt text | Every screenshot has a descriptive alt text (80 of 80); diagrams have a title and description; decorative markers are hidden from assistive technology. | Pass |
| Keyboard navigation | All links are keyboard focusable with a visible focus outline. The manual documents Ctrl+K search in the application. | Pass |
| Heading hierarchy | One H1 per document; chapters H2; sections H3; feature parts H4. No levels skipped. | Pass |
| Hyperlink accessibility | Links use descriptive text (for example "Chapter 7" or a section name) and are underlined. | Pass |
| Annotated screenshots | Markers use shape and number as well as colour; numbered legends are real text. | Pass |
| Known limitation | Word version: screenshots carry alt text and the contents list is clickable, but page numbers in the contents are not generated. | Open |